11.5 Installing the Identity Applications
This chapter provides instructions for installing and configuring an application server for the User Application and RBPM. You must have the correct version of the Java environment for your application server.
For more information about the requirements for Tomcat and Java, see the NetIQ Identity Manager Technical Information website.
11.5.1 Checklist for Installing the Identity Applications
Use the following checklist to guide you through the process of installing the identity applications.
|
Checklist Items |
|
|---|---|
|
|
|
|
|
|
|
|
|
|
|
|
|
|
|
|
|
|

11.5.2 Using the Guided Process to Install the Identity Applications
The following procedure describes how to install the identity applications using an installation wizard.
To prepare for the installation, review the activities listed in Checklist for Installing the Identity Applications. Also see the Release Notes accompanying the release.
NOTE:
-
The installation program does not save the values that you enter as you progress through the windows in the wizard. If you click Previous to return to an earlier window, you must re-enter the configuration values.
-
The installation program creates the novlua user account and sets the permissions in Tomcat to this user. For example, the services.msc script uses this user account to run Tomcat.
To install with the guided process:
-
Log in as an administrative user to the computer where you want to install the identity applications.
-
Stop Tomcat.
-
(Conditional) If you have the .iso image file for the Identity Manager installation package, navigate to the directory containing the installation files, located by default in the products\UserApplication\ directory.
-
(Conditional) If you downloaded the installation files, complete the following steps:
-
Navigate to the win.zip file for the downloaded image.
-
Extract the contents of the file to a directory on the local computer.
-
-
From the directory that contains the installation files, run the IdmUserApp.exe file.
-
Complete the guided process, using the following parameters:
-
Application Server Platform
Represents Tomcat for running the Identity Applications. Tomcat must already be installed.
-
Installation Folder
Represents the path to a directory where the installation program creates the application files.
-
Database Platform
Represents the platform of the User Application database. The database software must already be installed. However, you do not need to create the database schema during installation.
For your convenience, NetIQ provides PostgreSQL.
-
Database Host and Port
Represents the settings for the server that hosts the User Application database.
NOTE:In a cluster environment, you must specify the same database settings for each member in the cluster.
- Host
-
Specifies the name or IP address of the server.
- Port
-
Specifies the port that you want the server to use for communication with the User Application.
-
Database Username and Password
Represents the settings for running the User Application database.
NOTE:
-
If you installed PostgreSQL as part of the installation for this version of Identity Manager, the installation process already created the database and database administrator. By default, the installed database is idmuserappdb and the database user is idmadmin. Specify the same values that you used for the PostgreSQL installation.
-
In a cluster environment, you must specify the same database name, username, and password for each member in the cluster.
- Database Name or SID
-
Specifies the name of the database according to the database platform. By default, the database name is idmuserappdb.
-
For a PostgreSQL or SQL Server database, specify the name.
-
For an Oracle database, specify the Security Identifier (SID) that you created with the database instance.
-
- Database Username
-
Specifies the name of an account that allows the User Application to access and modify data in the databases.
- Database Password
-
Specifies the password for the specified username.
- Database Driver JAR File
-
Specifies the JAR file for the database platform.
The database vendor provides the driver JAR file, which represents the Thin Client JAR for the database server. For example, for PostgreSQL, you might specify postgresql-9.4-1212.jdbc42.jar, by default in the C:\NetIQ\idm\apps\Postgres folder.
NetIQ does not support driver JAR files from third-party vendors.
-
-
Database Administrator
Optional
Represents the name and password for the database administrator.
This field automatically lists the same user account and password that you specified for Database Username and Password. To use that account, do not make any changes.
- Database administrator
-
(Optional) Specifies the account for a database administrator that can create database tables, views, and other artifacts.
- Password
-
(Optional) Specifies the password for the database administrator.
-
Create Database Tables
Indicates whether you want to configure your new or existing database as part of the installation process, or afterward.
- Create Tables Now
-
The installation program creates the database tables as part of the installation process.
- Create Tables at Application Startup
-
The installation program leaves instructions to create the tables when the User Application starts for the first time.
- Write SQL to File
-
Generates a SQL script that the database administrator can run to create the databases. If you choose this option, you must also specify a name for Schema File. The setting is in the SQL Output File configuration.
You might select this option if you do not have permissions to create or modify a database in your environment. For more information about generating the tables with the file, see Manually Creating the Database Schema.
-
New Database or Existing Database
Specifies whether you want to use existing, empty databases or create new tables in the existing database. Use the following considerations:
-
New Database
If the database used is new, click New Database. Ensure that a database exists before selecting this option.
-
Existing Database
If database is existing and it has User Application tables from a previous installation, select Existing Database.
If the existing database runs on an Oracle platform, you must prepare Oracle before updating the schema.
After selecting the database type, you need to specify, as to when the database tables should be created. The Create Database Tables screen gives you the option to create tables at installation time or at application startup. Alternatively, you can create a schema file at installation time, which the Database Administrator would use to create the tables later.
If you want to generate a schema file, select the Write SQL to File button and provide a name for the file in the Schema Output File field.
-
-
Test Database Connection
Specifies whether you want the installer to connect to the database for creating tables directly or for creating the .sql file.
The installation program attempt the connection when you click Next or press Enter.
NOTE:You can continue with installation if the database connection fails. However, after installation, you must manually create the tables and connect to the database. For more information, see Manually Creating the SQL File to Generate the Database Schema.
-
Java Install
Represents the path to the JRE file used to launch the installation program. For example, C:\NetIQ\idm\jre.
-
Application_Server Configuration
Represents the path to the installation files for Tomcat. For example, C:\NetIQ\idm\jre. The installation process adds some files to this folder.
-
IDM Configuration
Represents the settings for the identity application context used in URLs and for the workflow engine.
- Application Context
-
Specifies a name that represents the Tomcat configuration, the application WAR file, and the name in the URL context.
The installation script creates a server configuration, then names the configuration according to the name that you created when installing Tomcat. For example, IDMProv.
IMPORTANT: NetIQ recommends that you make a note of the specified Application Context. You will use this application name in the URL when you start the identity applications from a browser.
-
Select Audit Logging Type
Indicates whether you want to enable CEF or Sentinel Log Management for IGA. Specify Yes or No.
-
Audit Logging
Applies only when you specify Yes for Select Audit Logging Type.
Indicates the type of logging that you want to enable.
For more information about setting up logging, see the User Application Administration Guide.
- Sentinel Log Management for IGA
-
Enables logging through a Novell or NetIQ client for the User Application.
NOTE:If you choose this option, you must also specify the hostname or IP address for the client server and the path to the log cache.
- CEF
-
Enables the User Application to log events through CEF.
NOTE:If you choose this option, you must also specify the hostname or IP address for the syslog server and the syslog port.
-
Security - Master Key
Indicates whether you want to import an existing master key. The User Application uses the master key to access encrypted data. Specify Yes or No.
You might want to import the master key in the following situations:
-
After installing the first instance of the identity applications in a cluster. Every instance of the User Application in a cluster must use the same master key. For more information, see Using the Same Master Key for Each User Application in the Cluster.
-
If you are moving your installation from a staging system to a production system and want to keep access to the database you used with the staging system.
-
If you are restoring your User Application and you want to access the encrypted data stored by your previous version of the User Application.
- Yes
-
Specifies that you want to import an existing master key.
- No
-
Specifies that you want the installation program to create the key.
By default, the installation procedure writes the encrypted master key to the master-key.txt file in the installation directory.
-
-
Import Master Key
Applies only when you specify Yes for Security - Master Key.
Specifies the master key that you want to use. You can copy the master key from the master-key.txt file.
-
Application server connection
Represents the settings of the URL that users need to connect to the identity applications on Tomcat. For example, https:myserver.mycompany.com:8080.
NOTE:If OSP runs on a different instance of the Tomcat application server, you must also select Connect to an external authentication server and specify values for the OSP server.
- Protocol
-
Specifies whether you want to use http or https. To use Secure Sockets Layer (SSL) for communications, specify https.
- Host Name
-
Specifies the DNS name or IP address of the server hosting OSP. Do not use localhost.
- Port
-
Specifies the port that you want the server to use for communication with client computers.
- Connect to an external authentication server
-
Specifies whether a different instance of Tomcat hosts the authentication server (OSP). The authentication server contains the list of users who can log in to SSPR.
If you select this setting, also specify values for the authentication server’s Protocol, Host name, and Port.
-
Authentication server details
Specifies the password that you want the identity applications to use when connecting to the authentication server. Also referred to as the client secret. The installation process creates this password.
-
-
Configure the settings for the identity applications in the Config Update window.
-
Browse for the Identity Vault DNs.
-
Click OK.
NOTE:
-
Ensure that the User Application and the Roles and Resources Service drivers are already created and deployed to the Identity Vault. For more information, see Installation Considerations for the Identity Applications.
-
If you click Cancel, the installer takes you back to the Application Server Connection window.
-
After installing the User Application, you can modify most of the settings in the configureupdate.bat files. For more information about specifying the values for the settings, see Configuring the Settings for the Identity Applications.
-
-
(Conditional) In a GUI installation, to immediately configure the identity applications, complete the following steps in the Configure IDM window:
-
Click Yes and then click Next.
-
In Roles Based Provisioning Module Configuration, click Show Advanced Options.
-
Modify the settings as needed.
NOTE:
-
For more information about specifying the values, see Configuring the Settings for the Identity Applications.
-
In production environments, all administrator assignments are restricted by licensing. NetIQ collects monitoring data in the audit database to ensure that production environments comply. Also, NetIQ recommends that only one user be given the permissions of the Security Administrator.
-
-
Click OK.
-
-
Click Next.
-
In the Pre-Installation Summary window, click Install.
-
(Optional) Review the installation log files. For results of the basic installation, see the user_application_install_log.log file in the C:\NetIQ\idm\apps\UserApplication\logs\ directory.
For information about the identity applications configuration, see the NetIQ-Custom-Install.log file in the C:\NetIQ\idm\apps\UserApplication directory.
-
(Optional) If you are using an external password management WAR, manually copy the WAR to the installation directory and to the remote application server deploy directory that runs the external password WAR functionality.
-
Continue with the post-installation tasks described in Completing the Installation of the Identity Applications.
11.5.3 Silently Installing the Identity Applications
This section describes how to perform a silent install of the identity applications. A silent installation requires no interaction during the installation and can save you time, especially when you install on more than one server.
To prepare for the installation, review the activities listed in Checklist for Installing the Identity Applications. Also see the Release Notes accompanying the release.
This process includes the following activities:
Setting Passwords in the Environment for a Silent Installation
You can create environment variables for the passwords that the silent installation process can read during the installation. This allows the silent installer to read the passwords from the environment, rather than from the user_app-silent.properties file. This can provide some additional security.
The following password parameters are required for the silent installation:
-
NOVL_DB_USER_PASSWORD
-
NOVL_CONFIG_DBADMIN_PASSWORD
-
NOVL_CONFIG_LDAPADMINPASS
-
NOVL_CONFIG_KEYSTOREPASSWORD
For example:
SET NOVL_DB_USER_PASSWORD=myPassWord
Editing the .properties File
You must edit the parameter values in the user_app-silent.properties file before performing the silent installation or configuration. The table in this section provides a list of the parameters. The parameters correspond to the basic installation parameters as well as for configuring RBPM and the identity applications. For more information about specifying the parameter values, see Using the Guided Process to Install the Identity Applications and Configuring the Settings for the Identity Applications.
-
Log in as administrative user to the computer where you want to install the identity applications.
-
Ensure that the user_app-silent.properties file is stored on the local computer.
By default, you can find the file in the \products\UserApplication directory within the .iso image file for the Identity Manager installation package.
-
Open the user_app-silent.properties file and modify the following parameters in the file:
Parameter Name
Description
USER_INSTALL_DIR=
Specify the installation path for the User Application.
For example: C:\netiq\idm\apps\UserApplication
NOVL_APP_SERVER_TYPE_CHOICE=
Specify the application server hosting the User Application.
This release of Identity Manager supports only Apache Tomcat.
NOVL_TOMCAT_BASE_FOLDER=
Specify the base folder location of the application server hosting the User Application.
For example: C:\netiq\idm\apps\tomcat
NOVL_APPLICATION_NAME=
Specify the application context name.
By default, it contains IDMProv as an application context name.
NOVL_CREATE_DB=
Specify whether you want to configure new or existing database as part of the installation process, or afterward. Alternatively, you can create a schema file at installation time, which the Database Administrator would use to create the tables later. Depending on your requirement, specify one of the following options:
-
Now: The installation program creates the database tables as part of the installation process.
-
File: The installation program generates a SQL script that the database administrator can run to create the databases. If you choose this option, you must also set NOVL_CONFIG_WRITE_TO_FILE to 1.You might select this option if you do not have permissions to create or modify a database in your environment. For more information about generating the tables with the file, see Manually Creating the Database Schema.
-
Startup: The installation program leaves instructions to create the tables when the User Application starts for the first time.
NOVL_DATABASE_NEW=
Specify whether you want to use existing, empty databases, or create new tables in the existing database.
To create a new database specify true. Ensure that a database exists before selecting this option. Otherwise, specify false.
NOVL_UPGRADE=
To upgrade your User Application using an existing database, specify true. If database is existing and it has User Application tables from a previous installation, specify false.
If the existing database runs on an Oracle platform, you must prepare Oracle before updating the schema. For more information, see Preparing an Oracle Database for the SQL File.
NOVL_UPGRADE_PROPS_FILE=
If you are upgrading the User Application, specify the path of the properties file of the currently installed application.
NOVL_JDBC_DRIVER=
NOVL_DB_JARFILE_NAME=
Specify the absolute path of the JDBC jar file.
For example: C:\netiq\idm\apps\postgres\postgresql-9.4.1212.jdbc42.jar
NOVL_DB_DRIVER_CLASS_NAME=
Specify the database driver class name for the database that is used for installation.
-
PostgreSQL: liquibase.database.core.PostgresDatabase
-
Oracle: liquibase.database.ext.OracleUnicodeDatabase
-
MS SQL: liquibase.database.ext.MSSQLUnicodeDatabase
NOTE:MS SQL is supported on Windows only.
NOVL_DB_DRIVER_NAME=
Specify the database driver name.
-
PostgreSQL: org.postgresql.Driver
-
Oracle: oracle.jdbc.driver.OracleDriver
-
MS SQL: com.microsoft.sqlserver.jdbc.SQLServerDriver
NOTE:MS SQL is supported on Windows only.
NOVL_DB_JDBC_URL=
Specify the URL to connect to the database running the User Application.
-
PostgreSQL: jdbc:postgresql://<database server IP address:port>/idmuserappdb
For example, jdbc:postgresql://192.168.0.1:5432/idmuserappdb
-
Oracle: jdbc:oracle:thin:@<database server IP address:port>:idmuserappdb
For example, jdbc:oracle:thin:@192.168.0.1:1521:idmuserappdb
-
MS SQL: jdbc:sqlserver://<database server IP address:port>;DatabaseName=idmuserappdb
For example, jdbc:sqlserver://192.168.0.1: 1433;DatabaseName=idmuserappdb
NOTE:MS SQL is supported on Windows only.
NOVL_DB_TYPE
Select the valid database type. Your options are: PostgreSQL, SQL Server, and Oracle.
NOVL_DB_ORACLE_VERSION=
If you select Oracle in NOVL_DB_TYPE, specify the version of the database.
NOVL_DB_HOST=
Specify the hostname or IP address of the User Application database server.For example: 192.168.0.1
NOVL_DB_PORT=
Specify the port that is used by the User Application database server.For example: 5432
NOVL_DB_NAME=
Specify the name of your database. For example, idmuserappdb.
NOVL_DB_USER=
Specify the name of an account that allows the User Application to access and modify data in the databases. For example, idmadmin.
NOVL_DB_USER_PASSWORD=
NOVL_DB_USER_PASSWORD_CONFIRM=
Specify and confirm the password for the username specified in NOVL_DB_USER.
NOVL_CONFIG_DBADMIN_NAME=
NOVL_CONFIG_DBADMIN_PASSWORD=
NOVL_CONFIG_DBADMIN_PASSWORD_CONFIRM=
Specify the name and password for the database administrator.
You can use the same user account and password that you specified for NOVL_DB_USER and NOVL_DB_USER_PASSWORD. To use that account, do not make any changes.
NOVL_CONFIG_WRITE_TO_FILE=
By default, the value of this property is set to 0. To write database to a file, change the value to 1.
You might select this option if you do not have permissions to create or modify a database in your environment. For more information about generating the tables with the file, see Manually Creating the Database Schema.
RUN_LDAPCONFIG=
Specify whether you want to configure LDAP settings now or later. The options are:
-
Now: Executes the LDAP configure right away by populating the WAR with the LDAP configuration settings provided.
-
Later: Just installs the User Application files without configuring LDAP settings.
NOVL_JAVA_HOME=
Specify the JAVA_HOME path for this attribute and specify the same path for USER_MAGIC_FOLDER_1 attribute also.
For example: C:\netiq\idm\apps\jre
NOVL_AUDIT_OFF=
NOVL_AUDIT_ON=
Specify whether you want to set up auditing for the User Application. By default auditing is enabled. If you choose this option, you must also set NOVL_AUDIT_SERVER and NOVL_AUDIT_LOG_CACHE_DIR properties.
NOVL_AUDIT_SERVER=
If auditing is enabled, specify the hostname or IP address of the Audit server.For example: 192.168.0.1
NOVL_AUDIT_LOG_CACHE_DIR=
If auditing is enabled, specify the absolute path of audit cache. For example: C:\Program Files\Novell\audit
NOVL_XDAS_OFF=
NOVL_XDAS_ON=
Do not use this option. XDAS is not supported with identity applications. You must use Common Event Format (CEF), an open log management standard, for auditing events. CEF logging is disabled by default. To enable it, see Configuring Identity Manager Components to Log Audit Events in CEF Format in the NetIQ Identity Manager - Configuring Auditing in Identity Manager.
NOVL_XDAS_SERVER_NAME=
Do not use this option. XDAS is not supported with identity applications.
NOVL_XDAS_LOGGING_DIR=
Do not use this option. XDAS is not supported with identity applications.
NOVL_UA_OSP_PWD=
Specify the User Application and OSP password.
NOVL_USE_EXTERNAL_AUTH_SERVER=
If OSP is installed on a different server, you can configure that server for external authentication with the User Application. If you choose this option, you must also set the following properties:
-
NOVL_EXTERNAL_AUTH_PROTOCOL
-
NOVL_EXTERNAL_AUTH_HOSTNAME
-
NOVL_EXTERNAL_AUTH_PORT
By default, authenticating to an external server is disabled.
NOVL_EXTERNAL_AUTH_PROTOCOL=
If you are using an external server for authentication, specify the external authentication protocol.
For example: http/https
NOVL_EXTERNAL_AUTH_HOSTNAME=
If you are using an external server for authentication, specify the hostname or IP address of the authentication server.For example: 192.168.0.1
NOVL_EXTERNAL_AUTH_PORT=
If you are using an external server for authentication, specify the port value of the authentication server.For example: 8180 for http, 8443 for https
NOVL_CONFIG_UPDATE_FILE_PATH=
Specify the path for the configuration update properties file.
For example: C:\configupdate.properties
-
Executing a Silent Installation of the Identity Applications
-
Log in as administrative user to the computer where you want to install the identity applications.
-
Specify the values for the installation. For more information, see Setting Passwords in the Environment for a Silent Installation.
-
To launch the installation program for your platform, enter the following command:
IdmUserApp.exe -i silent -f \yourdirectorypath\user_app-silent.properties
NOTE:If the user_app-silent.properties file is in a different directory from the installer script, you must specify the full path to the file. The script unpacks the necessary files to a temporary directory and then launches the silent installation.
11.5.4 Post-Installation Steps
This section provides information about updating your Tomcat environment after you install the identity applications.
If you used the convenience installer for Tomcat, the installation programs for Identity Manager configure Tomcat for you. If you installed your own Tomcat program, consider the following issues:
-
You can modify the Tomcat service to perform more effectively. For more information, see So You Want High Performance.
-
You might want to add support for logging events. For more information, see Using the Apache Log4j Service to Log Sign-on.
Adding the User Application Schema to your Audit Server as a Log Application
If your Audit server will use the User Application as a log application, you must copy the dirxml.lsc file to the server. This section applies to Novell Identity Audit only.
-
Locate the dirxml.lsc file.
This file is located in the Identity Manager User Application installation directory after the install, for example C:\NetIQ\idm\apps\UserApplication.
-
Use a web browser to access an iManager with the Novell Identity Audit plug-in installed, and log in as an administrator.
-
Navigate to Roles and Tasks > Auditing and Logging and then select Logging Server Options.
-
Browse to the Logging Services container in your tree and select the appropriate Audit Secure Logging Server, then click OK.
-
In the Log Applications tab, select the appropriate Container Name, and then click the New Log Application link.
-
In the New Log Application dialog box, complete the following steps:
-
For Log Application Name, specify any name that is meaningful for your environment.
-
For Import LSC File, browse to the dirxml.lsc file.
-
Click OK.
-
-
Click OK to complete your Audit server configuration.
-
Ensure that the status on the Log Application is set to ON. (The circle under the status should be green.)
-
Restart the Audit server to activate the new log application settings.
Passing the preferIPv4Stack Property to JVM
The identity applications use JGroups for the caching implementation. In some configurations, JGroups requires that the preferIPv4Stack property be set to true to ensure that the mcast_addr binding is successful.
Without this option, the following error might occur:
[10/1/09 16:11:22:147 EDT] 0000000d UDP           W org.jgroups.util.Util
createMulticastSocket could not bind to /228.8.8.8 (IPv4 address); make sure
your mcast_addr is of the same type as the IP stack (IPv4 or IPv6).
You might also see this error:
[3/21/12 10:04:32:470 EDT] 00000024 UDP      E org.jgroups.protocols.TP down
failed sending message to null (131 bytes)
        java.lang.Exception: dest=/228.8.8.8:45654 (134 bytes)
    at org.jgroups.protocols.UDP._send(UDP.java:353)
The parameter java.net.preferIPv4Stack=true is a system property that can be set in the same manner as other system properties such as extend.local.config.dir.
Checking the Health of the Server
Most loadbalancers provide a healthcheck feature for determining whether an HTTP server is up and listening. The User Application contains a URL that can be used for configuring HTTP healthchecks on your loadbalancer. The URL is:
http://<NodeIP>:port/IDMProv/jsps/healthcheck.jsp
Monitoring the Health Statistics
The REST API allows you to retrieve information about the health of the User Application. The API can access the system for the currently running threads, memory consumption, cache, and cluster information and returns the information using the GET operation.
-
Memory information (JVM and system memory): Reads the memory related information such as system memory and memory consumed by the JVM.
For example,
http://<ip_addr:port>/IDMProv/rest/monitoring/statistics/memoryinfo
-
Thread information: Reads the information about the CPU-intensive threads and returns the list of top threads that cause heavy utilization of the CPU.
For example,
http://<ip_addr:port>/IDMProv/rest/monitoring/statistics/threadinfo
To access the stack trace of threads in the JVM, set the stack parameter to True.
For example,
http://<ip_addr:port>/IDMProv/rest/monitoring/statistics/threadinfo?stack=true
To specify the number of threads in the JVM, specify the value for the thread-count parameter.
For example,
http://<ip_addr:port>/IDMProv/rest/monitoring/statistics/threadinfo?thread-count=1
-
Cache information: Reads the cache information for the User Application.
For example,
http://<ip_addr:port>/IDMProv/rest/monitoring/statistics/cacheinfo
-
Cluster information: Reads the cluster related information.
For example,
http://<ip_addr:port>/IDMProv/rest/monitoring/statistics/clusterinfo
NOTE:You need to be a Security Administrator to view the User Application health statistics by using the REST API.
Creating Compound Indexes
After installing or upgrading the identity applications, manually create the compound indexes for each attribute that you want to use to sort users in the Identity Manager Dashboard. You can create compound indexes using ndsindex utility which is located in the eDirectory installed path. You can specify multiple attributes separated using $ sign for compound indexing. Following are the basic attributes that require compound indexing:
-
Surname,Given Name
-
Given Name,Surname
-
cn,Surname
-
Title,Surname
-
Telephone Number,Surname
-
Internet Email Address,Surname
-
L,Surname
-
OU,Surname
The following command helps you to create compound indexes using ndsindex utility:
ndsindex add [-h <hostname>] [-p <port>] -D <admin DN> -W|[-w <password>] -s <eDirectory Server DN> [<indexName1>, <indexName2>.....]
For example, to sort users based on Title, execute the following command:
ndsindex add -h <hostname> -p <ldap port> -D <admin DN> -w <admin passwd> -s <eDirectory Server DN> Title-SN;Title$Surname;value
You can also create compound indexes using Conversion Export Utility.
You must use an LDIF file to create indexes. After the LDIF file is imported, initiate the indexing activity by triggering Limber. Otherwise, indexing takes place when Limber triggers automatically.
Example LDIF file to create compound indexes to sort users on Title attribute:
dn: cn=osg-nw5-7, o=Novell
changetype: modify
add: indexDefinition
indexDefinition: 0$sntitleindex$0$0$0$1$Title$surname
For more information LDIF files, see LDIF Files in NetIQ eDirectory Administration Guide.
Configuring Identity Application to Reject Client-initiated SSL Renegotiation
By default, the identity applications installer configures a non-secure connection (http). Under certain circumstances, a non-secure connection can make Identity Manager susceptible to a denial-of-service attack caused by client initiated SSL renegotiation with the identity applications server. To prevent this issue, add the following flag to the CATALINA_OPTS entry in <tomcat-install-directory>\bin\setenv.bat file.
"-Djdk.tls.rejectClientInitiatedRenegotiation=true"
11.5.5 Disabling the Prevent HTML Framing Setting for Integrating Identity Manager with SSPR
This section discusses the configuration required for Identity Manager to integrate it with an existing SSPR 4.2 environment which is not deployed by Identity Manager 4.5. SSPR provides a configurable option, Prevent HTML Framing, that allows users to view SSPR in an inline frame for any application that includes the iframe html source code. If you select this option, SSPR is not included in the specified iFrame for the application. To disable this option for Identity Manager, run the following steps:
-
Go to http://<IP/DNS name>:<port>/sspr. This link takes you to the SSPR portal.
-
Log in as SSPR administrator.
-
Click Configuration Editor at the top of the page and specify the OSP configuration password.
-
Click Settings > Security > Always Show Advanced Settings, and do the following actions:
-
Browse for Prevent HTML Framing, de-select Enabled and then click Save to save the setting.
-
In the confirmation window, click OK.
-
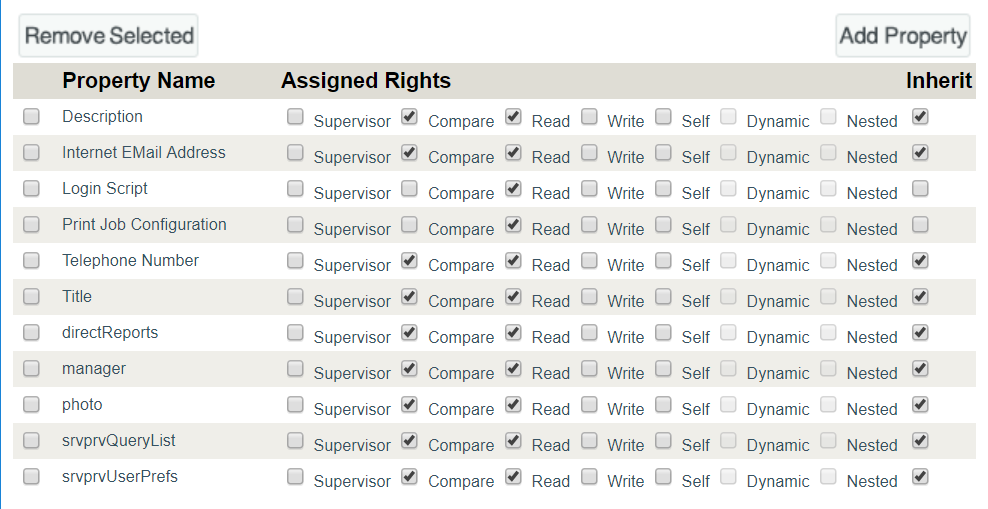
11.5.6 Verifying the User Properties
To enable your users to use identity applications, you must ensure that user properties with necessary rights are added to the container that consists all your system users. You can verify these properties using iManager. Perform the following steps in iManager to verify these settings:
-
Log in to iManager as an administrator using your Identity Vault IP address as tree.
-
In the Tree panel, select the tree where your identity applications are configured.
-
Click Assigned Rights for the container which consists of all the system users.
-
Verify that the following properties are having the necessary rights in the list:
-
Description
-
Internet EMail Address
-
Login Script
-
Print Job Configuration
-
Telephone Number
-
Title
-
directReports
-
manager
-
photo
-
srvprvQueryList
-
srvprvUserPrefs
If any of the properties are missing, click Add Property.
-
Select the required property from the list and click Done.
-
Select the necessary rights to the property and click Done.
Figure 11-1 Adding Properties to the User Container
-
11.5.7 Configuration and Usage Considerations for the Identity Applications
The following considerations apply to the configurations and initial usage of the identity applications.
-
Before users can access the identity applications, you must complete the following activities:
-
Ensure that all necessary Identity Manager drivers are installed.
-
Ensure that the indexes for the Identity Vault are in Online mode. For more information about configuring an index during installation, see Miscellaneous.
-
Enable cookies on all browsers. The applications do not work when cookies are disabled.
-
-
Users cannot access the identity applications as a guest or anonymous user without being logged in to the identity applications. The users are prompted to log in to the user interface. For more information, see Configuring Single Sign-on Access in Identity Manager in the NetIQ Identity Manager - Administrator’s Guide to the Identity Applications.
-
To ensure that Identity Manager enforces Universal Password functionality, configure the Identity Vault to use NMAS Login as the process for a user’s first login. Add NDSD_TRY_NMASLOGIN_FIRST with the string value true to the HKLM\SYSTEM\CurrentControlSet\Control\SessionManager\Environment registry key.
-
(Conditional) To run reports, you must have the components for Identity Reporting installed in your environment. For more information, see Administrator Guide to NetIQ Identity Reporting.
-
During the installation process, the installation program writes log files to the installation directory. These files contain information about your configuration. After you configure your Identity Applications environment, you should consider deleting these log files or storing them in a secure location. During the installation process, you might choose to write the database schema to a file. Since this file contains descriptive information about your database, you should move the file to a secure location after the installation process is complete.
-
(Conditional) To audit the identity applications, you must have the Identity Reporting and an auditing service installed in your environment and configured to capture the events. You must also configure the identity applications for auditing. For more information, see the NetIQ Identity Manager - Configuring Auditing in Identity Manager.
11.5.8 Starting the Identity Applications
This section provides instructions for starting the identity applications and logging in the first time on an application server. In a cluster environment, start the procedure on the primary node. The identity applications should be installed and ready for deployment. For more information about post-installation tasks, see Completing the Installation of the Identity Applications.
You use services.msc startup script to start the Tomcat service. You can also use this file for stopping and restarting the Tomcat service.
If your browser does not display the User Application page after you complete these steps, check the terminal console for error messages and refer to Section 29.0, Troubleshooting.
To start the identity applications:
-
Start the database for the identity applications. For more information, see your database documentation.
-
For the User Application to run reports, add the Djava.awt.headless=true flag to the startup script for Tomcat. For example:
JAVA_OPTS="-Djava.awt.headless=true -Dfile.encoding=UTF-8 -Dsun.jnu.encoding=UTF-8 -server -Xms1024m -Xmx1024m -XX:MaxPermSize=512m
NOTE:You do not need to perform this step if you are running on an X11 Windows system.
-
Start Tomcat where you installed the identity applications.
NOTE:In a cluster, start the primary node only.
-
At the command line, make the installation directory your working directory.
-
Execute the startup script.
-
To enable communication with the User Application driver, complete the following steps:
-
Log in to iManager.
-
Under Roles and Tasks > Identity Manager in the left navigation frame, click Identity Manager Overview.
-
In the content view, specify the driver set that contains the User Application driver, then click Search.
-
In the graphic showing the driver set with its associated drivers, click the red-and-white icon for the User Application driver.
-
Click Start Driver.
Upon start, the driver attempts a “handshake” with the User Application. If your application server is not running or if the WAR was not deployed successfully, the driver returns an error. Otherwise, the driver status changes to the yin-yang symbol, indicating that the driver is now started.
-
-
To start the Role and Resource Service driver, repeat the procedure in Step 6.
-
To launch and log in to the User Application, enter the following URL in your web browser:
http://hostname:port/ApplicationName
- hostname
-
Represents the name of the application server (Tomcat). For example, myserver.domain.com
- port
-
Represents the port number of the application server. For example, 8180.
- ApplicationName
-
Represents the name that you specified during the installation for the application when you provided application server configuration information. For example, IDMProv.
-
In the upper right corner of the User Application landing page, click Login.
-
(Conditional) To enable the User Application in a cluster group, complete the following steps:
-
Click Administration.
-
In the Application Configuration portal, click Caching.
-
In the Caching Management window, select True for Cluster Enabled.
-
Click Save.
-
Restart the server.
-
(Conditional) To use local settings, repeat this procedure for each server in the cluster.
-