11.7 Completing the Installation of the Identity Applications
This section provides instructions for activities that you might want to perform after installing identity application and their framework:
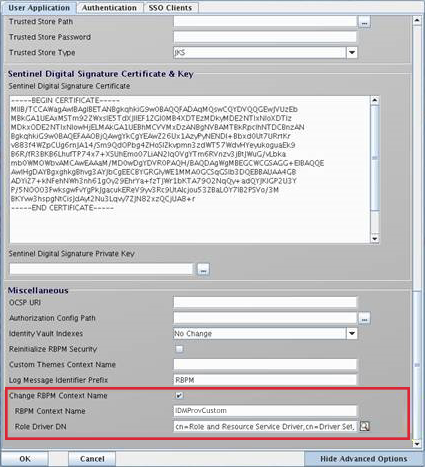
11.7.7 Changing the Default Context Name for User Application
Instead of using the default context name, you can create a new context based on your organizational requirements. You can change the context name by performing the following actions:
-
Stop the Tomcat service by using the services.msc file.
-
Navigate to the User Application directory located in C:\NetIQ\idm\apps\UserApplication.
-
Launch the configupdate utility in GUI mode.
Ensure that the use_console option is set to false in configupdate.bat.properties file.
-
In the tab, click and perform the following steps:
-
Select .
-
Specify the custom context name in . For example, IDMProvCustom.
-
Browse to and select the Roles Driver DN. For example, cn=Role and Resource Service Driver,cn=Driver Set,o=system.
-
Click .
-
-
Verify that the war file is renamed.
-
Navigate to the Tomcat webapps folder and check if IDMProvCustom.war entry is updated.
-
Navigate to ism-configuration properties file located in \TOMCAT_INSTALLED_HOME\conf and check if portal.context entry specifies the new context name.
-
-
Update your database with the new context name by using the update-context.bat file located in C:\NetIQ\idm\apps\UserApplication.
Execute the following command to run the update-context.bat file.
ua:C:\NetIQ\idm\apps\UserApplication # vi update-context.bat
You should see the following entries on your screen:
# copy and paste or execute this script before changing context name
# Substitute your new context where indicated
#
C:\NetIQ\idm\jre\bin\java -Xms256m -Xmx256m  -Dwar.context.name=[New Context Here] -Ddriver.dn=[UA Driver DN] -jar C:\NetIQ\idm\apps\UserApplication\liquibase.jar --databaseClass=liquibase.database.core.PostgresDatabase  --driver=org.postgresql.Driver  --classpath=
C:\NetIQ\idm\apps\postgres\postgresql-9.4.1212.jdbc42.jar:
C:\NetIQ\idm\apps\tomcat\webapps\IDMProv.war --changeLogFile=UpdateProducerId.xml   --url="jdbc:postgresql://localhost:5432/idmuserappdb?compatible=true" --contexts="prov,updatedb" --logLevel=debug --username=******** --password=******** update
For example, run the following script if you are using a PostgreSQL database:
C:\NetIQ\idm\apps\jre\bin\java -Xms256m -Xmx256m  -Dwar.context.name=IDMProvCustom  -Ddriver.dn= cn=Role and Resource Service Driver,cn=driverset1,o=system -jar
C:\NetIQ\idm\apps\UserApplication\liquibase.jar --databaseClass=liquibase.database.core.PostgresDatabase  --driver=org.postgresql.Driver  --classpath=
C:\NetIQ\idm\apps\postgres\postgresql-9.4.1212.jdbc42.jar:
C:\NetIQ\idm\apps\tomcat\webapps\IDMProv.war --changeLogFile=UpdateProducerId.xml   --url="jdbc:postgresql://<Database Server:5432/idmuserappdb?compatible=true" --contexts="prov,updatedb" --logLevel=debug -–username=dbadmin --password=******** update
where
-Dwar.context.name=IDMProvCustom specifies the new context.
-Ddriver.dn ="cn=User Application Driver,cn=driverset1,o=system" specifies the User Application driver DN.
--username=dbadmin specifies the database administrator username that can create database tables, views, and other artifacts.
IMPORTANT:Do not change the database driver details in the script for other supported databases.
-
Verify that the database tables have the new context name.
Table Name
Column to Check
PORTALPRODUCERS
producerid
PORTALPRODUCERREGISTRY
producerid
PORTALREGISTRY
producerid
PORTALPORTLETSETTINGS
producerid
PORTALPORTLETHANDLES
producerid
PROFILEGROUPPREFERENCES
elementid
For example, run the following SQL command to verify the new context name in the PORTALPRODUCERS table:
Select * from PORTALPRODUCERS;
The command should return only the new context name.
-
Start the Tomcat service by using the services.msc file.
11.7.9 Configuring Forgotten Password Management
The Identity Manager installation includes Self Service Password Reset to help you manage the process for resetting forgotten passwords. Alternatively, you can use an external password management system.
Using Self Service Password Reset for Forgotten Password Management
In most cases, you can enable the forgotten password management feature when you install SSPR and the identity applications. However, you might not have specified the URL of the landing page for the identity applications to which SSPR forwards users after a password change. You might also need to enable forgotten password management. This section provides the following information:
Configuring Identity Manager to Use Self Service Password Reset
This section provides information about configuring Identity Manager to use SSPR.
-
Log in to the server where you installed the identity applications.
-
Run the RBPM configuration utility. For more information, see Running the Identity Applications Configuration Utility.
-
In the utility, navigate to .
-
For , specify .
-
Select .
-
Navigate to .
-
For , specify the name that you want to use to identify the single sign-on client for SSPR to the authentication server. The default value is sspr.
-
For , specify the password for the single sign-on client for SSPR.
-
For , specify the absolute URL to which the authentication server redirects a browser client when authentication is complete.
Use the following format: protocol://server:port/path.For example, http://10.10.10.48:8180/sspr/public/oauth.
-
Save your changes and close the utility.
Configuring Self Service Password Reset for Identity Manager
This section provides information about configuring SSPR to work with Identity Manager. For example, you might want to modify the password policies and challenge response questions.
When you installed SSPR with Identity Manager, you specified a password that an administrator can use to configure the application. NetIQ recommends that you modify the SSPR settings, then specify an administrator account or group can configure SSPR. For more information about the configuration password, see Installing Password Management for Identity Manager.
-
Log in to SSPR by using the configuration password that you specified during installation.
-
In the Settings page, modify the settings for the password policy and challenge response questions. For more information about configuring the default values for SSPR settings, see Configuring Self Service Password Reset in the NetIQ Self Service Password Reset Administration Guide.
-
Lock the SSPR configuration file (SSPRConfiguration.xml). For more information about locking the configuration file, see Locking the SSPR Configuration.
-
(Optional) To modify SSPR settings after you lock the configuration, you must set the configIsEditable setting to true in the SSPRConfiguration.xml file.
-
Log out of SSPR.
-
For the changes to take effect, restart Tomcat.
Locking the SSPR Configuration
-
Go to . This link takes you to the SSPR portal.
-
Log in to the Identity Manager with an administrator account or log in with your existing login credentials.
-
Click at the top of the page and specify the configuration password that you specified during installation.
-
Click and navigate to .
-
Lock the SSPR configuration file (SSPRConfiguration.xml).
-
Under the Administrator Permission section, define a filter in LDAP format for a user or a group that has administrator rights to SSPR in the Identity Vault. By default, the filter is set to groupMembership=cn=Admins,ou=Groups,o=example.
For example, set it to uaadmin (cn=uaadmin) for the User Application administrator.
This prevents users from modifying the configuration in SSPR except the SSPR admin user who has full rights to modify the settings.
-
To ensure LDAP query returns results, click .
If there is any error in the setting, you cannot proceed to the next configuration option. SSPR displays the error details to help you troubleshoot the issue.
-
Click .
-
In the confirmation window that pops up, click .
When SSPR is locked, the admin user can see additional options in the Administration user interface such as Dashboard, User Activity, Data Analysis, and so on that were not available for him before SSPR lock down.
-
-
(Optional) To modify SSPR settings after you lock the configuration, you must set the configIsEditable setting to true in the SSPRConfiguration.xml file.
-
Log out of SSPR.
-
Log in to SSPR again as an admin user defined in Step 3.
-
Click , then click to confirm the changes.
-
For the changes to take effect, restart Tomcat.
Using the Legacy Provider for Forgotten Password Management
Instead of SSPR, you can use the legacy provider in Identity Manager for the Forgotten Password Management feature. If you choose the legacy provider, you do not need to install SSPR. However, you will need to reassign permissions for users to access the shared pages for password management. This section provides the steps to perform these activities:
For more information about shared pages and permissions, see Page Administration in the NetIQ Identity Manager - Administrator’s Guide to the Identity Applications.
Configuring the Legacy Provider for Forgotten Password Management
-
Log in to the server where you installed the identity applications.
-
Run the RBPM configuration utility. For more information, see Running the Identity Applications Configuration Utility.
-
In the utility, navigate to .
-
For , specify .
-
For , specify .
-
Navigate to .
-
For , the setting should be empty.
-
Save your changes and close the utility.
Reassigning Permissions for the Password Management Pages
The settings for the identity applications default to SSPR during installation. You must assign or reassign the permissions for the users, groups, or containers that you want to access the shared pages for managing passwords. When you assign users View permission for a container page or shared page, the users can access the page and see it in a list of available pages.
-
Ensure that Identity Manager is using the legacy provider. For more information, see Configuring the Legacy Provider for Forgotten Password Management.
-
Log in to the User Application as the application administrator. For example, log in as uaadmin.
-
Navigate to .
-
In the panel, navigate to .
-
Select the page for which you want to specify permissions. For example, Change Password or Password Challenge Response.
-
In the right panel, click .
-
In , select the users, groups, or containers that you want to assign to the page.
-
(Optional) To ensure that only an application administrator can access the specified page, select .
-
Click .
-
Perform Step 5 through Step 9 for each page that you want to configure.
-
Select the icon to return to the Dashboard.
-
Navigate to , then select
 .
. -
On the page, replace the link to SSPR with the link for UserApp PwdMgt.
For more information, see Updating SSPR Links in the Dashboard for a Distributed or Clustered Environment and the Help for the Identity Applications.
-
Log out and then restart Tomcat.
Using an External System for Forgotten Password Management
To use an external system, you must specify the location of a WAR file containing Forgot Password functionality. This process includes the following activities:
Specifying an External Forgotten Password Management WAR File
If you did not specify this values during installation and want to modify the settings, you can use either the RBPM Configuration utility or make the changes in the User Application as an administrator.
-
(Conditional) To modify the settings in the RBPM Configuration utility, complete the following steps:
-
Log in to the server where you installed the identity applications.
-
Run the RBPM configuration utility. For more information, see Running the Identity Applications Configuration Utility.
-
In the utility, navigate to .
-
For , specify .
-
-
(Conditional) To modify the settings in the User Application, complete the following steps:
-
Log in as the User Application Administrator.
-
Navigate to .
-
-
For Forgotten Password, specify .
-
For , specify the link shown when the user clicks Forgot password on the login page. When the user clicks this link, the application directs the user to the external password management system. For example:
http://localhost:8180/ExternalPwd/jsps/pwdmgt/ForgotPassword.jsp
-
For , specify the link shown after the user finishes performing the forgot password procedure. When the user clicks this link, the user is redirected to the link specified. For example:
http://localhost/IDMProv
-
For , specify the URL for the web service that the external forward password WAR uses to call back to the identity applications. Use the following format:
https://idmhost:sslport/idm/pwdmgt/service
The return link must use SSL to ensure secure web service communication to the identity applications. For more information, see Configuring SSL Communication between Application Servers.
-
Manually copy ExternalPwd.war to the remote application server deploy directory that runs the external password WAR functionality.
Testing the External Forgot Password Configuration
If you have an external password WAR file and want to test the Forgot Password functionality by accessing it, you can access it in the following locations:
-
Directly, in a browser. Go to the Forgot Password page in the external password WAR file. For example, http://localhost:8180/ExternalPwd/jsps/pwdmgt/ForgotPassword.jsp.
-
On the User Application login page, click the link for .
Configuring SSL Communication between Application Servers
If you use an external password management system, you must configure SSL communication between the Tomcat instances on which you deploy the identity applications and the External Forgotten Password Management WAR file. For more information, refer to the Tomcat documentation.
Updating SSPR Links in the Dashboard for a Distributed or Clustered Environment
The installation process assumes that you deploy SSPR on the same application server as the identity applications and Identity Reporting. By default, the built-in links on the page in the Dashboard use a relative URL format that points to SSPR on the local system. For example, \sspr\private\changepassword. If you install the applications in a distributed or clustered environment, you must update the URLs for the SSPR links.
For more information, see the Help for the Identity Applications.
-
Log in as an administrator to the Dashboard. For example, log in as uaadmin.
-
Click .
-
In the Edit Home Items page, hover on the item that you want to update, and then click the edit icon. For example, select .
-
For , specify the absolute URL. For example, http://10.10.10.48:8180/sspr/changepassword.
-
Click .
-
Repeat for each SSPR link that you want to update.
-
Upon completion, click .
-
Log out, and then log in as a regular user to test the changes.