24.2 Deployment Procedure
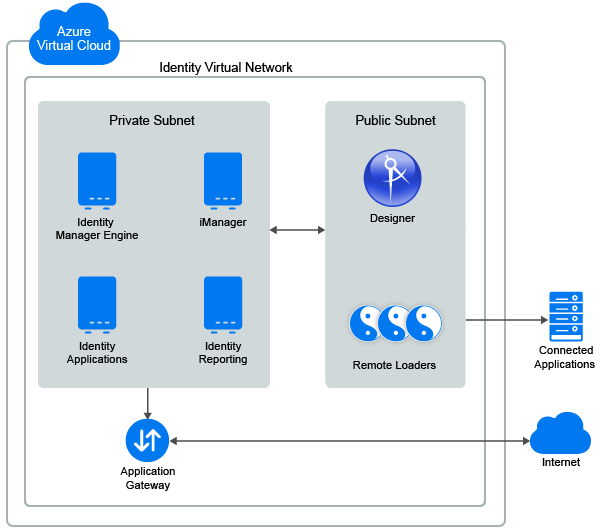
Identity Manager components can be deployed on a private or a public network based on your requirement. Figure 24-1, Identity Manager Deployment on Microsoft Azure illustrates a sample deployment that is used in the subsequent sections.
Figure 24-1 Identity Manager Deployment on Microsoft Azure
Identity Manager components can be deployed on Microsoft Azure in different combinations depending on how the components are distributed on different servers. However, the deployment procedure is the same for all scenarios.
The deployment procedure consists of the following steps:
24.2.1 Creating a Resource Group
NetIQ recommends you to create a resource group and add the required resources to the group to use with Identity Manager. Perform the following steps to create or determine an existing resource group:
-
Log in to the Azure portal as an administrator.
-
Click New.
-
Search for resource group and select the resource group.
-
Click Create.
24.2.2 Creating a Virtual Network and Subnet
-
In the Azure portal, click New.
-
Search for virtual network and select Virtual Network.
-
Click Create.
-
Configure the required network settings, such as Name, Subscription, Location, Address Space, Resource Group, Subnet name, and Subnet address range.
The following is an example configuration:
- Name: IDM-subnet1
- Address space: 10.10.10.0/24
- Resource group: Use the existing resource group which is already created. See, Creating a Resource Group.
- Subnet name: default
- Subnet address range: 10.10.10.0/24
-
Click Create.
24.2.3 Creating an Application Gateway
-
In the left menu, click Create a resource.
-
Select Networking > Application Gateway.
-
In Basics, specify the basic details to create an application gateway:
-
Specify the required gateway settings, such as Name, Standard Tier and SKU size, Instance count, Resource Group, Subscription, Location.
The following is an example configuration:
- Name: Identity Applications Gateway
- Standard Tier and SKU size: Medium
- Instance count: default
- Resource group: Use the existing resource group which is already created. See, Creating a Resource Group.
- Subnet name: default
-
Click OK.
-
-
In Settings, specify the application gateway network related details:
-
Select the virtual network and corresponding subnet which is created earlier. See, Creating a Virtual Network and Subnet.
-
In Frontend IP configuration, select Public > Create new Public IP address.
-
Specify the DNS name to access the VMs from an external network through the application gateway.
-
In Listener configuration, select the following options:
Field
Description
Protocol
HTTPS
Port
8443
-
-
In Summary, review your settings and click Create.
24.2.4 Creating a Virtual Machine Instance
Create a separate virtual machine to host Identity Manager components.
-
In the left menu, click Create a resource and select Compute.
-
Click Windows Server > Windows server 2016 Datacenter.
-
In Deployment Model, select Resource Manager and click Create.
-
Configure the following settings:
Field
Description
Name
Specify the VM name.
VM disk type
Select the disk type. For example SSD.
Username and Password
Specify the preferred username and password.
Subscription
Select your subscription.
Resource Group
Select the existing resource group. See Creating a Resource Group.
Location
Specify location where this VM should host the application.
-
Click OK.
-
In High Availability and Storage, retain the default settings.
-
In Network, select the virtual network and corresponding subnet that is already created. See, Creating a Virtual Network and Subnet.
-
(Conditional) If you want to access the virtual machine outside of the virtual network, select a public IP address for your virtual machine.
-
Specify the firewall rules for your Network security group to control incoming and outgoing requests of your virtual machine.
These firewall rules are required if you want to access the virtual machine from an external network.
-
Retain the default values for the rest of the options and click OK.
-
In Summary, review your settings and click Create the VM.
To host the following Identity Manager Components on the respective VMs, see:
24.2.5 Setting Up Designer
-
On a public subnet, launch a Virtual Machine instance. See, Creating a Virtual Machine Instance.
For the Windows security group, use rdesktop port only. For example 3389
-
Install Designer. See, Installing Designer.
24.2.6 Configuring the Application Gateway
Configure the application gateway to allow external networks to use Identity Manager components that are hosted on the virtual machines.
-
Configure a separate backend pool for Identity Manager components such as iManager, Identity Applications, and Identity Reporting.
-
In Backend pools, click Add.
-
Specify the following details:
Field
Description
Name
Specify the name of a backend pool to identify the Identity Manager component.
Type
Specify the type in one of the following ways:
-
IP address or FQDN: Specify the IP address or FQDN of the required Identity Manager component.
-
Virtual Machine: Select the Virtual Machine that is hosting the required Identity Manager component.
-
-
Click OK.
Repeat this step to configure additional backend pools.
-
-
Configure separate HTTP settings for Identity Manager components such as iManager, Identity Applications, and Identity Reporting.
NOTE:Ensure that you have exported the public certificate for the required Identity Manager components.
-
In HTTP Settings, click Add.
-
Specify the following details:
Field
Description
Name
Specify the name of an HTTP setting to identify the Identity Manager component.
Protocol
Select HTTPS.
Port
Specify the port of the Identity Manager Component.
For example:
-
iManager: 8443
-
Identity Applications: 8543
-
Identity Reporting: 8643
Backend Authentication Certificates
-
Select Create new.
-
Specify the name of the certificate.
-
Browse and upload the exported public certificate for the corresponding Identity Manager component.
-
Click Add Certificate.
-
-
Click OK.
Repeat this step to configure additional HTTP settings.
-
-
Configure a separate listener for each Identity Manager component such as iManager, Identity Applications, and Identity Reporting.
-
In Listeners, click Basic.
-
Specify the following details:
Field
Description
Name
Specify the name of the listener to identify the Identity Manager component.
Frontend IP configuration
-
Select the Virtual Network and subnet that is created earlier. See, Creating a Virtual Network and Subnet.
-
Specify the Name and Port number of the application. For example:
iManager: 8443
Identity Applications: 8543
Identity Reporting: 8643
Protocol
Select HTTPS.
Certificate
-
Browse and upload the PFX certificate.
-
Specify the Name and Password of the certificate.
-
-
Click OK.
Repeat this step to configure additional listeners.
-
-
Create a basic rule for Identity Manager components such as iManager, Identity Applications, and Identity Reporting and associate this rule with the respective backend pool, Listener, and HTTP setting.
-
In Rule, click Add.
-
Specify the following details:
Field
Description
Name
Specify the name of a rule that helps in identifying the Identity Manager component.
Listener
Select the respective listener that is created in Step 3.
Backend Pool
Select the respective backend pool that is created in Step 1.
HTTP setting
Select the respective HTTP setting that is created in Step 2.
-
Click OK.
Repeat this step to configure additional rules.
-