22.2 Preparing Your Environment
Your environment for PCRS must be configured appropriately. For example, the User Application must have new administrative user accounts that can be used by the policies to create and configure the configuration objects and job for quick onboarding of identity, resources, and permission assignments. This section helps you prepare your environment before you install a driver enabled with PCRS.
22.2.4 Configuring Custom Entitlements
You use Designer to configure custom entitlements on a driver enabled with PCRS. The entitlements packages contain the content necessary for collecting and reconciling permissions. If you want a driver to support permission collection and reconciliation, ensure that these packages are installed on the driver. You can turn this functionality on or off using the new set of GCVs included with the driver.
You can either create a new driver with the latest packages or upgrade the packages for an existing driver. In both cases, you install the driver packages and then modify the driver configuration to suit your environment. For creating new drivers, NetIQ recommends that you refer to the individual driver documentation guides.
Installing the Driver Packages
After you have imported the current driver packages into the Package Catalog, you can install the driver packages to create a new driver.
-
In Designer, open your project.
-
In the Modeler, right-click the driver set where you want to create the driver, then select .
-
Follow the driver configuration wizard to create the driver.
-
On the Entitlements Name to CSV File Mappings page, click the
 icon to populate the page with the entitlement configuration options.
Identity Manager uses the CSV file to map entitlements to corresponding resources in the Identity Manager catalog.
The information that you specify on this page is used for creating the permission catalog. This page uses BuildingAccess as an example. Fill in the following fields, then click :
-
Entitlement Name: Specify a descriptive name for the entitlement to map it to the CSV file that contains the connected system entitlement details.
is the name of the entitlement. This parameter corresponds to the Entitlement Assignment Attribute in the connected system. For example, you could define an entitlement called BuildingAccess.
This parameter is used to create a resource in the User Application.
-
Entitlement Assignment Attribute: Specify a descriptive name for the assignment attribute for an entitlement.
This parameter holds the entitlement values from the connected system. For the engine to receive the attribute events from the Publisher channel, ensure that you add this parameter to the Driver Filter. For example, you could have an attribute called BuildingAccess.
NOTE:For the Delimited Text Driver, add this parameter in the on the Driver Parameters page or modify it in driver settings after creating the driver.
-
CSV File: Specify the location of the CSV file. This file must be located on the same server as the Identity Manager engine. This file contains the values for the application entitlements in the format value, displayname, and description. An example for the CSV file path is /root/user/BuildingAccess.csv. For more information, see Understanding the CSV File Format.
-
Multi-valued?: Set the value of this parameter to if you want to assign resources and entitlements multiple times with different values to the same user. Otherwise, set it to .
NOTE: In case you changed the value of this parameter after the driver starts, delete the associated entitlement object and the resource, and then restart the driver.
-
-
Review the summary of tasks that will be completed to create the driver, then click .
The driver is now created. Deploy the driver to the Identity Vault.
22.2.5 Understanding the PCRS Process
After a driver with custom entitlements is created or configured in Designer, you must deploy it into the Identity Vault. When the driver is started, the driver automatically creates new resources based on the entitlements configured and populates the resource with the entitlement values from the CSV file. The new custom entitlement and the corresponding resource object is updated in the table. When a permission assignment changes in the connected system, the driver policies consume the modified permission value and update the Resource Catalog. The following sections provide information about the sequence of actions involved in this process.
Sequence of Actions
-
When the driver is started, the following actions occur:
-
Identity Manager executes the driver start up policies.
-
The InitEntitlementConfigurationResource policies perform the following actions:
-
Reads the permissionnametofile mapping table to retrieve the entitlement information from this mapping table and creates these entitlements in the Identity Vault if they are not already existing.
-
Updates the PermissionEntMapping object with the entitlement information and the location of the CSV file.
-
Updates the entitlement configuration resource object with the entitlement information. RBPM uses this object for refreshing the code map.
-
-
The SetJobNamedPassword and UpdateJobConfiguration policies configure the permission onboarding job with the required permissions.
-
The OnboardEntitlements policy starts the PermissionOnboarding job.
When the job is started, it performs the following actions:
-
Reads the CSV file containing the entitlement values.
-
Populates the <entitlementname>_Values objects in the Identity Vault. For example, for a custom entitlement named BuildingAccess, it creates a DirXML-Resource object in eDirectory with name BuildingAccess_values containing the values of the custom entitlement.
-
Creates a dynamic resource for assigning new custom entitlement values to the users.
-
Populates the PermissionEntMapping object with the newly created resource name.
-
Issues a code map refresh to update the Resource Catalog with the new entitlement values.
At the end of this step, verify that the following tasks are completed:
-
Custom entitlements are created in the Identity Vault.
-
The EntitlementConfiguration resource object is updated in the Identity Vault.
-
<entitlementname>_Values object is updated for each entitlement in the Identity Vault.
-
Resources are created in RBPM.
-
The PermissionEntMapping object is updated in the Identity Vault.
Now the driver is ready to synchronize the connected system permission changes to the User Application.
For more information, see Viewing Permission Collection and Reconciliation Service Configuration Objects.
-
-
How Permissions Are Reconciled
The below examples will help you understand how permissions are reconciled in different scenarios.
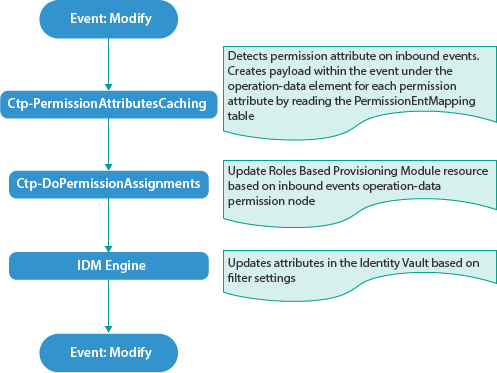
Use Case 1: When the Publisher channel has an event with permission changes.
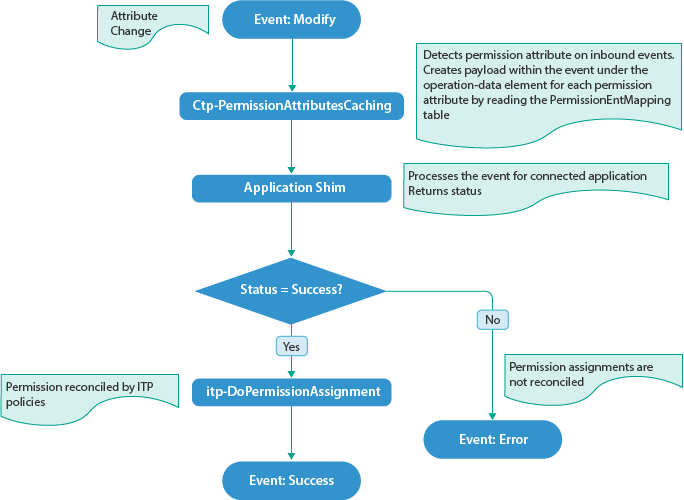
Use Case 2: When a permission attribute changes in the Identity Vault.
In this case, Identity Manager sends a Subscriber event to update the changed permission in the connected system. Also, the permission is reconciled in Resource Catalog.

Use Case 3: When a permission changes in Resource Catalog.
This action causes a Subscriber event to update the permission in the connected system.
IMPORTANT:You can create a new resource and map it to a custom entitlement and reconcile permission assignments. However, if PCRS is turned off, all resource assignments for the custom entitlement are disabled regardless of whether the resource is created through PCRS or not. Identity Manager does not support using the common package included with PCRS on a driver that already supports entitlements