4.2 Deployment Procedure
The following section provides instructions for deploying eDirectory on Microsoft Azure depending on the operating system running on the virtual machines.
4.2.1 Deploying on a Linux Platform
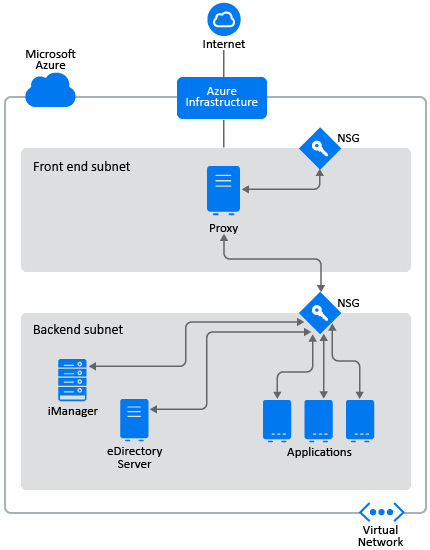
eDirectory should be deployed only in a backend subnet in Azure Virtual Network. Figure 4-1 illustrates a sample deployment that is used in the subsequent sections.
Figure 4-1 eDirectory Deployment on Azure
NOTE:
-
Proxy is bastion host in the front end subnet to which the administrator connects using SSH and connects to other instances in the backend subnet using the SSH agent forwarding.
-
Applications that need to access eDirectory should be deployed in the backend subnet. If these applications need to be accessed from the Internet, configure an Azure load balancer in the front end subnet to enable the access. For more information, see Create a Public Basic Load Balancer.
-
The Hybrid Set-up i.e installing the eDirectory Master on-premises and replica on Azure Virtual Machine and vice versa is not supported.
The deployment procedure consists of the following steps:
Preparing Azure Services
This section outlines general steps for creating Azure services for use with eDirectory. This includes creating the resource groups, virtual network (VNet) and subnets.
IMPORTANT:While creating services (such as, virtual network, security groups, virtual machines, etc.), ensure to specify the same value for .
Creating Resource Groups
A resource group is a container that holds related resources for an Azure solution. The resource group can include all the resources for the solution, or only those resources that you want to manage as a group. For example, while deploying eDirectory on Azure, the resource groups should contain Virtual Machines, Virtual Network, Application Security Groups, Network Security Groups, Public IP Address, Network Interface and Disks. For more information on how to create a resource group, see Manage Azure resources through portal.
NOTE:Not all administrators may have rights to create a new resource group.
Creating a Virtual Network
Azure Virtual Network enables many types of Azure resources, such as Azure Virtual Machines (VM), to securely communicate with each other within the Azure Internet, and on-premises networks. For more information, see What is Azure Virtual Network.
As part of creating the virtual network, one subnet gets created by default. If you want to create multiple subnets, go to the newly created > > .
Configuring Application Security Groups (ASG)
Application security groups enable you to configure network security as a natural extension of an application's structure. It also allows you to group virtual machines and define network security policies based on those groups. For more information, see Application Security Groups.
You must create the following Application security groups before configuring the network security groups:
Table 4-1 Application Security Groups
|
Name |
Description |
|---|---|
|
SSH_Proxy |
Contains the network interface of the virtual machine where SSH_Proxy will be configured |
|
eDirectory |
Contains the network interface of all the virtual machines where eDirectory will be configured |
|
eDirectory_CA |
Contains the network interface of the virtual machine where eDirectory server hosting the tree CA will be configured |
|
iManager |
Contains the network interface of the virtual machine where iManager will be configured |
Configuring Network Security Groups (NSG) for Subnets
You can filter inbound and outbound network traffic for subnet with an NSG. NSGs contain security rules that filter network traffic by IP address, port, and protocol.
This section outlines the rules to create an NSG for the front end subnet. Configure the following rules over the default security rules:
-
Inbound Rules:
Table 4-2 Inbound Rules for the Front End Subnet
Priority
Name
Port Range
Source
Destination
Action
Description
100
SSH
TCP 22
Any
SSH_Proxy (ASG)
ALLOW
Allows SSH connection to the Proxy server from the Internet
110
Allow Subnet Traffic
Any
Any
Front end subnet
ALLOW
(Optional) Allows all intra-subnet traffic.
NOTE:Set this rule only if you have other virtual machines in your front end subnet which need to communicate with each other.
120
All Traffic
All
Any
Any
DENY
Denies all inbound traffic not already handled by a preceding rule
This section outlines the rules to create NSGs in the backend subnet. Configure the following rules for network security groups:
-
Inbound Rules:
Table 4-3 Inbound Rules for the Backend Subnet
Priority
Name
Port Range
Source
Destination
Action
Description
100
SSH
TCP 22
Proxy (ASG)
Backend subnet
ALLOW
Allows inbound SSH traffic from the SSH Proxy
110
iManager
TCP 8443
Proxy (ASG)
iManager (ASG)
ALLOW
Allows HTTPS traffic for accessing iManager from SSH Proxy
120
HTTP CRL
TCP 8028
Virtual Network
eDirectory_CA (ASG)
ALLOW
Required for accessing the eDirectory tree CRL from the VNet when there are services in the VNet which are configured with certificates issued by tree CA.
130
Allow Subnet Traffic
Any
Backend subnet
Backend subnet
ALLOW
Allows all intra-subnet traffic
140
All Traffic
All
Any
Any
DENY
Denies all inbound traffic
Configuring Network Security Groups for Virtual Machine
A security group is a set of virtual firewall rules which can be assigned to one or more virtual machines in the Virtual Network.
By default, a new security group only allows incoming traffic on port 22, so that you can only connect to the instance by using SSH.
For more information, see Security Groups.
To deploy eDirectory on Azure, create the following network security groups: eDirectory_NSG_1, eDirectory_NSG_2 and iManager_NSG. Create these security groups with the following port rules over the default security rules:
-
eDirectory_NSG_1: This NSG should be associated with the virtual machine hosting the eDirectory tree CA.
Priority
Name
Port Range
Source
Destination
Action
Description
100
SSH
TCP 22
SSH Proxy (ASG)
eDirectory (ASG)
ALLOW
Allows SSH traffic from SSH Proxy
110
NCP
TCP 524
Backend subnet
eDirectory (ASG)
ALLOW
Allows NCP traffic for eDirectory in backend subnet
120
HTTP CRL
TCP 8028
Virtual Network
eDirectory_CA (ASG)
ALLOW
Required for accessing the eDirectory tree CRL from the VNet when there are services in the VNet which are configured with certificates issued by tree CA.
130
LDAPS
TCP 636
Backend subnet
eDirectory (ASG)
ALLOW
Allows secured LDAP traffic in backend subnet
140
SLP
Any 427
Backend subnet
eDirectory (ASG)
ALLOW
Allows SLP traffic in the backend subnet
150
All Traffic
All
Any
Any
DENY
Denies all inbound traffic
NOTE:eDirectory servers should not be configured to listen on LDAP port 389 and access to port 389 should not be allowed on the security group which is assigned to eDirectory. Also access to HTTP port should only be allowed on the security group assigned to eDirectory server hosting the tree CA.
-
eDirectory_NSG_2: This NSG should be associated with all virtual machines hosting eDirectory servers other than the eDirectory tree CA.
Priority
Name
Port Range
Source
Destination
Action
Description
100
SSH
TCP 22
SSH Proxy (ASG)
eDirectory (ASG)
ALLOW
Allows SSH traffic from SSH Proxy
110
NCP
TCP 524
Backend subnet
eDirectory (ASG)
ALLOW
Allows NCP traffic for eDirectory in backend subnet
120
LDAPS
TCP 636
Backend subnet
eDirectory (ASG)
ALLOW
Allows secured LDAP traffic in backend subnet
130
SLP
Any 427
Backend subnet
eDirectory (ASG)
ALLOW
Allows SLP traffic in the backend subnet
140
All Traffic
All
Any
Any
DENY
Denies all inbound traffic
-
iManager_NSG: This NSG should be associated with the virtual machine hosting iManager. The following NSG rules enable access to the iManager server from the Proxy server only.
Priority
Name
Port Range
Source
Destination
Action
Description
100
SSH
TCP 22
SSH Proxy (ASG)
iManager (ASG)
ALLOW
Allows SSH traffic from Proxy
110
HTTPS
TCP 8443
SSH Proxy (ASG)
iManager (ASG)
ALLOW
Allows secured HTTP traffic for accessing iManager from Proxy
120
All Traffic
All
Any
Any
DENY
Denies all inbound traffic
Creating a SSH Key Pair
You must create a SSH key pair before configuring the Azure VMs. To create a key pair, perform the following steps:
-
Create a 4096-bit RSA SSH key pair on your client using the following command:
ssh-keygen -t rsa -b 4096
ssh-keygen places the newly created public key at ~/.ssh/id_rsa.pub.
-
Provide the above SSH public key to your Azure account. For more information, see Provide an SSH Public Key.
IMPORTANT:You can connect to and manage your virtual machines only using the SSH private key. Therefore, do not lose the SSH private key.
Creating and Deploying Virtual Machines
Create and launch your virtual machines (VM) on one of the supported platforms. For more information on how to create and launch VMs, see Create and Launch Your Linux Virtual Machine. As a part of creating and launching the instances, you must also perform the following steps:
-
Associate eDirectory_NSG_1 with the VMs where the first eDirectory server will be configured, eDirectory_NSG_2 with the VM where all other eDirectory servers will be configured and iManager_NSG with the VM where iManager will be configured. For more information about security groups, see Configuring Network Security Groups for Virtual Machine.
-
Associate the public key created in section Creating a SSH Key Pair with your instances.
NOTE:When multiple Availability Zones are available for the selected Azure Location, the replica servers should not be deployed in the same Availability Zone as the master eDirectory server.
Configuring Data Disk for Storing eDirectory Data
Configuring data disk is required to prevent loss of eDirectory data and configuration in case of Azure vm crash. For more information on recovering eDirectory data and configuration, see Disaster Recovery. After creating the VM, perform the following steps to prepare the VM for deploying eDirectory:
-
Create and attach a data disk, perform the steps in Use the portal to attach a data disk to a Linux VM.
-
Login to the VM, format the data disk with ext4 file system and mount the data disk. For more information on how to format and mount the data disk, see Connect to the Linux VM to mount the new disk.
-
Bind mount directories from the data disk to eDirectory data/NICI data directories. Perform the following steps as root user to bind mount:
-
Create eDirectory data directory by using the following command:
mkdir <mount_point>/eDirectory_data
-
Create NICI data directory by using the following command:
mkdir <mount_point>/nici_data
-
Create NICI and eDirectory configuration directories by using the following command:
mkdir <mount_point>/eDirectory_nici_conf
-
Create required directories for eDirectory by using the following commands:
mkdir --parents /var/opt/novell/eDirectory
mkdir –-parents /var/opt/novell/nici
mkdir –-parents /etc/opt/novell/eDirectory
-
To bind mount the directories, add the following to /etc/fstab:
<mount_point>/eDirectory_data /var/opt/novell/eDirectory none defaults,bind 0 0
<mount_point>/nici_data /var/opt/novell/nici none defaults,bind 0 0
<mount_point>/eDirectory_nici_conf /etc/opt/novell/eDirectory none defaults,bind 0 0
NOTE:All operations in the VM should be performed as a root user.
-
Installing eDirectory and iManager
Prerequisites
-
Ensure that you meet the requirements listed in System Requirements.
-
Create security groups as mentioned in Configuring Network Security Groups for Virtual Machine.
-
Proxy VM should be hardened and secured server. SSH private key required for accessing VMs in the backend subnet and the Proxy VM, should not be stored in the VNet but on the client only. Choose a VM size that provides good performance and memory for this instance.
-
Create an additional network interface for the Proxy VM and assign a static public IP address to that interface.
-
Configure VNC server in the Proxy VM. VNC server should be hardened with a password of good strength. Connect to the VNC server through an SSH tunnel to allow secured communication. VNC server should be configured to listen only for connections from localhost. Disable screen lock to avoid session lockout. After using the VNC server, you should terminate the session.
-
Update the /etc/hosts file of VMs manually with IP-Address Full-Qualified-Hostname Short-Hostname entry. This is to work around the limitation with Azure to perform a reverse DNS lookup.
-
Connect to the VM in the backend subnet where eDirectory/iManager will be configured using SSH proxy:
ssh -i edir_key.pem -A -J azureuser@<ssh_proxy_ip> azureuser@<instance_private_ip>
NOTE:
-
in above sample commands, edir_key.pem is a sample file name containing the server key.
-
You can also add the identity file in the agent using the SSH-Add command to avoid using identity file every time you login.
To view the private IP address of a VM, click > [instance] > .
-
-
Configure an SLP Directory Agent (DA) server in a VM in the Backend subnet. Open port 427 in the inbound rule of NSG for the VM where SLP DA is deployed. Enable DA operation by editing the slp.conf file. For more information, see Configuring OpenSLP for eDirectory in the NetIQ eDirectory Administration Guide.
Installation and Configuration Procedure
This section explains the step by step instructions to install and configure eDirectory and iManager in an Azure environment. Once eDirectory is installed, you should ensure that the following conditions are met:
-
EBA is enabled
-
SNMP is disabled
-
eDirectory is not listening on port 389
-
LDAP and HTTP services are configured to use ECDSA certificates only
-
Access to the SSH port of the Azure VMs in the backend subnet should be disabled when not in use
-
Disable iMonitor, eMBox and DHost modules to provide additional security. After disabling them, all activities involving these modules should be performed using NDS utilities only.
Installing & Configuring eDirectory
-
Copy the eDirectory_<version>_Linux_x86_64.tar.gz file using Secure Copy (scp) to the VM in the backend subnet where eDirectory will be configured using SSH proxy:
scp -i <keyname> -o ProxyJump=vm-user@<ssh_proxy_ip> eDirectory_<version>_Linux_x86_64.tar.gz vm-user@<instance_ip>:/<directory> -
Install eDirectory. For more information, see Using the nds-install Utility to Install eDirectory Components.
-
Configure eDirectory. For more information, see Using the ndsconfig Utility to Add or Remove the eDirectory Replica Server. For example, here’s a sample command for installing and configuring eDirectory:
ndsconfig new [-t <tree_name>] [-n <server context>] -a <admin FDN> [-w <admin password>] -P ldaps://<instance_ip> --configure-eba-now yes -
Install openslp-server and start the SLPD service.
Installing & Configuring iManager
Using the iManager administrative console, you can manage the eDirectory operations on your Azure environment. iManager should be installed on your Azure VM after installing eDirectory.
-
Copy the iMan_<version>_linux_x86_64.tgz file using Secure Copy (scp) to the instance in the backend subnet where iManager will be configured using SSH proxy:
scp -i <keyname> -o ProxyJump=vm-user@<ssh_proxy_ip> iMan_<version>_linux_x86_64.tgz vm-user@<instance_ip>:/<directory> -
Install and configure iManager. For more information, see Installing iManager Server on Linux. Before installing iManager, see the system requirements in System Requirements section in the iManager Installation Guide.
-
Download the EBA CA certificate on the VM where iManager is running. For more information, see Managing the EBA CA by Using iManager in the NetIQ eDirectory Administration Guide.
-
Replace the Self-Signed certificates in the VM running iManager with a secure CA signed certificates. For more information, see Replacing the Temporary Self-Signed Certificates for iManager.
NOTE:Ensure to configure the iManager server to use ECDSA certificates only. After installing iManager, specify an authorized user and the appropriate eDirectory tree name that this user will manage.
Launching iManager
Perform the following steps to launch iManager:
-
Connect to the VNC server running on localhost of Proxy VM through SSH tunnel.
-
Install and launch a browser in the same instance.
-
Launch and connect to the eDirectory tree using the IP address or the tree name.
Post-Configuration Tasks
-
To check if EBA is enabled, see Viewing Information About EBA in the NetIQ eDirectory Administration Guide.
-
Enable Suite B on Certificate Server. For more information, see Enabling Suite B on the Certificate Serverin the NetIQ eDirectory Administration Guide.
-
Configure AES 256-bit tree key for the first eDirectory server. For more information, see Creating an AES 256-Bit Tree Key in the NICI Administration Guide.
-
Delete the CRL distribution points in the first eDirectory server. As non-secured LDAP access over port 389 is disabled on all eDirectory servers, the CRL for the tree CA should be available for download over HTTP only. Perform the following steps to delete the CRL distribution points:
-
Login to iManager as Administrator.
-
Go to > > .
-
Click .
-
Click . Select and delete all except the HTTP CRL Distribution Point (http://<instance_ip>:8028/crl/one.crl).
-
Click and then click .
-
Click . Select and delete all except the HTTP CRL Distribution Point (http://<instance_ip>:8028/crl/oneec.crl).
-
Click and then click .
-
-
Repair the server’s default certificates using the iManager certificate server plug-in. To repair the default certificates, perform the following steps:
-
Login to iManager as Administrator.
-
Go to > > .
-
Select the server(s) which owns the certificates and click .
-
Select and click .
-
Review the tasks to be performed and select .
-
-
Configure LDAP and HTTP services to use ECDSA Certificates and Suite B ciphers. For more information, see Configuring LDAP and HTTP Services to Use ECDSA Certificates and Suite B Ciphers in the NetIQ eDirectory Administration Guide. Once done, restart eDirectory.
-
For more information to check if SNMP sub-agent is unloaded, see Loading and Unloading the SNMP Server Module in the NetIQ eDirectory Administration Guide.
-
Ensure that eDirectory is not listening on port 389.
-
Disable iMonitor, eMBox, DHost and HTTP stack.
-
Perform the following steps to disable iMonitor, eMBox and DHost in the eDirectory server hosting the tree CA:
-
Edit the ndsmodules.conf file by commenting hconserv, imon and embox.
-
Restart eDirectory.
-
-
Perform the following steps to disable the HTTP stack in the eDirectory replica servers:
-
Edit the ndsmodules.conf file by commenting httpstk, hconserv, imon and embox.
-
Restart eDirectory.
NOTE:httpstk should be placed above nds in the ndsmodules.conf file before commenting. This stops nds module from enabling HTTP stack.
-
-
-
Configure SLP to force eDirectory to use unicast as advertising method. Edit the slp.conf file by providing the IP address of the DA server in the Backend subnet. For more information, see Configuration Parameters in the NetIQ eDirectory Administration Guide.
NOTE:Once all eDirectory VMs and iManager have been configured, configure the security rules of the Azure backend subnet to deny access to the SSH port and allow it only when required.
Deploying Auditing Services
You can deploy the Common Event Format (CEF) auditing service on Azure to audit various eDirectory events. Perform the following steps to deploy CEF auditing services:
-
Install an auditing server in the VNet.
-
Configure the auditing server to listen on a port
NOTE:We recommend you to use Sentinel as your auditing server.
-
Create a new network security group rule in the front end subnet with the following configuration and associate with the VM where the audit server is running:
Name
Port
Source
Destination
Description
Auditing Server Port
TCP (Auditing server port)
Backend subnet
Auditing server IP
Allows receiving events from eDirectory servers
-
Update the following in /etc/opt/novell/eDirectory/conf/auditlogconfig.properties file on all the eDirectory instances:
log4j.appender.S.Host=<Auditing server ip>
log4j.appender.S.Port=<auditing server port>
-
Enable the corresponding CEF events from iManager. For more information, see Configuring the CEF Events for Auditing. Enabled events will be forwarded to the auditing server.
Disaster Recovery
Disaster recovery is performed in case of a VM crash where eDirectory was running. Perform the following steps for disaster recovery:
-
Stop the VM which has crashed and dissociate the data disk from it. For more information, see How to detach a data disk from a Linux virtual machine.
-
Configure a new VM with the same operating system as the VM which has crashed.
-
Install the same version of eDirectory in the new VM.
-
Attach the data disk to the new VM and mount the file system. For more information, see Use the portal to attach a data disk to a Linux VM.
-
Bind mount the directories.
To bind mount the directories, update the following in /etc/fstab:
<mount_point>/eDirectory_data /var/opt/novell/eDirectory none defaults,bind 0 0
<mount_point>/nici_data /var/opt/novell/nici none defaults,bind 0 0
<mount_point>/eDirectory_nici_conf /etc/opt/novell/eDirectory none defaults,bind 0 0
-
Change the IP address in /etc/opt/novell/eDirectory/conf/nds.conf to current VM IP address.
-
Upgrade eDirectory skipping health check. For more information, see Upgrading eDirectoryin the NetIQ eDirectory Installation Guide.
-
Repair the network addresses using ndsrepair utility. For more information, see DSRepair Options in the NetIQ eDirectory Administration Guide.
-
Modify the CRL distribution point IP address if the tree CA IP address is changed. For more information on how to change the IP address, see Viewing and Modifying a CRL Configuration Object's Properties in the NetIQ eDirectory Administration Guide.
-
Repair the server’s default certificates using the iManager certificate server plug-in. To repair the default certificates, perform the following steps:
-
Login to iManager as Administrator.
-
Go to > > .
-
Select the server(s) which owns the certificates and click .
-
Select and click .
-
Review the tasks to be performed and select .
-
-
Configure LDAP and HTTP services to use new ECDSA Certificates.