6.1 Configuring Cloud Security Service Connectors for Cloud Manager
NetIQ Cloud Security Service is a Web-based identity and access management gateway that acts as a trusted identity broker between your NetIQ Cloud Manager installation being used as a cloud service provider and the various LDAP infrastructures you might have in place to support and manage your customer's authentication.
Through NCSS Connectors that you configure, your customers can seamlessly become users of Cloud Manager and are enabled to use their accustomed credentials to log in to Cloud Manager with limited access to services specific to their organizations. NCSS and Cloud Manager work in unison to provide this multi-tenant environment where information is separated, secured, and protected. There are four NCSS connectors that you need to configure:
-
Section 6.1.1, Creating and Configuring an NCSS Connector for the Cloud Manager Application Console
-
Section 6.1.2, Creating and Configuring an NCSS Connector for the Cloud Manager API
-
Section 6.1.3, Creating and Configuring an NCSS Connector for the Cloud Manager Tasks API
-
Section 6.1.4, Creating and Configuring an NCSS Connector for the Cloud Manager App Services API
The content in this section is not intended as a comprehensive guide to NCSS. You should have already installed NCSS and you should be familiar with its capabilities so that you understand the context of this section. For more complete information about NetIQ Cloud Security Service, see the Cloud Security Service documentation Web site.
6.1.1 Creating and Configuring an NCSS Connector for the Cloud Manager Application Console
This section includes information about creating and configuring the NCSS connector for the Cloud Manager Application Console.
Adding a Connector for the Cloud Manager Application Console
Use the steps in this section is to add a surface connector in NCSS that interacts with Cloud Manager Application Console user interface. Before you follow these steps to configure a connector, make sure that Cloud Manager is running and configured for an NCSS or an LDAP plus NCSS authentication.
-
Log in to the NCSS Provider Console and open the Home page. For more information about logging in to the console, see “Logging in to the Provider Console” in the NetIQ Cloud Security Service 1.5 Provider Administration Guide.
-
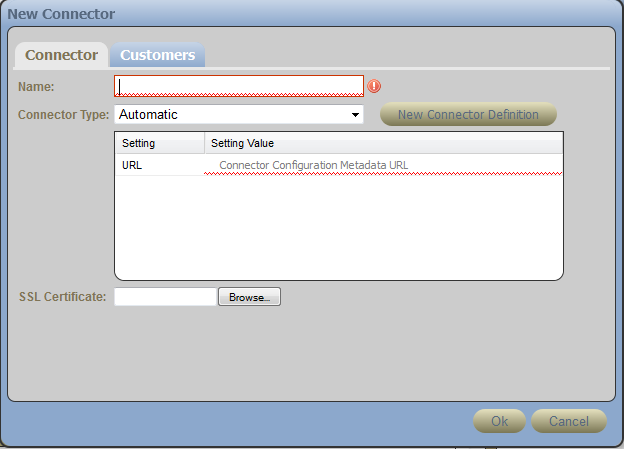
In the Connector panel, click .
-
In the field, specify a name for this connector, identifying it as a connector to the Cloud Manager Application Console.
-
In the field, select .
-
In the field, specify the full DNS name of your Cloud Manager Application Server, followed by the SSL port number, followed by /config. For example:
https://netiq-office.dnsdhcp.city.netiq.com:8183/config
-
In the field, click , then browse to and select the certificate you created for the Cloud Manager Application Server. This certificate must be in DER format for NCSS, so you might need to create another copy converted from PEM format.
-
Click to create the new connector.
An error message similar to the following might be displayed:
Error Adding Connector, reason: ProxyException starting new Automatic connector
9c31b250-0ea6-4f88-98ac-9ab22f0df391; cause:
com.sun.jersey.api.client.ClientHandlerException:
javax.net.ssl.SSLHandshakeException: com.ibm.jsse2.util.g:
PKIX path building failed: java.security.cert.CertPathBuilderException: unable to find valid certification path to requested target.
The error displays for several minutes in the NCSS console before the connector eventually starts (that is, its icon changes from red to green). You can ignore the message content.
-
Continue with Adding Customers to the Cloud Manager Application Console Connector.
Adding Customers to the Cloud Manager Application Console Connector
After you have created the connector to the Cloud Manager Application Console, you need to establish which NCSS customers can access the Application Console.
-
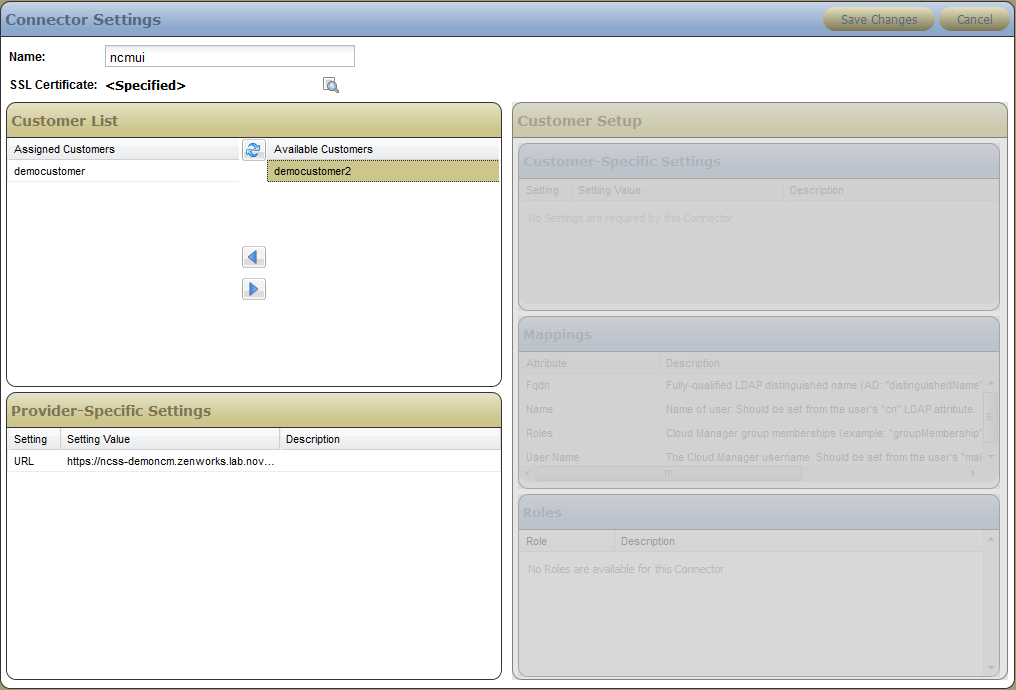
On the page of the NCSS provider console, select the active (green) icon of the connector that you created in Adding a Connector for the Cloud Manager Application Console to display the Connectors page of the console.
-
On the panel of the page, click to enable the edit mode for the subpanel.
-
Allow a customer access to the connector:
-
In the list, select the customer.
-
Click the arrow icon to move the customer from the list to the list.
-
-
Click .
-
Continue with Configuring the Application Console Connector as a Customer.
Configuring the Application Console Connector as a Customer
Cloud Manager requires that you map a customer’s LDAP attributes to attributes defined within NCSS. This is necessary because eDirectory and Active Directory define their attributes in different ways. Without a common mapping, these divergent methods can cause problems for the Cloud Manager system. NCSS lets you map these attributes to a single, common set of definitions. This mapping is usually performed by the customer in the customer login view of NCSS, or you can do it as the NCSS provider administrator.
-
Log in to the NCSS console to open the Customers page. For more information, see “Logging in to the Customer Console” in the NetIQ Cloud Security Service 1.5 Customer Administration Guide or “Logging in to the Provider Console” in the NetIQ Cloud Security Service 1.5 Provider Administration Guide.
-
(Conditional) If you log in to NCSS as a provider, you must select a customer in the panel of the Customers page. You must change the settings of the customer who will be logging in to the Cloud Manager Application Console.
-
In the panel of the Connectors page, make sure that the connector name of the Cloud Manager Application Console connector you created in Adding a Connector for the Cloud Manager Application Console is selected.
-
In the panel of the Connectors page, click .
-
Map the attributes for the connector according to the LDAP source (eDirectory or Active Directory) you are using:
-
Click the tab to open the required mappings table.
-
Select the or column for each attribute. As you browse your LDAP source, consult the information in column to give you guidance, specify the values for each attribute, then click .
-
FQDN: Specify the fully-qualified LDAP distinguished name. In Active Directory, the value is the distinguishedName LDAP attribute. In eDirectory version 8.8.3 and later, the value is the entryDN LDAP attribute.
-
Name: Specify the name of this user. Obtain the value from the user’s cn LDAP attribute.
-
Roles: Specify this user’s group memberships in Cloud Manager. In eDirectory, this value is the groupMembership LDAP attribute. In Active Directory, this is the memberOf LDAP attribute.
-
User Name: Specify the Cloud Manager user name. Obtain the value from the user’s mail attribute in his or her LDAP entry.
-
-
In the panel, click .
-
-
Select from the toolbar to open the panel, then click to send the mappings to the NCSS Secure Bridge.
-
Continue with Section 6.1.2, Creating and Configuring an NCSS Connector for the Cloud Manager API.
6.1.2 Creating and Configuring an NCSS Connector for the Cloud Manager API
To create and configure an NCSS connector for the Cloud Manager API, follow the steps in Section 6.1.1, Creating and Configuring an NCSS Connector for the Cloud Manager Application Console that you used to create the connector (including its unique name), associating users to the connector, and configuring the connector as a customer.
The unique difference in creating a connector for the Cloud Manager API occurs in Step 5 of the procedure, when you specify the full DNS name of your Cloud Manager Application Server in the field. For the API connector, use this syntax:
https://<ncm_server_address>:<port_if_needed>/cloudmanager-api/config
An actual URL might look like this:
https://netiq-office.dnsdhcp.city.netiq.com:8183/cloudmanager-api/config
When you have completed this process, continue with Section 6.1.3, Creating and Configuring an NCSS Connector for the Cloud Manager Tasks API.
6.1.3 Creating and Configuring an NCSS Connector for the Cloud Manager Tasks API
To create and configure an NCSS connector for the Cloud Manager Tasks API, follow the steps in Section 6.1.1, Creating and Configuring an NCSS Connector for the Cloud Manager Application Console that you used to create the connector (including its unique name), associating users to the connector, and configuring the connector as a customer.
The unique difference in creating a connector for the Cloud Manager Tasks API occurs in Step 5 of the procedure, when you specify the full DNS name of your Cloud Manager Application Server in the field. For the Tasks API connector, use this syntax:
https://<ncm_server_address>:<port_if_needed>/tasks-api/config
An actual URL might look like this:
https://netiq-office.dnsdhcp.city.netiq.com:8183/tasks-api/config
When you have completed this process, continue with Section 6.1.4, Creating and Configuring an NCSS Connector for the Cloud Manager App Services API.
6.1.4 Creating and Configuring an NCSS Connector for the Cloud Manager App Services API
To create and configure an NCSS connector for the Cloud Manager App Services API, follow the steps in Section 6.1.1, Creating and Configuring an NCSS Connector for the Cloud Manager Application Console that you used to create the connector (including its unique name), associating users to the connector, and configuring the connector as a customer.
The unique difference in creating a connector for the Cloud Manager App Services API occurs in Step 5 of the procedure, when you specify the full DNS name of your Cloud Manager Application Server in the field. For the App Services API connector, use this syntax:
/app-services-api/config
So an actual URL might look like this:
https://netiq-office.dnsdhcp.city.netiq.com:8183/app-services-api/config