3.2 Configuring Optional Settings

The following table describes the optional settings that you can do for Windows Client.

Setting

Description

disable_1N: true

To disable the automatic detection of username for Card and PKI methods. For more information, see Disabling 1:N

disable_local_accounts: true

In a non-domain mode, it is recommended to disable the local accounts. For more information, see Disabling the Local Accounts.

tenant_name

If you use Multitenancy, you must point Windows Client to a specific tenant. For more information, see Configuration Settings for Multitenancy.

event_name: <CustomEventName>

If you want to use DNS and non-domain based machines, you can use a custom event for the specific machines. For more information, see Selecting an Event.

card.timeout: X

To change a default Card waiting timeout. For more information, see Configuring Timeout for Card Waiting.

card.fail_on_timeout: true

To configure the login failure after the Card waiting timeout. For more information, see Enabling Login Failure After Card Timeout.

u2f.timeout: X

To configure the timeout for authentication with the U2F token. For more information, see Configuring Timeout for the U2F Authentication.

logo_path: C:\\dir\\filename.png

To customize a logo for Windows Client. For more information, see Customizing a Logo.

verifyServerCertificate: true

To configure the verification of server certificates for LDAP connection. For more information, see Configuring to Verify Server Certificates.

forceCachedLogon: true

To configure the cached login for client unlock. For more information, see Configuring the Enforced Cached Login.

sso_aaf_required: true

To configure single sign-on for Citrix and Remote Desktop. For more information, see Configuring Single Sign-on Support for Citrix and Remote Desktop.

select_terminal_client_user: true

To configure settings for a saved Remote Desktop session (.rdp file). For more information, see Configuring Settings for a Saved Remote Desktop Connection.

endpoint_name

To edit the name of an endpoint. For more information, see Changing an Endpoint Name.

authentication_agent_enabled = true

To enable Authentication Agent chain in the Windows Client. For more information, see Configuring to Enable the Authentication Agent Chain.

  • credprov_chaining_clsid

  • credprov_chaining_enabled

  • credprov_chaining_password_field

  • credprov_chaining_username_field

To integrate Advanced Authentication with the Sophos SafeGuard. For more information, see Configuring Integration with Sophos SafeGuard 8.

  • credprov_chaining_clsid

  • credprov_chaining_enabled

  • credprov_chaining_dump_fields

  • credprov_chaining_password_field

  • credprov_chaining_username_field

To configure the credential provider chaining. For more information, see Configuring the Credential Provider Chaining.

allowUnknownUserOfflineCredUI: true

To allow local users to log in to the remote desktop through offline mode. For more information, see Enabling Non-Enrolled Users to Log In to Remote Desktop and User Account Control through Offline Mode.

enableLinkedChainsOffline: false

To disable linked chains for offline login. For more information, see Disabling Linked Chains for Offline Login.

enable_last_chain_selection: false

To auto-select the last authenticated chain for login. For more information, see Enabling Last Logged In Authentication Chain for Login.

sso_flex_enabled: true

To enable flexible sign-on to skip LDAP password in authentication chain during Citrix or RDP login. For more information, see Enabling Flexible Sign-on for Citrix VDI or Remote Desktop Login

offline.port:<port number>

To configure the port that manages the Windows Client Cache Service. For more information, see “Configuring the Port for Windows Client Cache Service”.

provider.AuthenticationProtocol: value

To configure the authentication protocol that the Local Security Authority applies during Windows OS logon. For more information, see “Configuring the Authentication Protocol”.

show_copyright: false

To disable the copyright information on the login screen. For more information, see Hiding the Copyright Information.

rest_profiling: true

To enable the profiling tool that helps in analyzing the performance and CPU utilization of different programs. For more information, see Enabling the Profiling Tool.

allowedProviders: {classID of provider}

To configure the primary or third-party credential providers in Windows workstation that verify users’ identity during the logon process and grant access. For more information, see Enabling the Third-Party Credential Provider.

tlsVersion: value

To configure the TLS version that the network library of the Windows Client uses for establishing HTTPS connection with the Advanced Authentication server. For more information, see Configuring the TLS Version.

You can configure the following settings in the registry:

You can change the system locale for Windows Client with the setting, Changing the Locale for Windows Client.

You can localize the Advanced Authentication resources for your language with the instructions, Localizing the Messages for Clients

3.2.1 Disabling 1:N

You can disable the 1:N feature that allows you to detect the user name automatically while authenticating with the Card and PKI methods.

To disable the 1:N feature, perform the following steps:

  1. Open the file C:\Program Data\NetIQ\Windows Client\config.properties. If the file does not exist, create a new file.

  2. Add the line disable_1N: true to the config.properties file.

  3. Save the config.properties file and restart the Windows operating system.

3.2.2 Disabling the Local Accounts

It is recommended to disable local accounts for the non-domain mode to ensure security.

To disable the local accounts, perform the following steps:

  1. Open the file C:\Program Data\NetIQ\Windows Client\config.properties. If the file does not exist, create a new file.

  2. Add a parameter disable_local_accounts: true to the config.properties file.

If you do not disable the local accounts for a non-domain mode, it is possible to unlock the operating system and change the password using a local account with password authentication (one factor). This can lead to security issues.

3.2.3 Configuration Settings for Multitenancy

If the Multi-tenancy option is enabled, you must add the parameter tenant_name with a tenant name as the value in the configuration file: C:\ProgramData\NetIQ\Windows Client\config.properties.

For example, specify tenant_name=TOP for the top tenant in the file. If the configuration file does not exist, you must create it.

NOTE:If you do not add the parameter tenant_name, you might get an error Tenant not found.

3.2.4 Selecting an Event

By default, Windows Client uses the Windows logon event for authentication. However, in some scenarios you must create a separate custom event. For example, when the predefined event is used for DNS based workstations, you can create a custom event with the type as Generic for the non-domain based workstations. You must point these non-domain based workstations to the custom event using the event_name: <CustomEventName> parameter in the configuration file:

C:\ProgramData\NetIQ\Windows Client\config.properties

3.2.5 Configuring Timeout for Card Waiting

You can configure the time for which the card waiting dialog is displayed, when the user authenticates using the card method. If the user does not present the card for the specified timeout period, the Hardware timeout message is displayed and the card waiting dialog is closed. The user login selection screen is displayed.

By default, the card timeout is 60 seconds.

To configure the timeout for card waiting, perform the following steps:

  1. Open the configuration file C:\ProgramData\NetIQ\Windows Client\config.properties. If the file does not exist, create a new file.

  2. Specify card.timeout: X in the config.properties file. X is the timeout value in seconds.

  3. Save the configuration file.

  4. Restart the Windows operating system.

3.2.6 Configuring Timeout for the U2F Authentication

You can configure the timeout for which the authentication fails when the U2F token is not touched for authentication. The default value for the timeout is 60 seconds after which the authentication fails.

To configure the timeout for U2F authentication, perform the following steps:

  1. Open the configuration file C:\ProgramData\NetIQ\Windows Client\config.properties.

    If the file does not exist, create a new file.

  2. Specify u2f.timeout: X in the config.properties file. X is the timeout value in seconds.

  3. Save the configuration file.

  4. Restart the operating system.

3.2.7 Enabling Login Failure After Card Timeout

By default, the card timeout is not considered as a login failure. However, you can configure the card timeout as a login failure.

To enable login failure during card timeout, perform the following steps:

  1. Open the file C:\ProgramData\NetIQ\Windows Client\config.properties. If the file does not exist, create a new file.

  2. Specify card.fail_on_timeout: true in the config.properties file.

  3. Save the configuration file.

  4. Restart the Windows operating system.

3.2.8 Configuring Automatic Login

To enable the Windows operating system to perform an automatic login, perform the following steps:

  1. Go to HKLM\Software\Microsoft\Windows NT\CurrentVersion\Winlogon.

  2. In the registry key, it is mandatory to set the following parameters:

    • DefaultDomain

    • DefaultPassword

    • DefaultUserName

For more information about how to enable automatic login on Windows, see the Microsoft Support link.

3.2.10 Configuring to Verify Server Certificates

This option allows you to ensure a secure connection between a workstation and Advanced Authentication servers with a valid self-signed SSL certificate. This helps to prevent attacks on the connection and ensure safe authentication.

The option for verification of server certificates is disabled by default. You must import the trusted certificates to the Local Computer\Trusted Root Certification Authorities folder.

To enable verification of the server certificates, perform the following steps:

  1. Open the configuration file C:\ProgramData\NetIQ\Windows Client\config.properties.

    If the file does not exist, create a new file.

  2. Specify verifyServerCertificate: true (default value is false) in the config.properties file.

  3. Restart the Windows operating system.

NOTE:You must upload the SSL certificate in the Administration portal > Server Options. The SSL certificate provides high level of encryption, security, and trust. For more information about how to upload the SSL certificate, see Uploading the SSL Certificate.

3.2.11 Configuring the Enforced Cached Login

When the network connection is slow or unstable, the client login or unlock process can take several minutes. A solution to this is to enforce the cached login. The Client connects to Advanced Authentication server to validate the credentials in the background after the cached login. By default, the enforced cached login is not used and the Client will always try to connect to Advanced Authentication server to validate the credentials.

Perform the following steps to allow users to use the enforced cached login:

  1. Open the configuration file \ProgramData\NetIQ\Windows Client\config.properties. If the file does not exist, create a new file.

  2. Specify forceCachedLogon: true (default value is false) in the config.properties file.

  3. Save the configuration file.

  4. Restart the Windows operating system.

Following are different behavior of the Cache Service:

  • If a user account is marked as disabled, expired, or locked in the local cache, the Cache Service tries to switch online and based on the server status one of the following occurs:

    • When the Advanced Authentication server is available, the user is allowed to log in once. During the subsequent login, after selecting a chain and before providing credentials, an error message that states the account being disabled is displayed.

    • When the Advanced Authentication server is unavailable, the user can log in once. During the subsequent login, an error message is displayed after submitting the credentials.

  • If a user account is not marked as disabled, expired, or locked in the local cache, the Cache Service processes the login request and updates the user data in background.

3.2.12 Configuring Single Sign-on Support for Citrix and Remote Desktop

You can configure the Windows Client to use the Single Sign-on (SSO) feature for establishing a connection to a Citrix and a Remote Desktop server. Therefore, when the users are authenticated to the Windows domain, they are not prompted for credentials to connect to the terminal servers such as Citrix StoreFront and Remote Desktop Connection. This prevents users from specifying the credentials again when they login to terminal servers (remote machine to which the user is connecting from the Terminal Client) such as Remote Desktop or Citrix StoreFront, after they have performed the authentication to Microsoft Windows. To achieve this, you must install the Advanced Authentication Windows Client on the terminal server.

NOTE:When SSO for Remote Desktop is enabled, the Interactive logon: Smart card removal behavior policy is ignored. You need to disable SSO to make this policy to work.

Default value of SSO parameters is specific to the version of Advanced Authentication Windows Client, therefore refer one of the following sections as per your requirement:

For Advanced Authentication 6.3 to 6.3 Service Pack 4

The SSO feature is enabled by default for accessing the terminal servers. By default, SSO feature works irrespective of the Advanced Authentication Windows Client installation on the terminal client (user workstation on which the terminal connection is initiated).

To enable SSO only when the Advanced Authentication Windows Client is installed on the terminal client, perform the following steps on the terminal server:

  1. Open the config.properties at C:\ProgramData\NetIQ\Windows Client path.

    If the file does not exist, create a new file.

  2. In the config.properties file, specify sso_aaf_required: true (default value is false).

  3. Save the configuration file.

  4. Restart the Windows operating system.

To disable the SSO feature, perform the following steps on the terminal server:

  1. Open the config.properties at C:\ProgramData\NetIQ\Windows Client path.

    If the file does not exist, create a new file.

  2. Specify sso_logon_enabled: false (default value is true).

  3. Save the configuration file.

  4. Restart the Windows operating system.

For Advanced Authentication 6.3 Service Pack 4 Patch 1 and Later Versions

The SSO feature is disabled by default for accessing the terminal servers. To enable the SSO feature, perform the following steps on the terminal server:

  1. Open the config.properties at C:\ProgramData\NetIQ\Windows Client path.

    If the file does not exist, create a new file.

  2. Specify sso_logon_enabled: true (default value is false).

  3. Save the changes.

  4. Restart the Windows operating system.

If you have enabled the SSO, by default it will work only when you have the Advanced Authentication Windows Client installed on the terminal client. To disable SSO irrespective of the Advanced Authentication Windows Client installation of the terminal client, perform the following steps on the terminal server:

  1. Open the config.properties at C:\ProgramData\NetIQ\Windows Client path.

    If the file does not exist, create a new file.

  2. In the config.properties file, specify sso_aaf_required: false (default value is true).

  3. Save the changes.

  4. Restart the Windows operating system.

3.2.13 Configuring Settings for a Saved Remote Desktop Connection

This setting allows you to accomplish the following for a saved Remote Desktop Connection for a remote login.

  • If select_terminal_client_user: true, users cannot change their credentials while logging in.

  • If select_terminal_client_user: false, users can change their credentials while logging in.

NOTE:Advanced Authentication must be installed both on the terminal client and the terminal server.

To configure this setting, perform the following steps:

  1. Open the configuration file C:\ProgramData\NetIQ\Windows Client\config.properties. If the file does not exist, create a new file.

  2. Specify select_terminal_client_user: true in the config.properties file. The default value is true.

    Users will be not be able to edit the login credentials of the saved Remote Desktop connection on the Advanced Authentication Credential Provider.

  3. Save the configuration file.

  4. Restart the Windows operating system.

If you set select_terminal_client_user: false, users will be able to edit the login credentials of the saved Remote Desktop connection on the Advanced Authentication Credential Provider.

3.2.14 Changing an Endpoint Name

You can edit the name of an endpoint based on your requirement.

To change an endpoint name, perform the following steps:

  1. Open the configuration file C:\ProgramData\NetIQ\Windows Client\config.properties. If the file does not exist, create a new file.

  2. Specify endpoint_name: <endpoint name> in the config.properties file. For example, endpoint name can be computer 1.

  3. Save the configuration file.

  4. Restart the Windows operating system.

3.2.15 Configuring to Enable the Authentication Agent Chain

NOTE:The authentication_agent_enabled parameter is valid for Advanced Authentication 6.3 SP4 and prior versions. This parameter is not required from Advanced Authentication 6.3 SP5.

The Authentication Agent allows you to authenticate on one computer where all the devices required for authentication are connected. This helps to get authorized access to another computer or z/OS mainframe, where one of the following condition is true:

  • It is not possible to redirect the authentication devices.

  • It does not support devices that are used for authentication.

The Authentication Agent can be installed only on the Windows computer.

You must select Authentication Agent in the Chains list of Windows Client to initiate the authentication process on another Windows computer where the Authentication Agent is installed.

To enable the Authentication Agent chain on the Windows Client, perform the following steps:

  1. Navigate to C:\ProgramData\NetIQ\Windows Client path and open the file config.properties.

    If the configuration file does not exist, you must create it.

  2. Specify authentication_agent_enabled = true in the configuration file.

  3. Click Save.

  4. Restart your computer.

An Example of Using the Authentication Agent

This scenario describes how you can perform authentication on one Windows computer and auto-sign in to another Windows computer using the Authentication Agent.

Thomas uses two Windows computers simultaneously. However, the devices required for authentication such as FIDO U2F token and card reader are connected to one Windows computer. He cannot get authenticated to the other computer because there are no authentication devices connected to this computer and cannot redirect the devices. In this case, Thomas can use Authentication Agent to perform authentication on one Windows computer and get seamless access to another Windows computer without the authentication devices.

Consider the following setup:

  • Windows A is a computer with the Authentication Agent installed and is connected with the devices used for authentication such as FIDO U2F token and card reader.

  • Windows B is computer without the authentication devices and the Authentication Agent chain is enabled using the config.properties file.

The following sequence describes the authentication process using the Authentication Agent:

  1. Specify user name and select the Authentication Agent chain in Windows B computer.

  2. The Authentication Agent on Windows A computer launches a restricted browser.

  3. Select the preferred chain to log in to Windows B in the restricted browser.

  4. Perform the authentication using the FIDO U2F token and card reader in the restricted browser.

    Thomas is logged in to Windows B computer automatically.

3.2.16 Changing the Locale for Windows Client

This option allows you to change the locale of Windows Client. By default, Windows Client uses the locale of the Windows operating system.

To change the locale of Windows Client on Windows 10, perform the following steps:

  1. Specify Settings in the Search space.

  2. Open the Settings window.

  3. Click the Language tab.

  4. Click Administrative language settings in Related settings.

  5. Click Change system locale in the Administrative tab.

  6. Select the language from the Current system locale list.

  7. Click OK.

  8. A restart is recommended to apply the changes. Click Restart now.

You can change the locale of Windows Client without changing the locale of the operating system. For example, if the default language of your operating system is English, you can configure Windows Client to display the messages and warnings in German.

If you need to change the locale of the Windows Client but not the locale of the operating system, perform the following steps:

  1. Open the configuration file C:\ProgramData\NetIQ\Windows Client\config.properties.

  2. Specify the following parameter:

    locale: ISO code of the preferred language.

    NOTE:While changing the locale, keep the following points in mind:

    • The code of the language should be in lower case.

    • If the ISO standard name contains any special character such as hyphen or period, replace the special character with an underscore.

      For example, if the ISO code is fr.ca, then the value should be fr_ca.

    NOTE:By default, no value is specified. If no parameter is specified in the configuration file, operating system’s default locale will be picked.

  3. Save the config.properties file and restart the operating system.

3.2.17 Configuring the Credential Provider Chaining

This option allows you to integrate Advanced Authentication with any other credential provider in Windows Client. Therefore, when users are authenticated to Windows Client, they are not prompted for credentials to connect to other credential provider installed in the workstation.

To integrate Advanced Authentication with other credential provider, perform the following steps:

  1. Enable the debug logs for Windows Client.

    For more information about debugging the logs of Windows Client, see Debugging Logs for Advanced Authentication.

  2. Navigate to the path HKEY_LOCAL_MACHINE\SOFTWARE\Microsoft\Windows\CurrentVersion\Authentication\Credential Providers\ and search for the CLSID of the preferred credential provider with which you want to integrate Advanced Authentication.

    Ensure to copy the CLSID for further use.

  3. Navigate to the path C:\ProgramData\NetIQ\Windows Client\ and open the file config.properties.

  4. Specify the following parameters in the configuration file:

    • credprov_chaining_clsid: <CLSID>

    • credprov_chaining_enabled: True

    • credprov_chaining_dump_fields: True

    • credprov_chaining_password_field: 0

    • credprov_chaining_username_field: 0

    For example: The CLSID of Sophos SafeGuard is 5CDFA681-61C8-423d-999E-32EA10C5F7ED. Therefore, set the CLSID parameter as follows:

    credprov_chaining_clsid: {5CDFA681-61C8-423d-999E-32EA10C5F7ED}

  5. Log out and log in again.

  6. Navigate to the path C:\ProgramData\NetIQ\Windows Client\Logging\Logs then search for the parameter CpChaining::dumpFields in the logs file.

  7. Search for the fields that contain the label for the user name and password fields. Set the ID of these fields to the following parameters in the configuration file:

    • credprov_chaining_password_field:

    • credprov_chaining_username_field:

    For example: Consider the Sophos SafeGuard 8 login form contains the user name and password fields. The ID of these fields are 8 and 9 respectively. Therefore, the parameters are set as follows:

    • credprov_chaining_password_field: 9

    • credprov_chaining_username_field: 8

    For more information, see Configuring Integration with Sophos SafeGuard 8.

  8. Save the changes in the configuration file.

    NOTE:There may be more than one field that contain labels such as username and password. Here, you must use different fields and test the log in process.

  9. Log out and log in again.

    After providing the credentials, if you are able to sign in to the credential provider automatically, remove the parameter credprov_chaining_dump_fields: True from the configuration file.

    NOTE:While searching the labels, ensure to examine the label type. You can use a label with one of the following value that indicates the label type:

    • 0 - invalid

    • 1 - large text (label)

    • 2 - small text (label)

    • 3 - command link

    • 4 - edit box

    • 5 - password box

    • 6 - tile image

    • 7 - check box

    • 8 - combo box

    • 9 - submit button

3.2.18 Examples of Integration for the Credential Provider Chaining

This section contains the following examples for the CP chaining:

Configuring Integration with Sophos SafeGuard 8

This section provides the configuration information on integrating Advanced Authentication with Sophos SafeGuard 8 easy solution. Therefore, when the users are authenticated to Windows Client, they are not prompted for credentials to connect to the Sophos SafeGuard.

With this integration, Advanced Authentication is set as primary credential provider in the Windows Client. The Advanced Authentication server validates the user provided credentials and transmits the credentials to the Sophos credential provider to allow Single sign-on to the Sophos SafeGuard.

To integrate Advanced Authentication with the Sophos SafeGuard 8, perform the following steps:

  1. Navigate to the path C:\ProgramData\NetIQ\Windows Client and open the file config.properties.

  2. Specify the following parameters with corresponding values in the configuration file:

    • credprov_chaining_clsid: {5CDFA681-61C8-423d-999E-32EA10C5F7ED}

    • credprov_chaining_enabled: True

    • credprov_chaining_password_field: 9

    • credprov_chaining_username_field: 8

  3. Save the configuration.

  4. Log out and log in again.

Configuring Integration with TrendMicro FileEncryption

This section provides the configuration information on integrating Advanced Authentication with TrendMicro FileEncryption.

To integrate Advanced Authentication with the TrendMicro FileEncryption, perform the following steps:

  1. Navigate to the path C:\ProgramData\NetIQ\Windows Client and open the file config.properties.

  2. Specify the following parameters with corresponding values in the configuration file:

    • credprov_chaining_clsid: {5077AF65-B1B6-417b-A1E0-A05B2837A752}

    • credprov_chaining_dump_fields: True

    • credprov_chaining_enabled: True

    • credprov_chaining_password_field: 2

    • credprov_chaining_username_field: 1

  3. Save the configuration.

  4. Log out and log in again.

3.2.19 Enabling Non-Enrolled Users to Log In to Remote Desktop and User Account Control through Offline Mode

You can enable the non-enrolled repository users to perform offline login to the remote desktop and User Account Control (UAC) with the allowUnknownUserOfflineCredUI parameter.

By default, the Windows Client does not allow non-enrolled users to do offline login to remote desktop and UAC.

Before you enable this parameter, ensure that the Username disclosure option is set to ON in the Login Options policy of the Administration portal.

To allow non-enrolled users to do offline login to the remote desktop and UAC, perform the following steps:

  1. Open the configuration file C:\ProgramData\NetIQ\Windows Client\config.properties.

    If the file does not exist, create a new file.

  2. Specify allowUnknownUserOfflineCredUI:true (default value is false) in the config.properties file.

  3. Save the configuration file.

3.2.20 Disabling Linked Chains for Offline Login

With a linked chain, users can authenticate to the Windows client within the grace period after successful authentication with the required chain.

For example, LDAP Password+Card is a required chain, and Card is a linked chain. The users must use the LDAP Password+Card chain once in every 8 hours and within this period, they can only provide card without the LDAP Password to authenticate.

By default the linked chains are available in both online and offline mode.

NOTE:An administrator must ensure that the Enable linked chains option is set to ON in the Linked chains policy of the Administration portal to allow users to log in with the linked chain.

To disable linked chains for offline login, perform the following steps:

  1. Open the configuration file C:\ProgramData\NetIQ\Windows Client\config.properties.

    If the file does not exist, create a new file.

  2. Specify enableLinkedChainsOffline:false (default value is true) in the config.properties file.

  3. Save the configuration file.

3.2.21 Enabling Last Logged In Authentication Chain for Login

You can allow users to authenticate with the previous logged in authentication chain to the Windows Client without prompting the chain selection dropdown. However, user can still click back arrow to view the list of authentication chains.

To enable selection of last logged in authentication chain for login, perform the following steps:

  1. Open the configuration file C:\ProgramData\NetIQ\Windows Client\config.properties.

    If the file does not exist, create a new file.

  2. Specify enable_last_chain_selection:true (default value is false) in the config.properties file.

  3. Save the configuration file.

3.2.22 Enabling Flexible Sign-on for Citrix VDI or Remote Desktop Login

You can configure the Windows Client to enable the Flexible sign-on feature for remote login. Therefore, when a user needs to connect to a remote machine launched via Citrix StoreFront, the user needs to perform the following actions:

  1. Specify the URL of Citrix StoreFront in a browser.

  2. Enter the Username and LDAP Password to login to Citrix StoreFront.

  3. Select the published Windows desktop.

  4. Enter the username.

  5. Authenticate with the preferred authentication method(s) of the chain.

If Flexible SSO is enabled and the user selects the chain that has LDAP password method in it, then the user can skip the LDAP password prompt in Step 5 while accessing the published Windows desktop.

Ensure the following prerequisites are met before enabling flexible sign-on for remote login:

  • Create a chain with LDAP password in it and assign the chain to Windows Logon event.

  • Install Advanced Authentication Windows Client on remote machine.

Default value of Flexible sign-on parameter varies based on the version of Advanced Authentication Windows Client, therefore refer one of the following sections as per your requirement:

For Advanced Authentication Windows Client 6.3 Service Pack 4 and Prior Versions

Perform the following steps on the remote machine to enable flexible sign-on for LDAP password in the authentication chain:

  1. Open the config.properties file at C:\ProgramData\NetIQ\Windows Client path.

    If the file does not exist, create a new file.

  2. Specify sso_flex_enabled: true (default value is false).

  3. Save the configuration file.

  4. Restart the Windows operating system.

For Advanced Authentication Windows Client 6.3 Service Pack 4 Patch 1 and Later Versions

By default, the flexible sign-on is enabled for LDAP password on the remote machine. To disable the flexible sign-on for LDAP password, perform the following steps:

  1. Open the config.properties file at C:\ProgramData\NetIQ\Windows Client path.

    If the file does not exist, create a new file.

  2. Specify sso_flex_enabled: false (default value is true).

  3. Save the changes.

  4. Restart the Windows operating system.

3.2.23 Localizing the Messages for Clients

You can localize error messages, method message, and prompt message displayed on endpoints to an unsupported language.

To localize the client messages to an unsupported language, perform the following steps:

  1. Navigate to C:\Program Files\NetIQ\Windows Client\locale\.

  2. Create a new folder for preferred language and name the folder as per ISO nomenclature standards.

    To know more about ISO nomenclature standard, see http://www.loc.gov/standards/iso639-2/php/langcodes-search.php.

    For example, if you need to create a new folder for Latin, name the folder la.

    NOTE:While naming the folder, keep the following points in mind:

    • The name of the language folder should be in lower case.

    • If the ISO standard name of a language contains any special character such as hyphen or period, replace the special character with an underscore.

      For example, if the ISO code of a language is fr.ca, name the language folder fr_ca.

  3. Inside the preferred language folder, create a new folder and name it LC_MESSAGES

  4. Copy aaacachesrv.pot, aucore.pot, and CredentialProvider.pot files, and paste it in C:\Program Files\NetIQ\Windows Client\locale\<language>\LC_MESSAGES.

  5. Open the aaacachesrv.pot, aucore.pot, and CredentialProvider.pot files in a text editor. For example, PoEditor.

  6. Specify the preferred language message in the msgstr "".

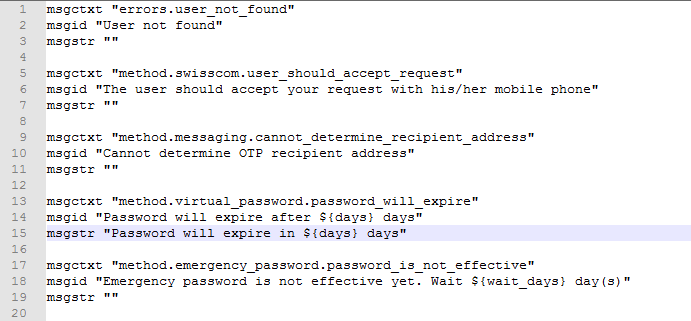
    For example, if you need to localize password will expire in $(days) days message to Latin, specify in password erit exspirare $ (dies) dierum in msgstr "" as in the following image.

  7. Save the changes.

  8. Convert the aaacachesrv.pot, aucore.pot, and CredentialProvider.pot files to.mo format using Po editing tools. For example, PoEditor.

  9. Change the Administrative language of the operating system to the preferred language. For more information, see Changing the Locale for Windows Client

  10. Restart the operating system.

3.2.24 Configuring the Port for Windows Client Cache Service

The Windows Client Cache Service listens on the port 8082 by default. If port 8082 is in use with another application, then the Cache Service listens on the port 8083 or 8084. When all the three ports are in use, the installation fails.

Before installing the Windows Client, you can configure a specific port that manages the Windows Client Cache Service and prevent installation failure.

You can define the offline port in one of the following ways:

Modifying the Configuration File

  1. Navigate to the C:\ProgramData\NetIQ\ path and create a folder Windows client.

  2. Create a file config.properties within Windows client.

  3. Specify offline.port:<port number> in the configuration file.

    For example, offline.port:8083

  4. Save the changes.

Using MSI Command

The MSI command to initiate the installation of Windows Client and define the offline port is as follows:

msiexec /i netiq_naaf-winclient-x64-release-<version>.msi OFFLINE_PORT=<port number>

For example, msiexec /i netiq_naaf-winclient-x64-release-6.3.3.msi OFFLINE_PORT=8092

To define multiple offline ports, use comma as a separator. You can configure maximum of three ports.

msiexec /i netiq_naaf-winclient-x64-release-<version>.msi OFFLINE_PORT=<port number1>, <port number2>,..

msiexec /i netiq_naaf-winclient-x64-release-6.3.3.msi OFFLINE_PORT=8090,8091,8092

3.2.25 Configuring the Authentication Protocol

Sometimes, the Logon Filter functionalities might not work as expected. In such case, you can enforce an alternate authentication protocol that the Local Security Authority applies during Windows OS logon process. The default authentication package is Negotiate.

To enforce the preferred authentication protocol in Windows operating system, perform the following steps:

  1. Open the configuration file C:\ProgramData\NetIQ\Windows Client\config.properties.

    If the file does not exist, create a new file.

  2. Specify provider.AuthenticationProtocol: value. The values are defined as follows:

    • 0 (default value): Represents Negotiate. Windows operating system selects Kerberos or NTLM, depending on the capability.

    • 1: Represents Kerberos authentication protocol.

    • 2: Represents NTLM authentication protocol.

    NOTE:When the provider.AutheticationProtocol parameter is set to 0 (Negotiate) or 2 (NTLM) and the Windows workstation is disconnected from network, users can still log in. However, when the parameter is set to 1 (Kerberos), user cannot log in if the workstation is disconnected from network.

  3. Save the configuration file.

3.2.26 Hiding the Copyright Information

This parameter allows you to hide the copyright information from the login screen of Windows Client. Perform the following steps to conceal the copyright information:

  1. Open the configuration file C:\ProgramData\NetIQ\Windows Client\config.properties.

    If the file does not exist, create a new file.

  2. Specify show_copyright: false.

    The default value of show_copyright parameter is True.

  3. Save the configuration file.

3.2.27 Enabling the Third-Party Credential Provider

With Advanced Authentication Windows Client installed on the Windows workstation, during login, the Client acts as the Credential Provider to confirm the identity of a user and authenticate. By default, Windows Client blocks other Credential Providers to enhance the security. You can enable primary or custom Credential Providers in Windows workstations and allow users to select the preferred providers that verify users’ identity during the logon process and grant access. This feature can also be used when the Credential Provider chaining does not help to integrate with a third-party Credential Provider (like baramundi).

To allow other credential providers in Windows workstation, perform the following steps:

  1. Open the configuration file C:\ProgramData\NetIQ\Windows Client\config.properties.

    If the file does not exist, create a new file.

  2. Specify allowedProviders: {classID of provider}

    You can configure more than one credential providers use comma or semicolon as a separator.

    For example, allowedProviders: {25CBB996-92ED-457e-B28C-4774084BD562}, {48B4E58D-2791-456C-9091-D524C6C706F2}

  3. Save the configuration.

3.2.28 Configuring the TLS Version

You can configure the TLS version that the network library of the Windows Client uses for establishing HTTPS connection with the Advanced Authentication server. The default version is TLSv1.3.

To configure the TLS version, perform the following steps:

  1. Open the configuration file C:\ProgramData\NetIQ\Windows Client\config.properties

    If the file does not exist, create a new file.

  2. Specify tlsVersion: value. The values are defined as follows:

    • TLSv1.3

      NOTE:TLSv1.3 is applicable only for Advanced Authentication 6.3 Service Pack 7 and later versions.

    • TLSv1.2

    • TLSv1.1

    • TLSv1

    • All: Network library will choose the TLS version automatically.

      NOTE:If you set invalid or unknown value for the tlsVersion parameter, then the default value TLSv1.3 is set automatically.

  3. Save the changes.