10.24 Web Authentication
This policy replaces the policy. The Web Authentication policy allows you to configure the following settings:
10.24.4 Customizing the Login Page of Web Authentication Events
NOTE:For more information about customizing the login page of Web Authentication events from Advanced Authentication 6.3 Service Pack 5 Patch 1 and SaaS 21.8.1 release, see Customizing the Login Page of Web Authentication Events.
You can customize the login page of the OAuth 2.0 or Open ID Connect and SAML 2.0 events. To do this, perform the following steps:
-
Set to .
-
Click .
-
Save the osp-custom-resources.jar file.
-
Unzip the osp-custom-resources.jar file and in the folder open the file that you want to customize as follows:
-
naaf_enduser_custom_resources_<language>.properties - Use this file to customize the text related to the all methods on the login and Chain Selection pages.
For example, to edit the text on the page, customize the values of the following parameters in the naaf_enduser_custom_resources_<language>.properties file:
-
NAAFENDUSER.ChainPageHeader: To edit the title
-
NAAFENDUSER.ChainPageSubHeader: To edit the paragraph after the title
-
NAAFENDUSER.ChainSelectChain: To edit the name of chain list drop down
NOTE:In case, you have customized the messages in the following files:
-
The naaf_enduser_custom_resources_<language>.properties file of osp-custom-resources.jar
-
>
Depending on the status of , the messages are displayed to end-users as follows:
-
With set to , Web authentication events display the customized messages from the osp-custom-resources.jar file
-
With is set to , Web authentication events display the messages from policy
-
-
oidp_enduser_custom_resources_<language>.properties - Use this file to customize css, logo, copyright text and links of the login page.
For examples, refer to Example of Customizing a Login Page.
NOTE:Ensure that you edit the attributes in the section of the oidp_enduser_custom_resources_<language>.properties file for the custom branding of the login page.
You must also add your customized .css file in the folder and required logo to the folder of the osp-custom-resources.jar file.
-
-
After you edit the specific file in the folder, zip the file osp-custom-resources.jar.
NOTE:To avoid the manifest file overwriting, make sure the jar file has been unzipped and zipped instead of opening and closing it with the Java .jar tool. Otherwise use the following command line switch to set the manifest file and make sure the name of the manifest file matches the filename in the template:
jar -cm <jar file name> <manifest file name>.
-
Click to upload the osp-custom-resources.jar file in the Web Authentication policy.
-
Click .
The following section describes an example of the customization that you can achieve for the Web authentication.
Example of Customizing a Login Page
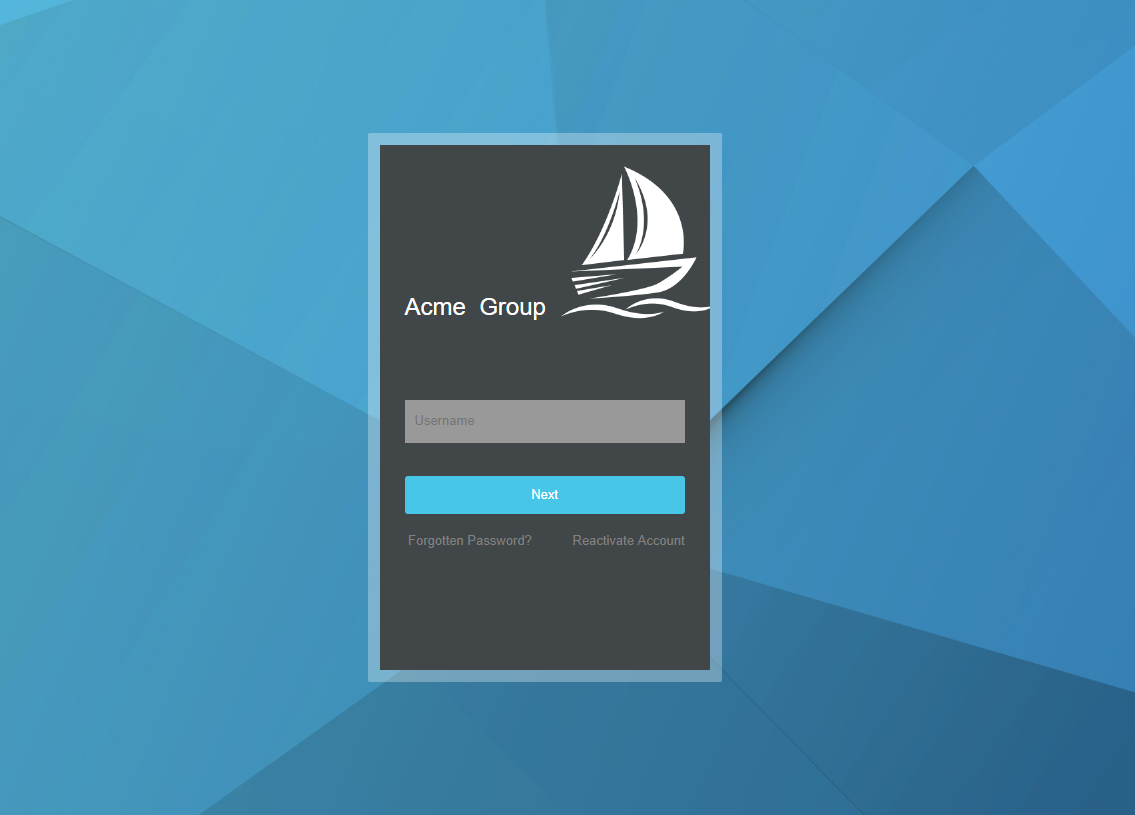
To achieve the customized login page in the Figure 10-2 for Acme Group of company, you can perform the following:
Figure 10-2 Customized Page for Acme Group
Adding a Customized CSS for the Login Page
You can add a customized css file to reflect changes for the login pages.
The following sample.css file has been customized for achieving the customized login page in Figure 10-2 for the Acme Group of company.
/* general styles
------------------------------- */
body {
  margin:0;
  padding:0;
  background:#fff url("/osp/TOP/images/login_bg.jpg") no-repeat center center fixed;
  -webkit-background-size: cover;
  -moz-background-size: cover;
  -o-background-size: cover;
  background-size: cover;
  font-family:Arial, Helvetica, sans-serif;
}
img {
  border:none;
  max-width: 100%;
}
/* login box
------------------------------- */
div.page-container {
  position:absolute;
  top: 50%;
  left: 0px;
  width:100%;
  margin:-265px auto 0 auto;
}
div.dialog {
  border: 12px solid rgba(255, 255, 255, 0.3);
  border-radius: 2px;
  width: 318px;
  max-width:100%;
  margin:0 auto;
  background-color: transparent;
}
div.dialog-content {
  height:525px;
  padding:0 15px;
  background:url(/osp/TOP/images/acme.png);
  background-color:#414749 ;
  background-position:180px 20px;
  background-repeat:no-repeat;
  font-family: Arial, Helvetica, sans-serif;
  text-align: left;
  }
.dialog-header {
  margin:0;
  padding: 150px 0 40px 0;
  color:#48c6e7;
  font-size:22px;
  font-weight:100;
  background: none;
}
div.dialog-header-content {
  display:block;
  color:#fff;
  font-weight: 200;
}
p { margin:0; padding:0; }
div.dialog-body {
  padding: 0;
}
.product-name {
  margin: 0;
}
#password, #Ecom_User_ID {
  color: #000 !important;
  background-color: #999;
  font-size: 13px;
  line-height: 20px;
  margin: 0 0 3px 0;
  padding: 11px 10px 12px;
  width: 100%;
  box-sizing: border-box;
  border: none;
  border-radius: 0;
}
.dialog-footer-content {
  display: none;
}
.button-container button, .btn {
  display: block;
  text-align: center;
  color: #fff;
  font-size: 13px;
  background-color: #48c6e7;
  border: none;
  margin: 30px 0 0 0;
  padding: 11px 10px 12px;
  box-sizing: border-box;
  width: 100%;
  cursor: pointer;
  -webkit-appearance: none;
  text-decoration: none;
}
.button-container button:hover {
  background-color:#00B4DF;
  border: none;
}
.input-box input {
  box-sizing: border-box;
  background-color: #999;
}
p.error {
    color: #cccccc;
    font-size: 13px;
    margin: 0;
    padding: 0 0 18px;
}
#logoutmsg, #logoutmsgsub { color:#fff; }
.error h1 { padding-bottom:20px; }
.help p { margin:0; padding:20px 0 0 0; font-size:11px; }
.help a { color:#cccccc; text-decoration:none; }
.help a:hover { color:#fff; }
.title {
  display: none;
}
.image-custom-link, .login-custom-link {
  display: inline;
}
.image-custom-link a {
  padding: 0;
}
.image-custom-link a:hover {
  color: #fff;
  background-color: transparent;
  display: inline;
  padding: 0;
}
.image-custom-link img {
  height: 0;
  width: 0;
}
#loginCustomLink1 {
  float: right;
}
/*------------------------------------*\
    RESPONSIVE
\*------------------------------------*/
@media only screen and (max-width:480px) {
  div.page-container {
    position: static;
    top: 0;
    margin: 0;
  }
  div.dialog {
    width: auto;
    margin: 0;
  }
}
Perform the following steps to add the sample.css file to the osp-custom-resources.jar file.
-
Open the osp-custom-resources.jar file.
-
Upload your .css file to the css folder.
-
Open the resources folder.
-
Open the oidp_enduser_custom_resources_en_US.properties file to edit the custom branding of the login pages in the English language.
-
Uncomment the line OIDPENDUSER.LoginCss=reset.css,uistyles.css,uistyles_loginselect.css by removing the # sign.
You can add your .css file here. For example, OIDPENDUSER.LoginCss=sample.css.
-
Save the oidp_enduser_custom_resources_en_US.properties file.
Customizing the Logo of an Enterprise
You can edit the logo displayed on the login page of web authentication event using the parameter OIDPENDUSER.LoginProductImage available in the Login page properties.
For example, to edit the logo of the login page of an OAuth 2.0 event in the English language, perform the following:
-
Open the oidp_enduser_custom_resources_en_US.properties file and edit the following attribute:
OIDPENDUSER.LoginProductImage=company_img.png.
You can also edit the .css file. The following code has been added to the sample.css file to display the logo in the Figure 10-2:
div.dialog-content { height:525px; padding:0 15px; background:url(/osp/TOP/images/company_img.png); background-color:#414749 ; background-position:180px 20px; background-repeat:no-repeat; font-family: Arial, Helvetica, sans-serif; text-align: left; } -
Ensure that you add the image that you want as a logo to the images folder with the name that matches with the attribute value in OIDPENDUSER.LoginProductImage.
By default the images folder contains the image company_img.
Customizing the Copyrights
You can edit the copyright text displayed on the login page of web authentication event using the parameter OIDPENDUSER.50004 available under the .
For example, to remove the copyright note that is displayed on the login page of an OAuth 2.0 event in the English language:
-
Open the oidp_enduser_custom_resources_en_US.properties file and search the following parameter:
#OIDPENDUSER.50004=Copyright [copy] [year] NetIQ[nbsp]Corporation, a Micro[nbsp]Focus company. All rights reserved
-
Uncomment the following parameter as follows:
OIDPENDUSER.50004=
This removes the copyright note from the web authentication event - login page.
Customizing the Branding Text
You can edit the branding text displayed on the login page of web authentication event using the parameter OIDPENDUSER.LoginProductName available in the section of the oidp_enduser_custom_resources_en_US.properties file.
For example, to edit the branding of the company to , perform the following:
-
Open the oidp_enduser_custom_resources_en_US.properties file and search the following parameter:
#OIDPENDUSER.LoginProductName=Company[nbsp]Name[reg]
-
Edit the following parameter as follows:
OIDPENDUSER.LoginProductName=Acme[nbsp]Group[reg]
If you want to remove the branding text
-
Open the oidp_enduser_custom_resources_en_US.properties file and search the following parameter:
#OIDPENDUSER.LoginProductName=Company[nbsp]Name[reg]
-
Uncomment the following parameter as follows:
OIDPENDUSER.LoginProductName=
This removes the branding text, Acme Group, from the web authentication event - login page.
Adding Links on the Login Page
You can add links for the login page of the web authentication event.
For example, if you want to add the link that is displayed on the login page in the English language, add the following: