In this chapter:
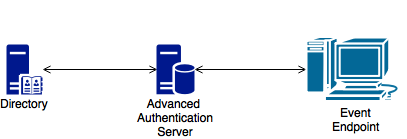
The basic architecture of the Advanced Authentication is simple and requires only one Advanced Authentication Server. You can use it for testing and proof of concepts.
Advanced Authentication Server is connected to a Directory that can be an Active Directory Domain Services, NetIQ eDirectory, Active Directory Lightweight Directory Service or other compliant LDAP directories. An Event Endpoint can be Windows, Linux or Mac OS X machine, NetIQ Access Manager, NetIQ CloudAccess, or RADIUS Client to authenticate through the RADIUS Server that is built-in the Advanced Authentication Server. For a complete list of supported events, see Configuring Events.
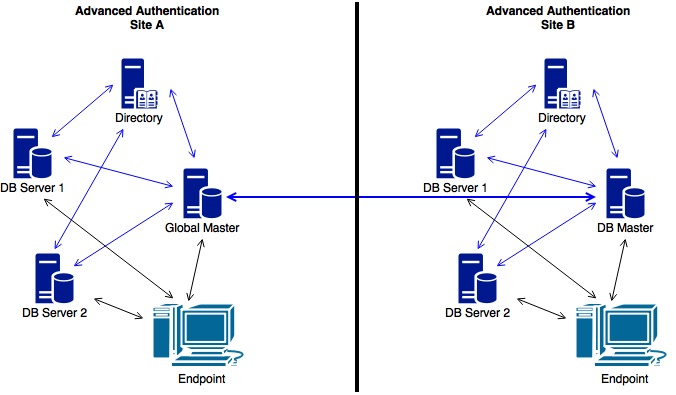
The Enterprise architecture of the Advanced Authentication contains sites that can be created for different geographical locations. For example, the following illustration displays two Advanced Authentication sites. Site A is the first site created for headquarters in New York. Site A’s first Advanced Authentication Server contains the Global Master and Registrar roles. This server contains a master database and it can be used to register new sites and servers.
NOTE:If the Global Master is down, new sites cannot be added.
Site B is created for the office in London and it contains the identical structure. The master server in another site has DB Master role. DB Masters interacts with the Global Master.
DB Server provides a DB Slave database that is used for backup and fail-over. You can create a maximum of two DB Slave Servers per site that can be DB Server 1 and DB Server 2. When the DB Master is unavailable, the DB Slave node responds to the database requests. When the DB Master becomes available again, the DB Slave node synchronizes with the DB Master and the DB Master becomes the primary point of contact for database requests again.
Endpoints can interact with every server that contain a database.
NOTE:Master Servers connect to each other directly. If the Global Master is down, others will replicate.
A Global Master must have a connection to each of the LDAP servers. Hence in a datacenter with Global Master, you must have LDAP servers for all the used domains.
IMPORTANT: Please ensure to take regular snapshots or to clone the primary Site to protect from any hardware issues or any other accidental failures. It is recommended to do it each time after you change the configuration of repositories, methods, chains, events and policies or add/remove servers in the cluster.
You can convert DB Slave of primary site to Global master. This requires corresponding DNS changes. Nothing can be done if Global Master and all slaves are lost.
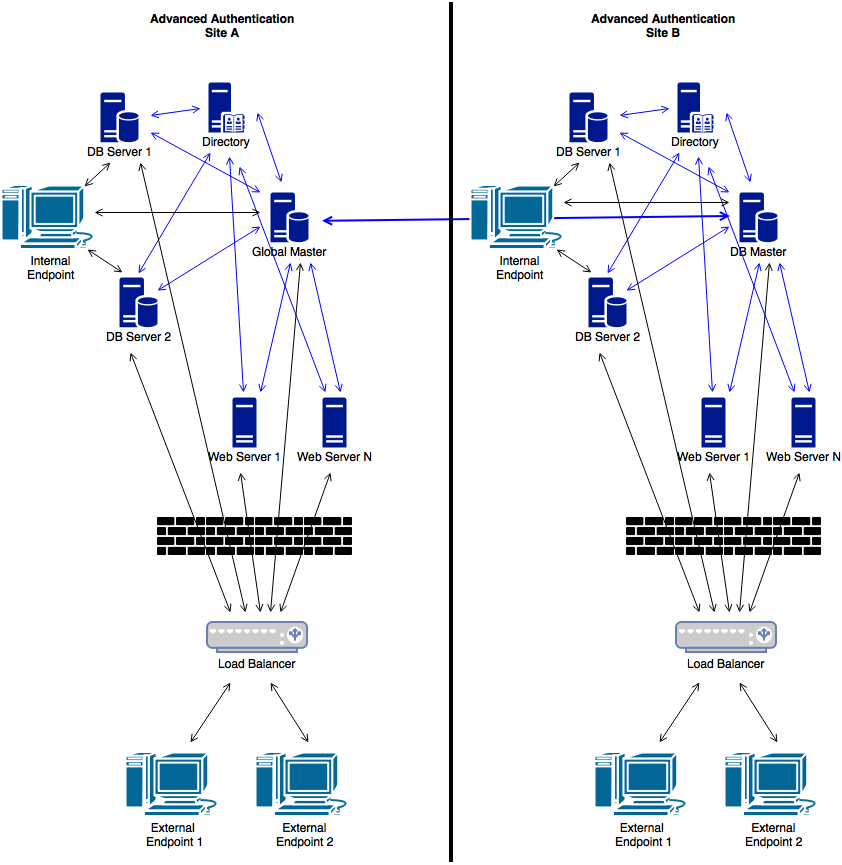
The Enterprise architecture with Load balancer contains a more complicated architecture in comparison with the Enterprise Architecture. The architecture contains the following components:
Web Servers: Web Server does not contain a database. It responds to the authentication requests and connects to the DB Master database. You need more Web Servers to serve more workload. There is no limitation for Web Servers.
Load Balancer: It provides an ability to serve authentication requests from the External Endpoints. Load Balancer is a third-party component. It is located in DMZ and can be configured to interact with all the Advanced Authentication Servers.
Load balancer can be installed and configured via third party software. Below is an example of how to install and configure nginx as load balancer on Ubuntu 14.
Target configuration:
|
Hostname |
IP address |
Role |
Operation System |
|---|---|---|---|---|
|
Domain controller |
win-dc |
192.168.1.42 |
AD DS, DNS |
Windows Server 2008 R2 |
|
AA v5 master |
naafmaster |
192.168.1.43 |
AA Master server |
AA v5 |
|
AA v5 slave |
naafslave |
192.168.1.41 |
NAAF Slave server |
AA v5 |
|
Load balancer |
loadbalancer |
192.168.1.40 |
Nginx load balancer |
Ubuntu 14 |
Before starting the configuration, please make sure that the following requirements are fulfilled:
Repository is configured in Advanced Authentication appliance.
Both Advanced Authentication servers are installed and configured as Master and Slave.
Appropriate entries are added to DNS.
Ubuntu 14 is installed.
To configure Load Balancer for Advanced Authentication cluster, it is required to install nginx on Ubuntu 14 and configure it.
To install nginx on Ubuntu 14, follow the steps:
Open the following source list:
sudo nano /etc/apt/sources.list
Add necessary entries:
deb http://nginx.org/packages/ubuntu/ trusty nginx
deb-src http://nginx.org/packages/ubuntu/ trusty nginx
Update repository and install nginx:
apt-get update
apt-get install nginx
Start nginx and make sure that web server is working:
sudo service nginx restart
Open your browser and go to web server http://192.168.1.40 or http://loadbalancer.
The following load balancing mechanisms/methods are supported in nginx:
round-robin - requests to the application servers that are distributed in a round-robin fashion
least-connected - next request assigned to the server with the least number of active connections
ip-hash - a hash-function that is used to determine what server should be selected for the next request (based on the client’s IP address)
This article describes only round-robin configuration. To configure nginx, follow the steps:
Backup original configuration file: sudo cp /etc/nginx/nginx.conf /etc/nginx/nginx.conf_original.
Open the nginx.conf file and replace with following:
user nginx;
error_log /var/log/nginx/error.log warn; # error log location
pid /var/run/nginx.pid; # process id file
# limit number of open sockets. Debian default max is 1024, ensure nginx not open all the sockets.
worker_processes 1;
events {
worker_connections 900; # 512 is default
}
# worker_processes auto; # ssl needs CPU
http {
include /etc/nginx/mime.types;
default_type application/octet-stream;
log_format main '$remote_addr - $remote_user [$time_local] "$request" '
'$status $body_bytes_sent "$http_referer" '
'"$http_user_agent" "$http_x_forwarded_for"';
access_log /var/log/nginx/access.log main; # access log location
sendfile on;
# keepalive default is 75
# keepalive_timeout 10;
gzip on;
gzip_static on;
gzip_comp_level 5;
gzip_disable msie6;
gzip_min_length 1000;
gzip_proxied expired no-cache no-store private auth;
gzip_vary on;
gzip_types text/plain text/css application/json application/javascript
text/xml application/xml application/rss+xml application/atom+xml;
ssl_certificate /etc/nginx/cert.pem;
ssl_certificate_key /etc/nginx/cert.pem;
ssl_session_cache shared:SSL:2m; # 1m stores 4000 sessions, default expire 5 min
ssl_protocols TLSv1 TLSv1.1 TLSv1.2; # disable TLSv3 - POODLE vulnerability
resolver 192.168.1.42 valid=300s ipv6=off; # ip address of DNS
resolver_timeout 10s;
upstream web {
#server naafmaster.company.local:443 resolve;
#server naafslave.company.local:443 resolve;
server 192.168.1.43:443;
server 192.168.1.41:443;
}
server {
#listen 80;
listen 443 ssl;
location / {
proxy_pass https://web;
proxy_set_header HOST $host;
proxy_set_header X-Forwarded-Proto $scheme;
proxy_set_header X-Real-IP $remote_addr;
proxy_set_header X-Forwarded-For $proxy_add_x_forwarded_for;
}
}
}
Copy certificate from any Advanced Authentication server in cluster from the directory /etc/nginx/cert.pem to the same directory on load balancer.
Go to https://loadbalancer/admin page and make sure that connection was redirected to Advanced Authentication cluster.
IMPORTANT:Nginx can be installed and configured on any Linux supported by nginx.
Additional information on nginx configuration can be found at http://nginx.org/en/docs/.