4.2.8 Configuring WS Federation
The first two topics in this section describe two different methods for setting up federation with a SharePoint server. The next sections describe how you can manage and modify WS Federation providers and configure Security Token Service (STS). STS is used to process authentication requests received at Identity Server for the WS Federation protocol.
You can obtain the WS-Federation metadata by using Samlv2Meta as described in the WS-Federation 1.1 and 1.2 specification. To obtain the metadata, use the following URL format:
<base-url>/nidp/wsfed/metadata?type=Samlv2Meta.
(Access Manager 4.5 Service Pack 4 and later) An EntityID attribute is added to the EntityDescriptor in Access Manager WS-Federation metadata. This attribute can be queried when using <base-url>/nidp/wsfed/metadata?type=Samlv2Meta endpoint.
Using Identity Server as an Identity Provider for ADFS
Identity Server can provide authentication for resources protected by an Active Directory Federation Services (ADFS) server. This allows Identity Server to provide single sign-on to Access Manager resources and ADFS resources, such as a SharePoint server. Figure 4-13 illustrates this configuration.
Figure 4-13 Accessing SharePoint Resources with Identity Server
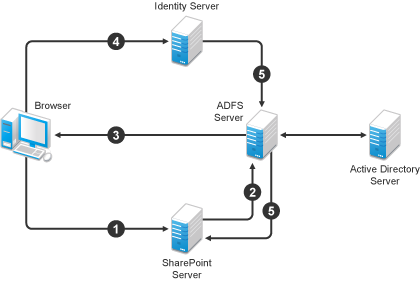
In this scenario, the following events occur:
-
A user requests access to a SharePoint server protected by the ADFS server.
-
The resource sends an authentication request to the ADFS server.
-
The ADFS server, which has been configured to use Identity Server as an identity provider, gives the user the option of logging in to Identity Server.
-
The user logs in to Identity Server and is provided a token that is sent to the ADFS server and satisfies the request of the resource.
-
The user is allowed to access the resource.
The following section describe how to configure your servers for this scenario:
Configuring Identity Server
Prerequisites
-
You have set up the Active Directory Federation Services, Active Directory, and SharePoint servers and the client as described in the ADFS guide from Microsoft. See the “Step-by-Step Guide for Active Directory Federation Services”.
-
You have set up the Access Manager system with a site configuration that is using SSL in Identity Server's base URL. See Section 19.0, Enabling SSL Communication.
Creating a New Authentication Contract
The Microsoft ADFS server rejects the contract URI names of the default Access Manager contracts, which have a URI format of secure/name/password/uri. The ADFS server expects the URI to look like a URL.
Use the following format for the URI of all contracts that you want to use with the ADFS server:
<baseurl>/name/password/uri
If the DNS name of your Identity Server is idp-50.amlab.net, the URI would look similar to the following format:
https://idp-50.amlab.net:8443/nidp/name/password/uri
This URL does not resolve to anything because Identity Server interprets it as a contract URI and not a URL.
To create a new authentication contract:
-
Click > > > > .
-
Click , then specify the following details:
Field
Description
Specify a name. For example, WS-Fed Contract.
Specify a URI. For example, https://idp-50.amlab.net:8443/nidp/name/password/uri.
Select this option. The ADFS server needs to satisfy this contract.
-
Move to the list.
-
Click , then specify the following details:
Field
Description
Leave this field blank. Supply a value when you want a reference that you can use externally.
Specify a description that is available to the user when the user hovers over the card.
Select an image, such as . This is the default image for the Name/Password - Form contract.
Select this option so that the card can be presented to the user as a login option.
-
Click .
-
Continue with Setting the WS-Fed Contract as the Default Contract.
Setting the WS-Fed Contract as the Default Contract
It is not possible to specify the contract to request from the ADFS service provider to Identity Server. You must either set the contract for WS-Fed to be the default or the users must remember to click that contract every time.
-
Click > > > > > .
-
In , select the WS-Fed Contract.
-
Click .
-
Continue with Enabling the WS Federation Protocol.
Enabling the WS Federation Protocol
By default, only SAML 1.1, Liberty, and SAML 2.0 are enabled. To use the WS Federation protocol, you must enable it on Identity Server.
-
Click > > > > .
-
In the section, select WS Federation.
-
Click .
-
Update Identity Server.
-
Continue with Creating an Attribute Set for WS Federation.
Creating an Attribute Set for WS Federation
The WS Federation namespace is http://schemas.xmlsoap.org/claims. With WS Federation, you need to decide which attributes you want to share during authentication. This scenario uses the LDAP mail attribute and the All Roles attribute.
-
Click > > > > .
-
Specify the following details:
Set Name: Specify a name that identifies the purpose of the set. For example, wsfed_attributes.
Select set to use as template: Select .
-
Click .
-
To add a mapping for the mail attribute, perform the following steps:
-
Click .
-
Specify the following details:
Field
Description
Select .
Specify .
This is the attribute that this scenario uses for user identification.
Select the option, and then specify the following namespace
http://schemas.xmlsoap.org/claims
-
Click .
-
-
To add a mapping for the All Roles attribute, perform the following steps:
-
Click .
-
Specify the following details:
Field
Description
Select .
Specify .
This is the name of the attribute that is used to share roles.
Select the option, and then specify the following namespace
http://schemas.xmlsoap.org/claims
-
Click .
-
-
Click .
-
Continue with Enabling the Attribute Set.
Enabling the Attribute Set
The WS Federation protocol uses STS. Therefore, you must enable the attribute set for STS to use it in an WS Federation relationship.
-
Click > > > > > .
-
Move the WS Federation attribute set to the list.
-
Select the WS Federation attribute set and use the up-arrow to make it first in the list.
-
Click , then update Identity Server.
Creating a WS Federation Service Provider
To establish a trusted relationship with the ADFS server, you need to set up the Trey Research site as a service provider. The trusted relationship allows the service provider to trust Identity Server for user authentication credentials.
Trey Research is the default name for the ADFS resource server. If you have used another name, substitute it when following these instructions. To create a service provider, you need to know the following details about the ADFS resource server:
Table 4-3 ADFS Resource Server Information
|
Option |
Default Value |
Description |
|---|---|---|
|
|
urn:federation:treyresearch |
This is the value that the ADFS server provides to Identity Server in the realm parameter of the query string. This value is specified in the Properties of the Trust Policy page on the ADFS server. The parameter label is . |
|
|
https://adfsresource.treyresearch.net/adfs/ls/ |
The identity provider redirects this value to the user after login. Although it is listed as optional, and is optional between two Access Manager Identity Servers, the ADFS server does not send this value to the identity provider. It is required when setting up a trusted relationship between an ADFS server and a Access Manager Identity Server. This URL is listed in the Properties of the Trust Policy page on the ADFS server. The parameter label is . |
|
|
https://adfsresource.treyresearch.net/adfs/ls/ |
This parameter is optional. If it is specified, the user is logged out of the ADFS server and Identity Server. |
|
|
NA |
The ADFS server uses this certificate for signing. You need to export it from the ADFS server. It can be retrieved from the properties of the on the ADFS Server on the tab.This certificate is a self-signed certificate that you generated when following the Active Directory step-by-step guide. |
To create a service provider configuration, perform the following steps:
-
Click > > > > .
-
Click > , then specify the following details:
Field
Description
Specify a name that identifies the service provider, such as TreyResearch.
Specify the provider ID of the ADFS server. The default value is urn:federation:treyresearch.
Specify the URL that the user is redirected to after login. The default value is https://adfsresource.treyresearch.net/adfs/ls/.
(Optional) Specify the URL that the user can use for logging out. The default value is https://adfsresource.treyresearch.net/adfs/ls.
Specify the path to the signing certificate of the ADFS server.
-
Click , confirm the certificate, and then click .
-
Continue with Configuring the Name Identifier Format.
Configuring the Name Identifier Format
The Unspecified Name Identifier format is the default for a newly created WS Federation service provider, but this name identifier format does not work with the ADFS federation server. Additionally, some Group Claims (Adatum ClaimApp Claim and Adatum TokenApp Claim) must be satisfied to gain access to the SharePoint server.
-
On the WS Federation page, click the name of the TreyResearch service provider.
-
Click , then specify the following details:
Field
Description
Select the WS Federation attribute set you created.
Move the All Roles attribute to the list.
-
Click , then click .
-
Select for the Name Identifier Format.
-
Select as the value for the e-mail identifier.
-
Click > , then update Identity Server.
-
Continue with Setting Up Roles for ClaimApp and TokenApp Claims.
Setting Up Roles for ClaimApp and TokenApp Claims
When users access resources on the ADFS server, they need to have two roles assigned: a ClaimApp role and a TokenApp role. The following steps explain how to create these two roles so that they are assigned to all users that log in to Identity Server.
-
Click > > > > > .
-
Click , specify a name for the policy, select , then click .
-
On the Rule 1 page, leave Condition Group 1 blank.
With no conditions to match, this rule matches all authenticated users.
-
In the section, click > .
-
Specify .
-
In the section, click > .
-
Specify .
-
Click > , then click .
-
Click .
-
On the Roles page, select the role policy you just created, then click .
-
Click , then update Identity Server.
-
Continue with Importing the ADFS Signing Certificate into the NIDP-Truststore.
Importing the ADFS Signing Certificate into the NIDP-Truststore
The Access Manager Identity Provider (NIDP) must have the trusted root of the ADFS signing certificate (or the certificate itself) listed in its trust store, and specified in the relationship. This is because most ADFS signing certificates are part of a certificate chain, and the certificate that goes into the metadata is not the same as the trusted root of that certificate. Because the Active Directory step-by-step guide uses self-signed certificates for signing, it is the same certificate in both the trust store and in the relationship.
To import the ADFS signing certificate’s trusted root (or the certificate itself) into the NIDP-Truststore, perform the following steps:
-
Click > > > > > .
-
Click .
-
Next to , click the icon.
This adds the trusted root of the ADFS signing certificate to the trust store.
-
On the Select Trusted Roots page, select the trusted root or certificate that you want to import, then click .
If there is no trusted root or certificate in the list, click . This enables you to import a trusted root or certificate.
-
Next to , click the icon.
-
Select the trust stores where you want to add the trusted root or certificate, then click > .
-
Update Identity Server so that the changes can take effect.
This finishes the configuration that must be done on Identity Server for Identity Server to trust the ADFS server. The ADFS server must be configured to trust Identity Server. Continue with Configuring the ADFS Server.
Configuring the ADFS Server
You must complete the following tasks on the Trey Research server (adfsresouce.treyresearch.net) to establish trust with Access Manager Identity Server:
Enabling E-mail as a Claim Type
You can enable three types of claims for identity that can be enabled on an ADFS server. The claims include Common Name, E-mail, and User Principal Name. The ADFS step-by-step guide specifies that you do everything with a User Principal Name, which is an Active Directory convention. Although it could be given an e-mail name that looks the same, it is not. This scenario selects to use E-mail instead of Common Name because E-mail is a more common configuration.
-
From the Administrative Tools, open the Active Directory Federation Services tool.
-
Navigate to the by clicking > > .
-
Verify that E-mail is in this list. If it isn’t, move it to the list.
-
Navigate to your Token-based Application and enable e-mail by right-clicking the application, editing the properties, and clicking the box.
-
Navigate to your Claims-aware Application and repeat the process.
-
Continue with Creating an Account Partners Configuration.
Creating an Account Partners Configuration
WS Federation requires a two-way trust relationship. Both the identity provider and the service provider must be configured to trust the other provider. This task sets up the trust between the ADFS server and Identity Server.
-
In the Active Directory Federation Services console, navigate to the Account Partners by clicking > > .
-
Right-click , then select > .
-
Supply the following information in the wizard:
-
You do not have an account partner policy file.
-
For the display name, specify the DNS name of Identity Server.
-
For the specify the following:
https://<DNS_Name>:8443/nidp/wsfed/Replace <DNS_Name> with the DNS name of Identity Server.
This URI is the base URL of your Identity Server with the addition of /wsfed/ on the end.
-
For the , specify the following:
https://<DNS_Name>:8443/nidp/wsfed/epReplace <DNS_Name> with the DNS name of Identity Server.
This URL is the base URL of your Identify Server with the addition of /wsfed/ep at the end.
-
For the verification certificate, import the trusted root of the signing certificate on your Identity Server.
If you have not changed it, you need the Organizational CA certificate from your Administration Console. This is the trusted root for the test-signing certificate.
-
Select .
Identity Server is outside of any forest, so do not select .
-
Select the E-mail claim.
-
Add the suffix that you will be using for your e-mail address.
You need to have the e-mail end in a suffix that the ADFS server is expecting, such as @novell.com, which grants access to any user with that e-mail suffix.
-
-
Enable this account partner.
-
Finish the wizard.
-
Continue with Enabling ClaimApp and TokenApp Claims.
Enabling ClaimApp and TokenApp Claims
The Active Directory step-by-step guide sets up the roles to be used by the resources. You set them up to be sent in the All Roles attribute from Identity Server. You must map these roles into the Adatum ClaimApp Claim and the Adatum TokenApp Claim.
-
In the Active Directory Federation Services console, click the account partner that you created for Identity Server (see Creating an Account Partners Configuration).
-
Right click the account partner, then create a new with the following values:
Incoming group claim name: Specify .
Organization group claim: Specify .
-
Right-click the account partner, and create another with the following values:
Incoming group claim name: Specify .
Organization group claim: Specify .
-
Continue with Disabling CRL Checking.
Disabling CRL Checking
If you are using the Access Manager certificate authority as your trusted root for the signing certificate (test-signing certificate), there is no CRL information in that certificate. However, the ADFS has a mandatory requirement to perform CRL checking on any certificate that they receive. For information about how to disable this checking, see “Turn CRL checking on or off”.
Use the following information when you follow these instructions:
-
Create a file from the script contained at that link called TpCrlChk.vbs.
-
Exit the Active Directory Federation Services console.
If you do not exit the console, the console overwrites the changes made by the script file and CRL checking is not turned off.
-
Run the command with the following syntax:
Cscript TpCrlChk.vbs <location of ADFS>\TrustPolicy.xml "<service URI>" None
Replace <location of ADFS> with the location of the ADFS TrustPolicy.xml file. The default location is C:\ADFS\TrustPolicy.xml.
Replace <service URI> with the URI you specified in Step 3. If the DNS name of your Identity Server is idp-50.amlab.net, replace it with https://idp-50.amlab.ne:8443/nidp/wsfed/.
Your command must look similar to the following:
Cscript TpCrlChk.vbs C:\ADFS\TrustPolicy.xml "https://idp-50.amlab.net:8443/nidp/wsfed/" None
Logging In
-
In a browser on your client machine, enter the URL of the SharePoint server. For example,
https://adfsweb.treyresearch.net/default.aspx
-
Select the IDP from the drop-down list of , then submit the request.
If you are not prompted for the realm, clear all cookies in the browser and try again.
-
Log in as a user at the Access Manager Identity Provider
-
Verify that you can access the SharePoint server. If you see only a page that says Server Error in '/adfs' Application, see Enabling Logging on the ADFS Server and follow the instructions in Common Errors.
Troubleshooting
Enabling Logging on the ADFS Server
If you see the message Server Error in '/adfs' Application displayed in the client's browser, you can verify the ADFS log file to find the cause.
To enable logging, perform the following steps:
-
In the Active Directory Federation Services console, right-click , then click .
-
Select , then enable all options on the page.
-
Click , then look for the file that is created in the path listed in the .
-
Look in that file for the reasons of the issue.
For an explanation of some of the common errors, see Common Errors.
Common Errors
[ERROR] SamlViolatesSaml:
Error parsing AuthenticationMethod: Invalid URI: The format of the URI could not be determined.
Cause: This is because the contract has the wrong format for its URI. The URI must start with urn: or http://. Change the contract and try again.
[ERROR] Saml contains an unknown NameIdentifierFormat:
Issuer=https://idp-51.amlab.net:8443/nidp/wsfed/; Format=urn:oasis:names:tc:SAML:1.1:nameid-format:unspecified
Cause: The name identifier format is set to unspecified, and it needs to be set to E-mail.
[ERROR] Saml contains an unknown Claim name/namespace:
Issuer=https://idp-51.amlab.net:8443/nidp/wsfed/; Namespace=urn:oasis:names:tc:SAML:1.0:assertion; Name=emailaddress
Cause: The emailAddress attribute is not in the correct namespace for WSFed.
CRL Errors
-
2008-08-01T19:56:55 [WARNING] VerifyCertChain: Cert chain did not verify - error code was 0x80092012
-
2008-08-01T19:56:55 [ERROR] KeyInfo processing failed because the trusted certificate does not have a a valid certificate chain. Thumbprint = 09667EB26101A98F44034A3EBAAF9A3A09A0F327
-
2008-08-01T19:56:55 [WARNING] Failing signature verification because the KeyInfo section failed to produce a key.
-
2008-08-01T19:56:55 [WARNING] SAML token signature was not valid: AssertionID = idZ0KQH0kfjVK8kmKfv6YaVPglRNo
Cause: The CRL check isn't turned off. See Disabling CRL Checking.
[ERROR] EmailClaim.set_Email:
Email 'mPmNXOA8Rv+j16L1iNKn/4HVpfeJ3av1L9c0GQ==' has invalid format
Cause: The drop-down list next to E-mail in the identifier format was not changed from <Not Specified> to a value with a valid e-mail address in it.
Using the ADFS Server as an Identity Provider for an Access Manager Protected Resource
You can configure the ADFS server to provide authentication for a resource protected by Access Manager.
Figure 4-14 Using an ADFS Server for Access Manager Authentication
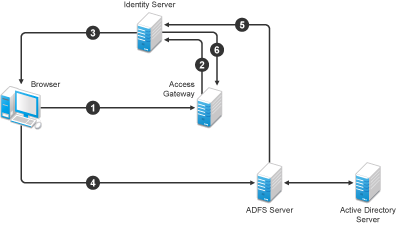
In this scenario, the following exchanges occur:
-
The user requests access to a resource protected by Access Gateway.
-
The resource sends an authentication request to Access Manager Identity Server.
-
Identity Server is configured to trust an ADFS server and gives the user the option of logging in at the ADFS server.
-
The user logs in to the ADFS server and is provided a token.
-
The token is sent to Identity Server.
-
The token satisfies the authentication requirements of the resource, and the user is allowed to access the resource.
The following sections describe how to configure this scenario:
Configuring Identity Server as a Service Provider
Prerequisites
-
You have set up ADFS, Active Directory, and SharePoint servers and the client as described in the ADFS guide from Microsoft. See the “Step-by-Step Guide for Active Directory Federation Services”.
-
You have set up Access Manager with a site configuration that is using SSL in Identity Server's base URL. See Section 19.0, Enabling SSL Communication.
-
Enable the Liberty Personal Profile.
Click > > > . Select the , then click > . Update Identity Server.
Enabling the WS Federation Protocol
Access Manager ships with only SAML 1.1, Liberty, and SAML 2.0 enabled by default. To use the WS Federation protocol, it must be enabled on Identity Server.
-
Click > > .
-
In the section of the General Configuration page, select .
-
Click .
-
Update Identity Server.
-
Continue with Creating a WS Federation Identity Provider.
Creating a WS Federation Identity Provider
To have a trust relationship, you need to set up the Adatum site (adfsaccount.adatum.com) as an identity provider for Identity Server.
Adatum is the default name for the identity provider. If you have used another name, substitute it when following these instructions. To create an identity provider, you need to know the following information about the Adatum site:
Table 4-4 Adatum Values
|
Option |
Default Value and Description |
|---|---|
|
Provider ID |
Default Value: urn:federation:adatum The ADFS server provides this value to the service provider in the realm parameter in the assertion. You set this value in the of the Trust Policy on the ADFS server. The label is . |
|
Sign-on URL |
Default Value: https://adfsaccount.adatum.com/adfs/ls/ The service provider uses this value to redirect the user for login. This URL is listed in the of the Trust Policy on the ADFS server. The label is . |
|
Logout URL |
Default Value: https://adfsresource.treyresearch.net/adfs/ls/ The ADFS server makes no distinction between the login and logout URL. Access Manager has separate URLs for login and logout, but from an Access Manager Identity Server to an ADFS server, they are the same. |
|
Signing Certificate |
This is the certificate that the ADFS server uses for signing. You need to export it from the ADFS server. It can be retrieved from the properties of the on the ADFS Server on the tab.This certificate is a self-signed certificate that you generated when following the step-by-step guide. |
To create an identity provider, perform the following steps:
-
Click > > > .
-
Click , select , and then specify the following details:
Field
Description
Specify a name that identifies the identity provider, such as Adatum.
Specify the federation service URI of the identity provider. For example, urn:federation:adatum.
Specify the URL for logging in, such as https://adfsaccount.adatum.com/adfs/ls/.
Specify the URL for logging out, such as https://adfsresource.treyresearch.net/adfs/ls/
Specify the path to the signing certificate of the ADFS server.
-
Confirm the certificate, then click .
-
For the authentication card, specify the following values:
Field
Description
Leave this field blank.
Specify a description that is available to the user when the user hovers the mouse over the card.
Select an image, such as , or any other image.
Select this option to display the card as a login option.
-
Click .
-
Continue with Modifying the User Identification Specification.
Modifying the User Identification Specification
The default settings for user identification are set to do nothing. The user can authenticated, but the user is not identified as a local user on the system. However, in this scenario, the user must be identified on the local system. Additionally, You need to specify which contract on Access Gateway is satisfied with this identification. If a contract is not specified, Access Gateway resources must be configured to use the option, which is not a typical configuration.
-
On the WS Federation page, click the name of the Adatum identity provider configuration.
-
Click .
-
For , select .
-
Select .
-
For the , select .
-
Click > .
-
Update Identity Server.
-
Continue with Importing the ADFS Signing Certificate into the NIDP-Truststore.
Importing the ADFS Signing Certificate into the NIDP-Truststore
Identity Server must have the trusted root of the ADFS signing certificate (or the certificate itself) listed in its trust store, and specified in the relationship. This is because most ADFS signing certificates have a chain, and the certificate that goes into the metadata is not the same as the trusted root of that certificate. However, as the Active Directory step-by-step guide uses self-signed certificates for signing, it is the same certificate in both the trust store and in the relationship.
To import the ADFS signing certificate’s trusted root (or the certificate itself) into the NIDP-Truststore, perform the following steps:
-
Click > > > > .
-
Click .
-
Next to , click the icon.
This adds the trusted root of the ADFS signing certificate to the Trust Store.
-
On the Select Trusted Roots page, select the trusted root or certificate that you want to import, then click .
If there is no trusted root or certificate in the list, click . This enables you to import a trusted root or certificate.
-
Next to , click the icon.
-
Select the trust stores where you want to add the trusted root or certificate, then click twice.
-
Update Identity Server.
Continue with Configuring the ADFS Server to Be an Identity Provider.
Configuring the ADFS Server to Be an Identity Provider
The following tasks describe the minimum configuration required for the ADFS server to act as an identity provider for Access Manager Identity Server:
For additional configuration options, see Additional WS Federation Configuration Options.
Enabling a Claim Type for a Resource Partner
You can enable three types of claims for identity on an ADFS Federation server. They are Common Name, E-mail, and User Principal Name. The ADFS step-by-step guide specifies that you do everything with a User Principal Name, which is an Active Directory convention. Although it could be given an e-mail that looks the same, it is not. This scenario selects to use E-mail instead of Common Name because E-mail is a more common configuration.
-
In the Administrative Tools, open the tool.
-
Navigate to the by clicking > > .
-
Ensure that E-mail is in this list.
-
Navigate to Active Directory by clicking > > .
-
Enable the :
-
Right-click this claim, then select .
-
Click the box.
-
Add the LDAP mail attribute by clicking > and selecting .
This is the LDAP attribute in Active Directory where the user’s e-mail address is stored.
-
Click .
-
-
Verify that the user you are going to use for authentication has an E-mail address in the mail attribute.
-
Continue with Creating a Resource Partner.
Creating a Resource Partner
WS Federation requires the two-way trust. The identity provider must be configured to trust the service provider, and the service provider must be configured to trust the identity provider. You have already set up the service provider to trust the identity provider (see Creating a WS Federation Identity Provider). This section sets up the trust so that the identity provider (the ADFS server) trusts the service provider (Identity Server).
-
In the Active Directory Federation Services console, access the Resource Partners page by clicking > > .
-
Right-click the , then click > .
-
Supply the following information in the wizard:
-
You do not have a resource partner policy file to import.
-
For the display name, specify the DNS name of Identity Server.
-
For the , enter the following:
https://<DNS_Name>:8443/nidp/wsfed/Replace <DNS_Name> with the name of your Identity Server.
This is the base URL of your Identity Server with the addition of /wsfed/ at the end.
-
For the Federation Services endpoint URL, specify the following:
https://<DNS_Name>:8443/nidp/wsfed/spassertion_consumer
Replace <DNS_Name> with the name of your Identity Server.
This is the base URL of your Identity Server with the addition of /wsfed/spassertion_consumer at the end.
-
Select .
Identity Server is outside of any forest, so do not select .
-
Select the E-mail claim.
-
Select the option.
-
-
Enable this resource partner.
-
Finish the wizard.
-
To test the configuration, continue with Logging In.
Logging In
-
In a client browser, enter the base URL of your Identity Server.
-
From the list of cards, select the Adatum contract.
-
(Conditional) If you are not joined to the Adatum domain, enter a username and password in the browser pop-up. Use a name and a password that are valid in the Adatum domain.
If you are using the client that is joined to the Adatum domain, the card uses a Kerberos ticket to authenticate to the ADFS identity provider (resource partner).
-
When you are directed back to Identity Server for Federation User Identification, log in to Identity Server with a username and password that is valid for Identity Server (the service provider).
-
Verify that you are authenticated.
-
Close the browser.
-
Log in again.
This time you are granted access without entering credentials at the service provider.
Additional WS Federation Configuration Options
You can enable the sharing of attribute information from Identity Server to the ADFS server. This involves creating an attribute set and enabling the sending of the attributes at authentication. See Configuring the Attributes Obtained at Authentication.
For other options that can be modified after you have created the trusted identity server configuration, see Modifying a WS Federation Identity Provider.
Managing WS Federation Providers
The WS Federation page allows you to create or edit trusted identity providers and trusted service providers. When you create an identity provider configuration, you are configuring Identity Server to be a WS Federation resource partner. When you create a service provider configuration, you are configuring Identity Server to be a WS Federation account partner.
-
Click .
-
Select one of the following actions:
New: Launches the Create Trusted Identity Provider Wizard or the Create Trusted Service Provider Wizard, depending on your selection. For more information, see one of the following:
Delete: Allows you to delete the selected identity or service provider. This action deletes the definition.
Enable: Enables the selected identity or service provider.
Disable: Disables the selected identity or service provider. When the provider is disabled, the server does not load the definition. However, the definition is not deleted.
Modify: Click the name of a provider. For configuration information, see Modifying a WS Federation Identity Provider or Modifying a WS Federation Service Provider.
-
Click , then update Identity Server.
Creating an Identity Provider for WS Federation
To have a trust relationship, you need to set up the ADFS server as an identity provider for Identity Server.
-
Click > > > .
-
Click , select , then specify the following details:
Field
Description
Specify a name that identifies the identity provider, such as Adatum.
Specify the federation service URI of the identity provider. For example, urn:federation:adatum.
Specify the URL for logging in, such as https://adfsaccount.adatum.com/adfs/ls/.
Specify the URL for logging out, such as https://adfsresource.treyresearch.net/adfs/ls/
Specify the path to the signing certificate of the ADFS server.
-
Confirm the certificate, then click .
-
For the authentication card, specify the following values:
Field
Description
Leave this field blank.
Specify a description that is available to the user when the user hovers the mouse over the card.
Select an image, such as , or any other image.
Select this option to display the card as a login option.
-
Click .
For information about additional configuration steps required to use this identity provider, see Using the ADFS Server as an Identity Provider for an Access Manager Protected Resource.
If you want to use Access Manager as a WS Federation identity provider and consumer, perform the following steps:
NOTE:Use this setup only in the test environment and not in the production environment.
-
Click > > > .
-
Click > , then specify the following details:
Field
Description
Specify a name that identifies the identity provider.
https://240onbox.nam.example.com:8443/nidp/wsfed/
https://240onbox.nam.example.com:8443/nidp/wsfed/ep.
https://240onbox.nam.example.com:8443/nidp/wsfed/loreply
-
Upload the test-signing certificate of the trusted identity provider.
NOTE:You can get the test-signing certificate from > > > > .
-
Click .
-
For the authentication card, specify the following values:
Field
Description
Specify an alphanumeric value. This value is persistent.
If you do not assign a value, Identity Server creates an internal value that keeps changing whenever you restart the Identity Server.
Specify a description to help a user understand the authentication method of the card.
This description is displayed when the user hovers over the authentication card.
Select an image.
Select this option to display the card as a login option.
-
Click .
Creating a Service Provider for WS Federation
To establish a trusted relationship with the ADFS server, you need to set up the ADFS server as service provider. The trusted relationship allows the service provider to trust Identity Server for user authentication credentials.
-
Click > > > .
-
Click > , then specify the following details:
Field
Description
Specify a name that identifies the service provider, such as TreyResearch.
Specify the provider ID of the ADFS server. The default value is urn:federation:treyresearch.
Specify the URL that the user is redirected to after login. The default value is https://adfsresource.treyresearch.net/adfs/ls/.
(Optional) Specify the URL that the user can use for logging out. The default value is https://adfsresource.treyresearch.net/adfs/ls.
Specify the path to the signing certificate of the ADFS server.
-
Click , confirm the certificate, then click .
For information about additional configuration steps required to use this service provider, see Using Identity Server as an Identity Provider for ADFS.
If you want to use Access Manager as a WS Federation service provider, perform the following steps:
NOTE:Use this setup only in the test environment and not in the production environment.
-
Click > > > .
-
Click > , then specify the following details:
Field
Description
Specify a name that identifies the service provider.
https://240onbox.nam.example.com:8443/nidp/wsfed/.
https://240onbox.nam.example.com:8443/nidp/wsfed/ep.
https://240onbox.nam.example.com:8443/nidp/wsfed/loreply
-
Upload the test-signing certificate.
NOTE:You can get the test-signing certificate from > > > > .
-
Click , confirm the certificate, then click .
Contracts Assigned to a WS Federation Service Provider
During federation, when a service provider initiates an authentication request, contract information may not be available. If the contract information is not available, Identity Server executes a default contract for validating the user. You can use the step-up authentication to assign a default contract for service providers in such scenarios.
The following scenario helps you understand the execution of contracts that are assigned to a WS Federation service provider:
Figure 4-15 Step-up authentication example with two applications
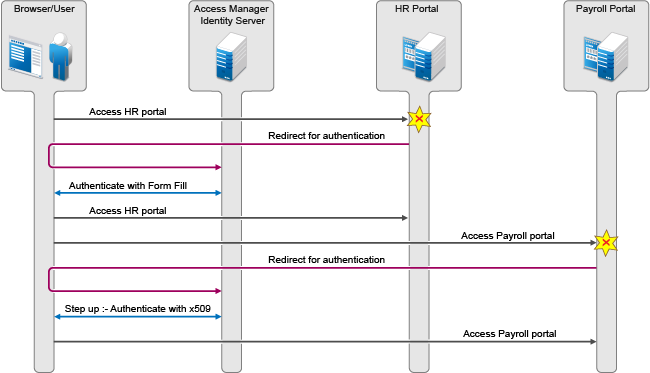
Two web applications Payroll Portal and HR Portal that are protected through different service providers use Access Manager Identity Server as an identity provider. A user wants to use the name/password form contract whenever the user accesses the HR application and wants to use the higher level contract X509 for the Payroll application. Identity Server provides ability to execute the appropriate contract that has been assigned to the service provider instead of executing the default contract.
Perform the following steps to assign a specific contract to a service provider:
-
Click > > > .
-
Click the configured service provider.
-
Go to > contracts and select the contracts from the list.
NOTE:When using the service provider (SP) initiated login with a WS Federation SP, the SP configuration can impact the selection of the Access Manager contract for authentication depending on the values sent in WS Fed authentication request. To make it work properly, you must define your Access Manager contract URI to match with the request sent by the service provider.