This section includes the following topics:
For more information about risk-based authentication, see Risk-based Authentication.
Configuring risk-based authentication involves the following steps:
Create a risk policy. For more information, see Configuring a Risk Policy.
Create a method for the risk-based authentication class. For more information, see Configuring a Method for an Authentication Class.
Create a contract for the risk-based authentication class. For more information, see Configuring a Contract for an Authentication Class.
You must consider the following points while configuring the risk-based authentication:
A rule must be included in a risk policy. A rule can exist in multiple risk policies.
A risk-based authentication class maps to only one risk policy and vice versa.
If a rule condition is not met, the score associated with that rule is added to the risk score. If the rule condition is met, the specified action is executed.
The risk level is determined based on the total risk score, that is the sum of the scores of all rule conditions that are not met.
If a rule is configured to allow or deny access and exit the policy when a condition is met, the risk score is zero as other rules in the group are not evaluated.
Before creating a risk-based policy, determine the following to understand the criteria for defining a rule:
The application or resource you want to protect.
The parameters you want to assess during a login attempt.
The risk score for each parameter.
The risk levels for risk scores.
The action for the risk levels.
If you want to record the details of risk assessment.
If you want to store history details from the risk assessment in MySQL, MicroSoft SQL Server, or Oracle database.
If you want to perform profiling on user login events based on the geolocation of the user.
If you want to assess the risk before a user attempts to login.
Configuring a risk policy includes the following three parts:
Adding a Risk Policy
Click Policies > Risk-based Policies > Risk Policy.
If there is no risk policy configured, clicking Risk Configuration opens the Overview page.
Click the Create Risk Policy icon.
NOTE:To create an identical copy of any existing risk policy:
Click Policies > Risk-based Policies > Risk Policy.
Locate the policy you want to clone and click the Clone Risk Policy icon. All rules and risk levels configured for the existing policy are copied to the new policy.
Specify a name for the new policy and assign a cluster and an authentication class.
Under Add Risk Policy, specify the following details:
Risk Policy Name: Specify a name for the policy.
Policy Description: Describe the purpose of this policy.
Assign Policy To: Select Identity Server cluster and then select an authentication class. You can select the class from the list of existing classes or you can create a new class.
NOTE:If you select an existing class, settings of the selected class are overwritten with values of this policy.
For creating a new class, perform the following steps:
Select either of the following options:
Calculates the risk score after authentication. For more information, see Risk Assessment and Risk Mitigation after Authenticating a Login Attempt.
Calculates the risk score before authentication. For more information, see Risk Assessment and Risk Mitigation before Authenticating a Login Attempt.
NOTE:To modify an existing authentication class go to Identity Server > cluster > Edit > Local > Classes.
Specify a name for the class.
Select Record User History to record the user’s login details.
Before enabling this option, ensure that you have enabled recording user history in Policies > Risk Configuration > User History and configured a database. For more information, see History:.
NOTE:The Record User History option is available only for Risk-based Auth Class.
Select Use Cumulative Risk Score to add current risk score of the session to this evaluation.
If you select this option, ensure that you have defined appropriate risk levels in this class to accommodate the cumulative value. For more information, see Cumulative Scoring:.
To send the user name, risk score, and risk level of a specific login attempt to an external REST interface, click Score Sharing URLs and specify the URL of the interface. The external REST interface uses this score information to perform additional actions on the user’s identity.
(Optional) Specify the REST endpoint authentication credential. Whenever the risk score is sent to the REST endpoint, the endpoint sends these credentials as a basic authentication header. If the REST endpoint is protected by using basic authentication, then this credential is used.
If Reduce Score is enabled, the reduced risk score is sent to the REST endpoint for a successful additional authentication.
After enabling Score Sharing URLs, you must enable the identified risk scores for sharing.
You can enable two Score Sharing URLs. If the REST endpoint is down, a warning message is logged in the log file (Linux: catalina.out; Windows: stdout.log). If the REST endpoint is down during risk score sharing, the risk is not cached and will not be shared later.
NOTE:The Score Sharing URLs option is available only for Risk-based Auth Class.
Continue with Configuring Policy Rules.
Configuring Policy Rules
You can select a rule from the existing list or create a new rule and then assign it to the risk policy. You can assign multiple rules to a policy. The rules are executed in the top to bottom sequence. You can drag and drop to change the priority and sequence of rules. Rules for which action is defined as Allow Access, Deny Access, or Exit with Risk Level as specified risk level are executed as specified in the rule irrespective of the risk score accumulated for other rules that previously failed.
For each rule you want to add to a policy, you must perform the following steps:
To create a new rule, perform the following actions:
Click Actions > Create Rule.
Specify a rule name.
Select a rule definition. For details, see Step 2 in Configuring Rules.
Click OK.
Define actions for the rule.
Condition |
Action |
---|---|
If rule condition is met |
Select any of the following options:
|
If rule condition is not met, add risk score |
Specify the risk score that will be stored when the rule evaluation fails. |
NOTE:You can also create a rule here Policies > Risk-based Policies > Rules > New. See Configuring Rules.
To select a rule from the existing list, perform the following actions:
Under Policy Rules, click Actions > Add Existing Rule.
In Risk Rule, select the rule you want to add from the list.
Define actions for the rule. For details, see Step 1.e.
NOTE:To validate the rule configuration and view the result when a condition is met, click Actions > Toggle Validate. For more information, see Understanding How to Use the Validate Tool to Emulate Total Risk Score and Risk Levels.
Continue with Configuring Risk Levels.
Configuring Risk Levels
Under Risk Levels, click Actions > Add Risk Level.
Specify the following details:
Risk Level: Select a risk level to associate with the risk score. If you select Other, specify a name to identify the custom risk level.
Risk Score: Specify a risk score to be associated with the risk level. The risk score indicates a value that is stored in the database after rule evaluation fails.
Action: Select an action for this risk score.
If you select Additional Authentication under Action, you can either select a class or a method to configure the step-up authentication. Typically, the step up to a method is used when branding, overwriting of users, or a change of userstore is required. If the userstore of the Additional Authentication is same as the risk-based authentication class and no additional branding is needed, then use a class.
Reduce Score: After a successful additional authentication, you can configure to reduce the associated risk score. Specify the value that you want to reduce from the risk score in this field. For more information, see Risk Score Reduction after a Successful Additional Authentication:.
Share Score: Select this option if you want to send the risk score of this risk level to the URL specified in Score Sharing URLs in the associated authentication class. You can share risk scores only for the risk levels configured for Risk-based Auth Class.
This option is available only if at least one Share Score URLs is configured for the authentication class.
Continue with Configuring a Method for an Authentication Class.
Click Local > Method > New to create a new method for the risk based authentication class.
Specify a name to identify the method.
Select the risk-based authentication class from Class.
Deselect Identifies User.
NOTE:If the policy is using Risk-Based Pre-Auth Class, this options must be selected at least in one method of the contract.
Select a user store from the list of Available User Stores.
IMPORTANT:In a risk-based authentication class, properties configured for the risk-based authentication method are ignored. So, if you want to configure additional properties, add the property to the risk-based authentication class.
Continue with Configuring a Contract for an Authentication Class.
Click Local > Contract > New to create a new contract for the risk based authentication class.
Specify a name to identify the contract.
You can either use an existing authentication contract or create a new authentication contract. For example, for Risk-based Auth Class, you can add the default Name/Password – Form method as the first method and risk-based authentication method as the second method. For Risk-based Pre-Auth Class, the risk-based authentication method must be configured as the first method.
Click Next to configure a card for the contract. For more information about configuring contracts, see Section 5.1.4, Configuring Authentication Contracts.
NOTE:If you want to use this contact in federation, ensure that you assign this contract to a protected resource.
Click Policies > Risk-based Policies > Rules > New.
Specify a name for the rule and select a rule type in Rule Definition based on your requirement and specify the details.
Rule Type |
Procedure |
---|---|
IP Address |
|
Cookie |
|
HTTP Header |
|
User Profile |
|
User Last Login |
|
User Time of Login |
|
Device Fingerprint |
|
Device ID (Deprecated) |
In Access Manager 4.3, this rule has been replaced with the Device Fingerprint rule. If you have configured any Device ID rule in Access Manager 4.1 or 4.2, this rule will be listed as deprecated after upgrading to Access Manager 4.3. |
Geolocation |
|
External Parameter Configuration |
For an example about configuring external parameter, see Using External Parameters in Risk Assessment:. NOTE:To use this rule, you must create a custom class to retrieve details from an external provider. For more information, see |
Custom Rule |
|
When you choose to record user history details for a risk policy that is linked to an authentication class, you get the flexibility to segregate the history details as per your requirement.
Consider a situation where you have configured the following two risk policies:
One risk policy assesses authentication requests from internal users in an organization.
Another risk policy assesses authentication requests from users external to the organization.
The following risk-rules support enabling user history:
Custom Rule
Device Fingerprint Rule
Geolocation Rule
IP Address Rule
User Time of Login Rule
To record the history details for internal users only, enable the recording of user history at the risk-based authentication class that is used to authenticate the internal users.
Recording the user history involves the following steps:
Configuring an external database to log history records. For more information, see Section 5.5.9, Configuring an External Database to Store User History.
Enabling user history. For more information, see Enabling User History.
Enabling user history while configuring a rule. For more information, see Configuring Rules.
Configuring user history for a risk policy that is linked to an authentication class. For more information, see Configuring a Risk-based Authentication Class.
Click Policies > Risk-based Policies > User History.
Select Enable User History to save the user session details in the database.
Under History Settings, you can either specify the number of days of history to consider during the rule execution or select the option to consider all historical records. For example, if you specify 10, it indicates that the details of last 10 days must be considered during the rule execution. If you do not specify the number of days, all historical records are considered for the execution.
NOTE:If you select Built-in Data Store (Bundled eDirectory) as History Data Store, specify the number of entries instead of the number of days. eDirectory supports recording history only up to 5 entries.
(Conditional) To store details in eDirectory, select Built-in Data Store (Bundled eDirectory).
NOTE:In a production environment, it is strongly recommended that you do not use eDirectory as the data store.
(Conditional) If you choose to save the session details in an external database, select External Database.
Specify the name to identify the driver.
Select the Database Driver. The driver path and dialect are displayed. You can change the driver and dialect details if required.
Specify the Username and Password to access the database.
Specify the URL to access the database.
NOTE:To configure MySQL as the database, ensure that the database URL is specified as mysql://db_user:db_user@localhost/netiq_risk?autoReconnect=true.
For information about configuring an external databases, see Section 5.5.9, Configuring an External Database to Store User History.
If you have enabled user history, details for all login attempts using a risk-policy or a device fingerprint policy are recorded in the database. This may result in huge data and occupy a large space. It is recommended to delete the entries periodically after you complete the analysis.
Go to Start > All Programs > Microsoft SQL Server 2016 > SQL Server Management Studio.
Connect to the database engine.
Expand Databases, you can see the netiq_risk database.
Click New Query.
To check the number of entries in the usrtransaction table, select the following command and click Execute.
Select * from dbo.usrtransaction;
To delete entries, select the following command and click Execute:
Delete from dbo.usrtransaction;
NOTE:This command deletes all entries in the table. If you want to delete a specific range of entries, use the appropriate SQL command.
Perform step 5 and 6 for the device fingerprint table (device_fingerprint) also.
Connect to MySQL Server installed on Linux by using the MySQL client:
mysql -u root -p password
Connect to the use netiq_risk database.
use netiq_risk;
List the tables. The usrtransaction table is listed in the list of tables.
show tables;
Delete entries.
delete from usrtransaction;
NOTE:This command deletes all entries in the table. If you want to delete a specific range of entries, use the appropriate SQL command.
Perform step 4 for the device fingerprint table (device_fingerprint) also.
Open Oracle SQL Developer.
Right-click Connections and select New Connection.
Connect to the database engine.
Expand Connections, you can see the netiq_risk database under .
To check the number of entries in the usrtransaction table, select the following command and execute:
Select * from usrtransaction;
To delete entries, select the following command and execute:
Delete from usrtransaction;
NOTE:This command deletes all entries in the table. If you want to delete a specific range of entries, use the appropriate command.
Perform step 5 and 6 for the device fingerprint table (device_fingerprint) also.
Click Policies > Risk-based Policies > Geolocation.
Select Enable Location Profiling to fetch location data from a geolocation database. This helps to identify the location of the user based on the IP address details.
Select a Geolocation Provider. The available options are:
Database |
Details |
---|---|
Neustar Service |
|
Custom Provider |
|
You can configure Identity Server to retrieve IP addresses in a NAT environment.
Click Policies > Risk-based Policies > NAT Settings.
Specify the name of the field to use for fetching the IP address of the client.
Specify the regular expression to retrieve the client IP address from the HTTP header value.
When you use the regular expression .* , the rule execution fails even if the client IP address exists in the list of multiple IP addresses. So, if you want to retrieve an IP address from a list of multiple IP addresses, modify the regular expression accordingly.
For example: If you specify the regular expression as .*?(?=,), Identity Server considers the first IP address in the list to calculate risk.So, if the list of IP addresses are similar to 10.20.20.1,10.30.30.1,10.40.40.1, the regular expression .*?(?=,) returns IP address 10.20.20.1.
NOTE:if you have only one address, .* is sufficient. The approach described in step 3 is required for a list of addresses in the x-forwarded-for format.
In an authorization policy, you can define a condition group that uses risk scores from Identity Server to protect a resource.
Defining a Condition Group and Assigning Actions:
Select Policies > Policies.
Select the policy container and click New.
Specify a name for the policy and select Access Gateway: Authorization for the type of policy.
From the Condition Group, select Risk Score. For more information about Comparison, Value, and Result on Condition Error, see Risk Score.
Select an action. For more information about actions, see step 7 in Creating Access Gateway Authorization Policies.
This section explains the use cases and their configuration steps demonstrated in the Try Now option on the Risk Configuration > Overview interface.
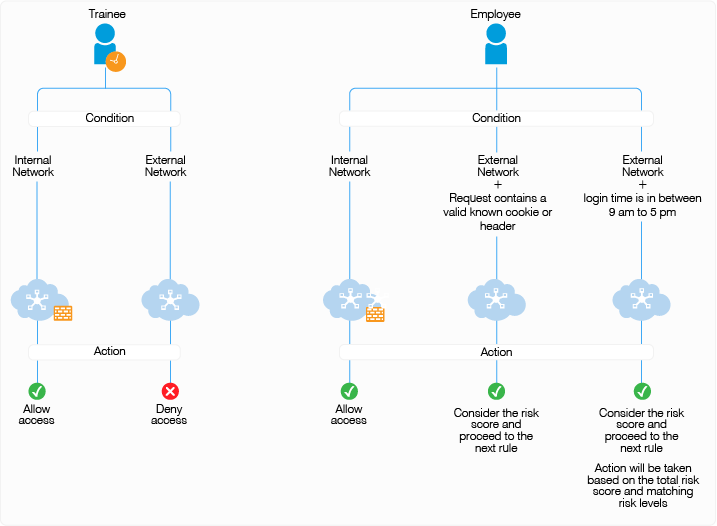
Let us assume a company named Company1 wants to control access to its resources. There are two users. One is a permanent employee of Company1 and another is a trainee at Company1. This configuration will refer the regular employee as Employee and the trainee as Trainee.
Company1 wants to achieve the following actions:
Scenario 1: Trainee or Employee is accessing the resource by using the internal network: Allow access.
Scenario 2: Trainee is accessing the resource by using the external network: Deny access.
Scenario 3: Risk associated with accessing the resource from an external network can depend various conditions. The following are the conditions with equal weightage:
Employee’s request contains a cookie from the Intranet site or has a header from the Payroll site, indicating that Employee was successfully logged into these resources earlier.
Employee is logging in during normal work hours that is 9 am to 5 pm
All conditions are evaluated. The risk decreases as the number of conditions met increases. The action performed depends on the risk score and associated risk level.
The following diagram illustrates the rule execution logic of the demo risk policy:
You can configure rules for these scenarios and arrange the rules in the order of priority on the UI. The rules are executed based on the priority from top to bottom. You can drag and drop rules on the UI to change their priority.
In this sample, the following five rules are created and executed in the same sequence:
Sequence of Execution |
Rule Name |
Action |
---|---|---|
1 |
DemoRule_InternalNetwork: |
If Trainee or Employee is in the internal network, then allow access and exit the policy. If not, add risk score of 20 and proceed to the next rule. |
2 |
DemoRule_TraineeUser |
If Trainee is accessing from an external network, deny access and exit the policy. If Employee is accessing from an external network, add risk score of 20 and proceed to the next rule. |
3 |
DemoRule_Combo |
If Employee is accessing with a cookie from the payroll site or HTTP Header value contains loggedIn, proceed to the next rule with the total risk score accumulated due to the failure of the above three rules. For example, assume the risk score for each rule is 20. If the condition for this rule is met, then proceed to next rule with a risk score 60. If the condition for this rule is not met, then proceed to next rule with a risk score of 80. NOTE:To use this rule, you must set cookies or headers per domain with a path of /, so that Identity Server can receive them. |
4 |
DemoRule_TimeOfLogin |
If Employee is logging in using an external network and time is in between 9 AM to 5 PM, proceed to the next rule. The risk score will depend on whether the condition of the DemoRule_Combo was met. If the conditions of both DemoRule_Combo and DemoRule_TimeOfLogin rules fail, the total risk score will be 100 and access will be denied. |
The following steps have been performed to configure the demo risk policy for the identified scenarios:
Go to Policies > Risk-based Policies > Risk Policy.
Click the Create Risk Policy icon.
Under Add Risk Policy, specify the following details:
Risk Policy Name: Specify Demo_RiskPolicy.
Policy Description: Specify the purpose of this policy.
Assign Policy To: Select Identity Server cluster and then configure an authentication class.
Select Create Risk-based Auth Class.
Specify Class Name as Demo_RBAAuthClass.
Click Save.
Create the following rules:
Under Policy Rules, click Create Rule and specify the following values:
DemoRule_InternalNetwork
Rule Name: DemoRule_InternalNetwork
Rule Definitions: IP Address Rule
Specify the IP address range as 121.1.1.1 - 121.121.255.255 and click OK
If rule condition is met, then: Allow Access and Exit Policy
If rule condition is not met, add risk score: 25
Click OK.
DemoRule_TraineeUser
Rule Name: DemoRule_TraineeUser
Rule Definitions: User Profile
Select EmployeeType, Equals, and then specify Trainee. Click OK
If rule condition is met, then: Deny Access and Exit Policy
If rule condition is not met, add risk score: 25
Click OK.
DemoRule_Combo
Rule Name: DemoRule_Combo
Rule Definitions:
Rule 1: Cookie Rule
Cookie Name: IntranetCookie
Cookie Value: is test 12
Rule 2: HTTP Header Rule
HTTP Header Name: PayrollAccessHeader
HTTP Header Value: Contains loggedIn
Combination Rule Definition: In Condition Group, click Assign Rules and then select both rules. Select OR in Group Operator
If rule condition is met, then: Proceed to Next Rule
If rule condition is not met, add risk score: 25
Click OK
DemoRule_TimeOfLogin
Rule Name: DemoRule_TimeOfLogin
Rule Definitions: User Time of Login Rule
User time of login: is
Day: Monday to Friday
Time: 9 AM to 5 PM
Click OK
If rule condition is met, then: Proceed to Next Rule.
If rule condition is not met, add risk score: 25
Click OK
Under Risk Levels, click Actions > Add Risk Level and create the following risk levels:
Low
Field |
Value |
---|---|
Risk Score |
Less than 35 |
Risk Level |
Low |
Action |
Allow Access |
Medium
Field |
Value |
---|---|
Risk Score |
Between 35 and 75 |
Risk Level |
Medium |
Action |
Authenticate using Trust levels |
High
Field |
Value |
---|---|
Risk Score |
Greater than 75 |
Risk Level |
High |
Action |
Deny Access |
Click OK.
Create an authentication method. For more information, see Configuring a Method for an Authentication Class.
Create a contract. For more information, see Configuring a Contract for an Authentication Class.
Assign the contract to the protected resource.