5.5 Risk-based Authentication

Traditional password-based authentication systems have their own limitations at implementing security in an organization. Enhancing the strength of the password is inadequate to prevent security threats. Thus, there is a need to explore and apply better authentication techniques such as risk-based authentication.

Risk-based authentication provides context-aware access control that acts to balance the level of trust against risk. It enables organizations to address access-related risks and improves user experience. Risk-based authentication enables to validate the risk of an access request at the run time and take appropriate actions such as forcing an advanced authentication or denying access.

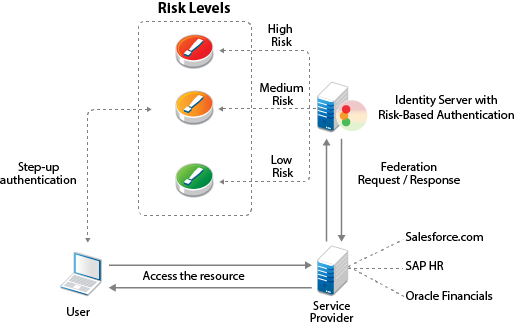
You can also assess risk in a federated setup with service providers such as Salesforce.com, SAP HR, and Oracle Financial with protocols such as SAML and WS Fed.

Access Gateway can also control access for a protected resource based on the risk score.

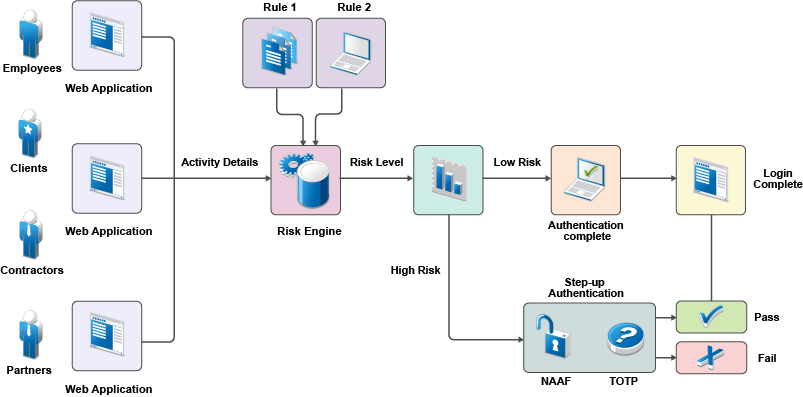
The following illustration depicts risk-based authentication process:

The following illustration depicts the risk-based authentication in a federated setup:

This section describes risk-based authentication concepts and how to configure it.

5.5.1 How Risk-based Authentication Works

You can configure risk-based authentication in the following two ways:

  • Risk assessment and risk mitigation before authenticating a login attempt

  • Risk assessment and risk mitigation after authenticating a login attempt

Risk Assessment and Risk Mitigation before Authenticating a Login Attempt

You can assess the potential risk of a particular login attempt before authenticating the user and then mitigate the risk, if required. You can also configure specific authentication mechanisms based on the risk. In this scenario, user profile is not involved. In this scenario, risk-based authentication works by developing a risk score based on the following parameters:

  • IP Address

  • Cookie

  • HTTP Header

  • Geolocation

  • External parameters

  • Time of login

  • Device Fingerprint (without user attributes)

  • Custom rule (without user attributes)

This risk score is then evaluated against defined risk levels. You can define the risk levels based on the sensitivity of the information. After the risk level is identified, the authentication mechanism is selected and the user is authenticated. In cases of high risk, the user is either denied access or is required to go through additional authentication methods.

NOTE:You cannot record history in this configuration because there are no user-context. If you want to use history with pre-authentication risk assessment, you must configure a post risk-based authentication.

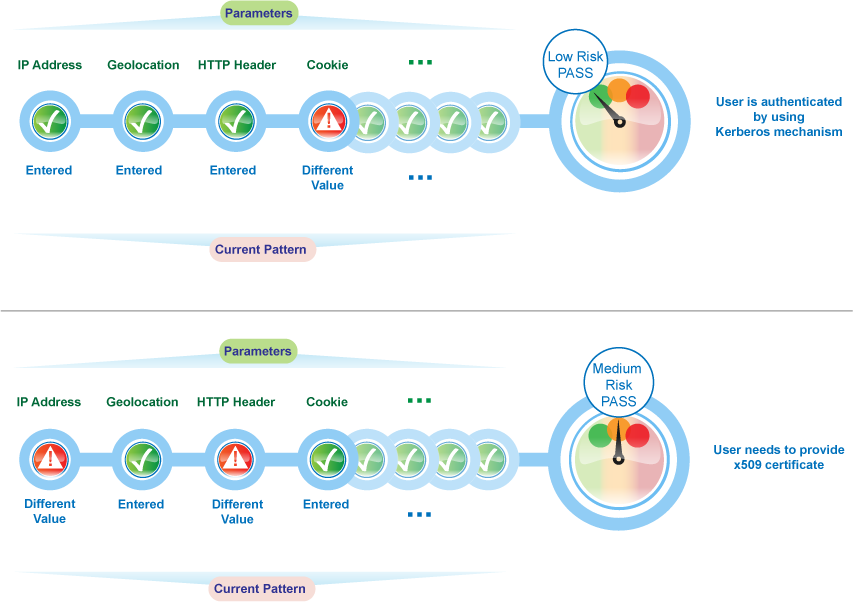
For example, an employee trying to log into a payroll application by using the corporate Intranet is authenticated through Kerberos authentication mechanism. However, the employee logging into the payroll application from outside the office must provide an x509 certificate for authentication.

The following graphic illustrates how risk-based authentication works in this scenario:

Risk Assessment and Risk Mitigation after Authenticating a Login Attempt

You can assess the potential risks associated with a particular login attempt after authenticating the user and then mitigate the risk, if required. In this scenario, risk-based authentication works by developing a risk score for each login attempt based on the following parameters:

  • Geographical location

  • Device Fingerprint

  • IP address

  • HTTP Header

  • User attributes

  • Cookie

  • User last login

  • Time of login

  • External parameters

  • Custom parameters

This risk score is then evaluated against defined risk levels. The risk levels are defined based on the sensitivity of the information. After the risk level is identified, the user is granted or denied access. In cases of high risk, the user is prompted for additional authentication to confirm the user identity one more time and assess the validity of the request.

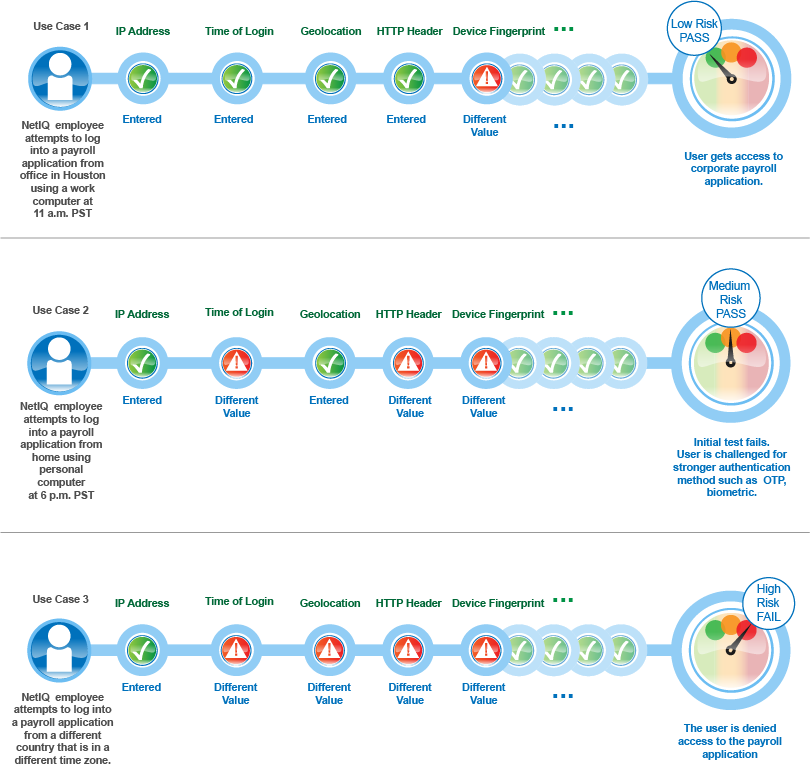
For example, an employee logging into a payroll application by using the office laptop during the usual business hours from the same location and IP address will have a low-risk score. Whereas, an attempt to access the payroll application by using a personal hand-held device from non-office location yields an elevated risk score. If the risk score for a user’s access attempt exceeds the defined risk score, the login attempt is considered as high risk, and the user might need to provide a higher level of authentication using a PIN or token.

Additional authentication can be implemented by using techniques such as TOTP authentication or Advance Authentication Framework methods. If the risk is too high, access can be denied. For more information, see Section 5.3, Advanced Authentication.

The following graphic illustrates how risk-based authentication works based on specific parameters:

5.5.2 Why Risk-based Authentication

Risk-based authentication helps you in achieving the following goals:

  • Reduce fraud and the risk of improper access

  • Enforce different levels of authentication depending on factors such as user activity and geolocation, and calculated risk score

  • Improve user experience. Users need to provide additional details for authentication only when the associated risk prevails

  • Access control in federated setups

Consider a scenario where a company named Company1 wants to protect its payroll application. Risk-based authentication enables Company1 to achieve the following actions:

  • Restrict access to its contractual employees.

  • Grant access to permanent employees during the company business hours between 9 a.m. to 5 p.m. After business hours, all employees must specify a one-time password in addition to login credentials.

  • Grant special privileges to employees who work in the Finance department. For example, Company1 does not ask employees of the Finance department to specify a one-time password even if they log in after business hours.

  • Grant access to the Self-Service tool along with the payroll application when contractual employees use Intranet to log in.

  • Determine actions based on the priority of rule conditions. For example, type of employment is the most important criterion to grant access followed by the location of the user, and then the time of the login attempt.

  • Grant access without any additional authentication if the user has successfully logged in within one month.

  • Restrict access when an employee tries to log in from a specific geographical location.

  • Grant or deny access based on the version of the web browser used for the login attempt.

  • Deny access to any login attempt that originates from a handheld device.

5.5.3 Features of Risk-based Authentication

Risk-based authentication provides the following features:

  • Risk identifications by using rule definitions: Risk-based authentication helps you define rules that are classified as follows:

    Rule Category

    Rule Description

    IP Address

    Use this rule to define a condition to track login attempts from an IP address, range of IP addresses, an IP subnet range, or a list of IP addresses from an external provider.

    For example: If you are aware that login attempts from a specific range of IP addresses are riskier, you can define a rule to watch for such login attempts. When a request originates from the specified IP address range, you can prompt for additional authentication.

    IMPORTANT:It is not possible to create a rule by using the IP subnet condition. Instead you can use the IP address range condition to select a range of IP addresses in the rule.

    NOTE:The IP address may not be the clients IP address, but that of an intermediate device. In such a case, you need to use the X-Forwarded-For to determine the IP address of the workstation

    Cookie

    Use this rule if you want to track login attempts from a browser-based application that has a specific cookie value or name.

    For example: Consider a scenario where you have a financial application and a user accessing this application has cookies stored on the browser. If the cookie has a specific value or name, the user can be granted access without additional authentication. But, if the user accessing the application has no cookies stored, then you can request additional authentication to validate the user.

    HTTP Header

    Use this rule to track the HTTP header of requests based on the name or the value contained in the HTTP header.

    For example, if you want to track HTTP requests containing custom HTTP header information, you can define the action to be performed on evaluation of this rule.

    User Last Login

    This rule creates a cookie in browser after a successful step up authentication. Subsequent login verifies this cookie. Use this rule to define the duration for which the cookie is valid. On expiry of the specified duration, the user is prompted for additional authentication.

    For example, this rule can be used to evaluate if the user is logging in by using a device that was used earlier for a login attempt. You can define the risk level and also request additional authentication, as necessary.

    User Profile

    Use this rule to define a condition based on the LDAP attribute of the user.

    For example, you can define a rule to deny access if the employee ID of the user matches a specific string.

    User Time of Login

    Use this rule to define a condition based on the user’s attempts to login at a specific time.

    For example, if the usual login pattern for an employee is between 9 a.m. to 5 p.m., you can define a rule that takes an action if the login pattern differs from the observed pattern.

    Device Fingerprint

    Use this rule to uniquely identify and control the type of device from which a user could log into the applications secured by Access Manager.

    When a user log in the first time from a device and device fingerprint is not available for that device, a risk is added and Access Manager can be configured to prompt for an additional authentication. After the first successful authentication, a device fingerprint is calculated based on the parameters configured in the Device Fingerprint rule.

    In subsequent login attempts, Access Manager verifies device fingerprint parameters configured in the Device Fingerprint rule.

    In the current implementation, you cannot add more than one Device Fingerprint rule per Access Manager setup.

    For more information about device fingerprinting, see Section 6.0, Device Fingerprinting.

    Device ID

    (Deprecated)

    In Access Manager 4.3, this rule has been replaced with the Device Fingerprint rule. If you have configured any Device ID rule in Access Manager 4.1 or 4.2, this rule will be listed as deprecated after upgrading to Access Manager 4.3.

    External Parameters

    Use this rule to consider inputs from external providers to evaluate the risk associated with a login attempt.

    For example, if a user is already authenticated with an external authentication provider, Access Manager receives authentication details from that provider such as the method used for the authentication. Access Manager can use this information for evaluating the risk.

    NOTE:To use this rule, you must create a custom authentication class to retrieve details from an external provider. For more information, see User Information Methods and Creating a Custom Rule Class in the NetIQ Access Manager 4.3 Developer Guide.

    Geolocation

    Use this rule to track login attempts based on the geographical location of the user. You can track details ranging from a wide area such as a country or to a smaller area such as a region.

    For example, you can use this rule to introduce additional authentication attempts in the following scenarios:

    • when a user logs in from a specific geolocation

    • when a user accessing from a specific gelocation to be considered as a valid user and be granted access without further checks

    Custom Rule

    Lets you to define your own custom rules by using a custom Java authentication class. This is useful in deployments where the existing rules do not meet the requirements.

    For example: Consider a situation where the HTTP header contains the company name in an encoded format. You can create a custom rule to decode the HTTP header and retrieve the name of the company. This value can later be compared to an LDAP attribute, and based on the results, action to be taken.

    Consider a situation where a user logs in from India at a specific time each day. You can create a custom rule that will prevent login by the same user from USA within 24 hours of the previous login attempt.

    For more information about creating a custom class, see NetIQ Access Manager 4.3 Developer Guide.

  • Risk Engine: The risk engine evaluates and assesses rules, including risk score and risk level processing. It ensures that the risk associated with the login attempt is considered during authentication.

  • History: Each time a user makes a login attempt, the rules are evaluated and then based on the analysis, the user is either granted access or additional authentication is requested. These details are stored in an external database. The details recorded in history are:

    • Risk score after evaluation of the rule

    • Last login time of the user

    • Geolocation details such as city or country

    • IP address of the client

    • Risk level details after evaluation of the rule

    • Details of additional authentication

    • Details of error messages displayed during risk assessment

    • Time zone details

    It is recommended to configure Oracle, MySQL, or Microsoft SQL Server as the database to store the risk-based authentication data. Built-in Data Store is not recommended in a production environment.

  • Risk Policies for risk mitigation: A risk policy is a group of risk rules. A rule must be assigned to a risk policy for functioning. The risk policy was called rule group in Access Manager 4.1.

  • Authorization policies for protected resources: You can define a condition group as part of the authorization policy that uses the risk score from Identity Server to protect a resource. This provides an additional level of security for your environment. For more information, see Configuring an Authorization Policy to Protect a Resource.

  • Risk score and risk levels validation utility: After configuring a risk policy and corresponding risk scores and actions, you can use the Validate utility to emulate the total risk score and the action in event of rule failure. The validation result indicates the total risk score and action. Based on these details, you can adjust the risk score and risk levels depending on your needs. For more information, see Understanding How to Use the Validate Tool to Emulate Total Risk Score and Risk Levels.

  • Risk Rule Validation Utility: To determine the best way to implement risk levels and actions for your business needs, use the Risk Rule Validation Utility to test different risk rules and risk scores. For more information about this tool, see Understanding How To Use the Risk Rule Validation Utility To Troubleshoot Rule Configuration.

  • Cumulative Scoring: You can configure to add the risk score of the current session while evaluating contracts.

    For example, assume that you have configured two contracts, Contract A and Contract B. Contract A contains both PreAuthRiskBasedAuthenticationClass and RiskBasedAuthClass (post authentication). In this case, cumulative scoring is enabled in RiskBasedAuthClass. When Contract A is executed, RiskBasedAuthClass considers the risk score calculated by PreAuthRiskBasedAuthenticationClass.

    Contract A is configured with the following two risk-based methods:

    • A_RiskMethod1, which uses a PreAuthRiskBasedAuthenticationClass that in turn uses a risk policy A_SamplePolicy1.

    • A_RiskMethod2, which uses a RiskBasedAuthClass that in turn uses a risk policy A_SamplePolicy2.

    For an arbitrary request, A_RiskMethod1 and A_RiskMethod2 calculate risk scores 100 and 150 respectively. As RiskBasedAuthClass has cumulative scoring enabled, total risk score calculated at the end of Contract A execution is 250.

    Contract B is configured with a method named B_RiskMethod. B_RiskMethod uses a RiskBasedAuthClass that in turn uses a risk policy named B_SamplePolicy. The risk score associated with this policy is 75. If evaluation of Contract B fails, 75 is returned as the risk score. If cumulative scoring is enabled, the final risk score of the session is 250 (risk score of Contract A) + 75 (risk score of Contract B) = 325. If cumulative scoring is not enabled, risk score is 75

  • Risk Score Reduction after a Successful Additional Authentication: The Reduction option enables you to reduce the risk score by a specified value after a successful strong additional authentication.

    For example, Assume you want to reduce the risk score by 100 after a successful additional authentication. You have configured to prompt for an additional authentication when the risk score is more than 200. You have configured an authentication class with a risk policy that includes the following rules:

    • IPAddressRule: If this rule fails, the risk score is 125

    • HTTPHeaderRule: If this rule fails, the risk score is 150

    • UserProfileRule: If this rule fails, the risk score is 200

    Specify 100 in Reduction. For an arbitrary request, IPAddressRule and HTTPHeaderRule have failed and the effective risk score is 275. The user will be prompted for an additional authentication. If this authentication succeeds, the risk score becomes 175. If you have configured to share the risk score, the reduced risk score is shared. If you have enabled recording user history, the reduced value is logged.

    If the risk score value is less than one after reduction, risk score will be considered as zero.

  • Using External Parameters in Risk Assessment: The External Parameters Rule enables you to consider inputs from external providers in evaluating the risk associated with a login attempt.

    For example, if a user is already authenticated with an external authentication provider, Access Manager can receive authentication details such as the authentication type, IP address, and location of the user from that provider. Access Manager can then use this information for evaluating the risk.

    You can configure to retrieve the input based on multiple parameters. Assume, you want to get the input if the user is from US and the method used to authenticate is Kerberos. Also, the user must not be using a device with the anti-virus software version 1.1.0.99. In this scenario, the configuration is as follows:

    1. Create Parameter Set 1, set logical operator as AND, and configure the following two parameters:

      Parameter Name

      Regex

      Operator

      Parameter Value

      Authentication Mechanism

      NA

      Is equal to

      Kerberos

      Location

      NA

      Is equal to

      US

    2. Create Parameter Set 2 and configure the following parameter:

      Parameter Name

      Regex

      Operator

      Parameter Value

      Anti-virus software

      \\d+\\.\\d+\\.\\d+\\.\\d+

      is not equal to

      The version of anti-virus software is 1.1.0.99.

    3. Set the logical operator between parameter sets as AND.

    NOTE:To use this rule, you must create a custom class to retrieve details from an external provider. For more information, see User Information Methods and Creating an Authentication Class in the NetIQ Access Manager 4.3 Developer Guide.

5.5.4 Key Terms

Table 5-6 Risk-based Authentication Terms

Term

Description

Rule

A rule indicates a condition that you want to evaluate during a login attempt. For evaluation, a rule is linked to a risk policy. A rule can be assigned to multiple risk policy.

For example, to assess the IP address of a user and the location from which the user logs in, you need two separate rules: One for IP address and another rule for location.

Risk Policy

You can combine one or more rules with a risk policy. A rule cannot be processed without being included in a risk policy. You can combine multiple rules in a risk policy.

Risk Score

The value that is returned if the rule conditions do not meet.

For example, you have set the risk score as 50. If the risk evaluation fails, 50 is the value returned to the risk engine.

Assume that the IP address rule is assigned a risk score of 50 and the geolocation rule is assigned a risk score of 30. If both IP address rule and geolocation rule fail, the risk score is 80. If only the IP address rule fails, the risk score is 50. As the geolocation rule is evaluated successfully, the risk score is 0 for this rule.

Is/Is Not condition

When you configure a rule and select a parameter for assessment, you can determine how the conditions must match for each of the subparameters.

For example, if you configure a rule to assess the IP address of a user, you can configure whether the IP address must be specific, be in a range, or be in a particular subnet.

For example, if you want to assess whether the IP address of a user is within a range of 10.10.10.1 to 10.10.10.10, you can specify an Is condition in the rule configuration. This indicates that when the rule is evaluated, only IP addresses in the range of 10.10.10.1 to 10.10.10.10 must be considered as a valid IP addresses and then the user must be granted access.

During the rule evaluation, if you want a rule to be passed when it does not meet a specific criteria, select Is Not in the rule configuration screen. For example, if you want to stop all login attempts from a particular IP address, then configure a rule using the Is condition. Using the same example as above, if you want to stop any login attempts from IP addresses in the range of 10.10.10.1 to 10.10.10.10, configure the rule using the Is Not condition.

Combination Rule

When you configure a set of rules, it is configured with the OR logical operator, by default.

For example, if you have configured an IP address rule and a geolocation rule without any additional configuration, either the IP address rule is evaluated or the geolocation rule is evaluated. But, if you want both the IP address rule and the geolocation rule to be evaluated during a login attempt, configure a combination rule. A combination rule lets you use the AND/OR logical operators to configure a rule based on your preferences.

For example, If you configure an IP address rule and a geolocation rule, select the AND operator to evaluate both rules. Whereas if you use the OR operator, either IP address rule or the geolocation rule is evaluated.

Risk Level

When a rule fails to evaluate successfully, the risk score is returned to the risk engine. If you have multiple rules configured, for each rule that fails to evaluate successfully, the risk score is added up to get a cumulative score. When configuring the risk level, you can determine the action the risk engine has to take if the total risk score crosses a certain limit and the risk level for the value.

For example, you can determine that the risk is low if the total risk score is less than or equal to 50. Whereas if it is greater than 50, some action is required. Here action might mean an additional authentication request for the user.

Action

When a risk level and the associated risk score crosses the set threshold limit, you can configure the action as deny access or demand additional authentication.

For example, if you have defined a risk level of High for a cumulative risk score of greater than 50, then you can specify that either the user must be denied access or additional authentication methods must be requested.

5.5.5 Understanding Risk-based Authentication through Scenarios

The following are few example configuration to describe how you can use risk-based authentication:

Scenario 1

You want to enable two-factor authentication for a user outside the corporate network, and single factor authentication when the user is in the corporate network.

You can configure risk-based authentication in this scenario by using Risk-based Pre-Auth Class. You can determine the authentication method required for an access based on the context before the user’s identity is validated through authentication. You can choose from many authentication methods and apply them as per your security policy requirements.

For example, you can enable a simple username/password prompt when the user is in the internal network. If the user is trying to login from outside the corporate network using a known device, prompt for Advanced Authentication Framework (username/password and smartphone) authentication.

Configuration Steps:

  1. Go to Policies > Risk-based Policies > Risk Policy.

  2. Click the Create Risk Policy icon.

  3. Under Add Risk Policy, specify the following details:

    Risk Policy Name: Specify a name.

    Policy Description: Specify the purpose of this policy.

    Assign Policy To: Select Identity Server cluster and then configure an authentication class.

    • Select Risk-based Pre-Authentication Class.

    • Specify Display Name.

    • Click Save.

  4. Create an IP Address rule.

    1. Under Policy Rules, click Create Rule and specify the following values:

      • Rule Name: Specify a name.

      • Rule Definitions: Select IP Address Rule.

      • Select Allow if IP Address Is in the list.

      • Specify the corporate IP Address details. For more information, see IP Address in Step 2.

    2. Click OK.

    3. If rule condition is met, then: Exit with Risk level as.

    4. Select Risk Level: Low

    5. Click OK.

  5. Create a Device ID rule.

    1. Under Policy Rules, click Create Rule and specify the following values:

      • Rule Name: Specify a name.

      • Rule Definitions: Select Device ID Rule.

      • Specify the details. For more information, see Device ID in Step 2.

    2. Click OK.

    3. If rule condition is met, then: Exit with Risk level as.

    4. Select Risk Level: Medium

    5. If rule condition is not met, add risk score: 50

    6. Click OK.

  6. Under Risk Levels, click Actions > Add Risk Level and create the following risk levels:

    • Low

      Field

      Value

      Risk Score

      Less than 50

      Risk Level

      Low

      Action

      Authenticate by using Name/Password - Basic

    • Medium

      Field

      Value

      Risk Score

      Equals to or greater than 50

      Risk Level

      Medium

      Action

      Authenticate by Advanced Authentication Framework (username/password and smartphone)

      NOTE:To enable this configuration, you must configure Advance Authentication Framework with Access Manager. For more information, see Access Manager - Advanced Authentication Plugin User Guide.

  7. Click OK.

  8. Create an authentication method. For more information, see Configuring a Method for an Authentication Class.

  9. Create a contract. For more information, see Configuring a Contract for an Authentication Class.

  10. Assign the contract to the protected resource.

Scenario 2

You want to configure an authentication mechanism or an additional authentication mechanism based on the type of the device.

You can configure risk-based authentication in this scenario by using Risk-based Pre-Auth Class. You can create a risk rule to choose an authentication mechanism or an additional authentication mechanism based on the type of device used by a user.

For example, if a user is logging in from a mobile device, you can prompt the user to provide an additional authentication such as SMS or One-Time Password based authentication after the user is authenticated. You can define an HTTP Header rule by using a user-agent property such as Mozilla/5.0 (iPhone; U; CPU iPhone OS 3_0) to verify whether the request is from a mobile.

Configuration Steps:

  1. Click Risk-based Policies > Rules.

  2. Specify a name for the rule.

  3. Select HTTP Header Rule.

  4. Specify HTTP Header Name as X-Forwarded-For.

  5. Select Contains in HTTP Header Value and specify Mozilla/5.0 (iPhone; U; CPU iPhone OS 3_0).

    NOTE:You must configure NAT settings for this rule to work. See Configuring NAT Settings.

  6. Click OK.

  7. Assign the rule to a risk-policy and follow steps Step 7 to Step 9.

Scenario 3

You want to grant access only to employees. You want to deny access for any request from a specific region even if the user is an employee of your organization.

This scenario requires to create two separate rules: one for geolocation named example_geolocation and another for user profile named example_user_profile.

You can configure risk-based authentication for this scenario by using Risk-based Auth Class.

Configuration Steps:

  1. Go to Policies > Risk-based Policies > Risk Policy.

  2. Click the Create Risk Policy icon.

  3. Under Add Risk Policy, specify the following details:

    Risk Policy Name: Specify a name.

    Policy Description: Specify the purpose of this policy.

    Assign Policy To: Select Identity Server cluster and then configure an authentication class.

    • Select Create Risk-based Auth Class.

    • Specify Class Name.

    • Click Save.

  4. Create a Geolocation rule and a User Profile rule.

    • Geolocation Rule

      Under Policy Rules, click Create Rule and specify the following values:

      NOTE:You must configure a provider in the Geolocation user interface for a geolocation rule to work.

      • Rule Name: Specify example_geolocation.

      • Rule Definitions: Select Geolocation Rule.

      • User Location: Select Is not.

        Specify the following geolocation details of the region which you want to deny all login requests from:

        • Country Code
        • State Name
        • State Code
        • City Name
        • Zip Code
        • Metro Code
        • Area Code
        • Region Code
        • Region Name
      • If rule condition is met, then: Allow Access and Exit Policy

      • If rule condition is not met, add risk score: 60

      • Click OK.

    • User Profile Rule

      Under Policy Rules, click Create Rule and specify the following values:

      • Rule Name: Specify example_user_profile.

      • Rule Definitions: Select User Profile.

      • Select employeeType.

      • Select Equals.

      • Specify Employee.

      • If rule condition is met, then: Proceed to Next Rule

      • If rule condition is not met, add risk score: 60

      • Click OK.

        To evaluate example_user_profile first, drag it up before example_geolocation in the rules list in Administration Console.

  5. Under Risk Levels, click Actions > Add Risk Level and create the following risk level:

    For more information about risk scores, see Risk Score in Table 5-6, Risk-based Authentication Terms.

    Field

    Value

    Risk Score

    Equals to or greater than 50

    Risk Level

    High

    Action

    Deny Access

  6. Click OK.

  7. Create an authentication method. For more information, see Configuring a Method for an Authentication Class.

  8. Create a contract. For more information, see Configuring a Contract for an Authentication Class.

  9. Assign the contract to the protected resource.

Scenario 4

If the user is an employee and is not located in a specific region, grant the access. If the user is an employee, but accessing from a specific region, deny the access. If the user is an employee and accessing from the specified location, but the HTTP header contains a specified email ID, grant the access.

You can configure a risk policy for this scenario by using the combination rule. A combination rule assesses more than one parameter to validate an authentication request from a user.

The rule must assess the user profile and geolocation first and consider the HTTP header condition only when the first condition evaluation fails.

You can configure risk-based authentication in this scenario by using Risk-based Auth Class.

Configuration Steps:

  1. Go to Policies > Risk-based Policies > Risk Policy.

  2. Click the Create Risk Policy icon.

  3. Under Add Risk Policy, specify the following details:

    Risk Policy Name: Specify a name.

    Policy Description: Specify the purpose of this policy.

    Assign Policy To: Select Identity Server cluster and then configure an authentication class.

    • Select Create Risk-based Auth Class.

    • Specify Class Name.

    • Click Save.

  4. Create a Geolocation rule and a User Profile rule as a single rule.

    1. Under Policy Rules, click Create Rule and specify the following values:

    2. Rule Name: Specify example_combination_rule.

    3. Configure the geolocation rule.

      NOTE:You must configure a geolocation provider in the Geolocation user interface for this rule to work.

      1. Rule Definitions: Select Geolocation Rule.

      2. User Location: Select Is not.

      3. Specify the following geolocation details of the region which you want to deny all login requests from:

        • Country Code
        • State Name
        • State Code
        • City Name
        • Zip Code
        • Metro Code
        • Area Code
        • Region Code
        • Region Name
    4. Click Combine with to add the user profile rule.

      1. Select User Profile Rule.

      2. Under User Attributes, Select employeeType and Equals, and specify Employee.

    5. Click Combine with to add the HTTP Header rule.

      1. Select HTTP Header Rule.

      2. Specify the HTTP header Name and the specific HTTP header value that you want to search for an HTTP header.

    6. In Combination Rule Definition > Condition Group, click Assign Rules and then select user profile and geolocation rules. Select AND in Group Operator. For information about how these operators work, see Combination Rule in Table 5-6, Risk-based Authentication Terms.

    7. Click Add Condition Group and select HTTP Header Rule.

    8. Select the OR operator for Condition Group 1 and Condition Group 2.

    9. If rule condition is met, then: Allow Access and Exit Policy.

    10. If rule condition is not met, add risk score: 50

    11. Click OK.

  5. Under Risk Levels, click Actions > Add Risk Level and create the following risk levels:

    You can define actions for a risk score or for a range of risk score. When evaluation of all conditions in a risk policy fail, the action is taken based on the accumulated risk score.

    For more information, see Risk Score in Table 5-6, Risk-based Authentication Terms.

    • Low

      Field

      Value

      Risk Score

      Less than 30

      Risk Level

      Low

      Action

      Allow Access

    • Medium

      Field

      Value

      Risk Score

      Between 30 and 50

      Risk Level

      Medium

      Action

      Authenticate using Trust levels

    • High

      Field

      Value

      Risk Score

      Equals to or greater than 50

      Risk Level

      High

      Action

      Deny Access

  6. Click OK.

  7. Create an authentication method. For more information, see Configuring a Method for an Authentication Class.

  8. Create a contract. For more information, see Configuring a Contract for an Authentication Class.

  9. Assign the contract to the protected resource.

Scenario 5

You want to store the details of login attempts in the configured history databases and take actions based on these details in subsequent login attempts.

While configuring risk-based authentication, you can determine if you want to save the history details and the number of days for which history to consider for evaluation of the authentication attempt.

For example: Let us assume that you have enabled recording of history details and have specified that the history of last 10 days are used for evaluation before granting or denying access. If the user logs in from a different geolocation, additional authentication is requested as the risk is high. The risk evaluation details are stored in the database. Next time the user logs in from the same geolocation, the historical details for the last ten days are checked to see if there are details about a login attempt from the same geolocation. As the geolocation details exist in the database, the user is granted access without being prompted for additional authentication.

You can enable recording of user history only for a risk policy that uses Risk-based Auth Class.

For more information about how to enable recording of user history, see Configuring User History.

Scenario 6

You want to identify the characteristics or fingerprints of devices users use for login. The device can be a desktop, a laptop, or a mobile device. You want this information to achieve the following activities:

  • Uniquely identify users’ devices used in login attempts

  • Use the device identification details in evaluating risks associated with a login attempt and decide the action based on the risk.

You can configure a risk policy for this scenario by using the Device Fingerprint rule. The Device Fingerprint rule enables you to identify user devices previously used for access. A fingerprint can be imprinted on the device itself or stored to the risk database. In pre-authentication scenarios, the device fingerprints consist of the device characteristics. In post-authentication scenarios, the device fingerprints consist of the device characteristics and user identifier.

For example, when a user logs in the first time through a laptop, the user needs to provide an additional authentication. After the successful additional authentication, a device fingerprint is computed and stored either in the device (without any user information) or in the database (tied to the user). If the rule is configured for a pre-authentication scenario, the details are stored in the browser cache on the device. For a post-authentication scenario, you can configure to save these details in the browser cache or a risk database.When the user logs in next time, the device fingerprint of this device is computed and matched with the stored values. If the value does not match, the user is asked for additional authentication or a risk is added to the session.

For an example configuration, see Section 6.4, Configuring an Example Device Fingerprint Policy.

5.5.6 Understanding Risk Score Calculation

A risk score is assigned when a rule is added to a risk policy. This risk score indicates the priority and criticality of the rule.

For example, if you have configured a set of rules, but you want one rule to be the most important rule, assign it a higher risk score compared to the other rules. If the rule evaluation is successful, the risk score is set as zero.

If a rule evaluation is not successful, the risk score is set as the value of the rule. If you have configured multiple rules, the total risk score is the sum of risk scores of all the failed rules.

Scenario 1

Let us assume that you have created two rules to validate login requests to a financial application. You have determined that Rule 1 is the most critical rule and want users to gain access when this rule is evaluated.

Table 5-7 Risk Rules

Rules

Risk Score

If rule condition is met, then

Rule 1

50

Allow access and exit policy

Rule 2

30

Return risk level low

Depending on the risk score returned after evaluation of rule, risk level is assigned and action is taken.

Table 5-8 Risk Scores and Risk Levels

Total Risk Score

Risk Level

Action

31-80

Medium

Additional authentication must be requested.

0-30

Low

Allow access.

The following table describes how the rules are evaluated:

Table 5-9 Risk Score Calculation for the Rules

Scenario

Details

Total Risk Score

Action

Rule 1 is successfully evaluated.

Rule 2 is not considered for rule processing as Rule 1 is configured to exit the policy when condition is met.

0

Access is allowed.

Rule 1 and Rule 2 fail.

In this case, the total risk score is 80 as both the rules have failed.

80

Additional authentication is requested.

Scenario 2

You have created three rules to access login requests to a financial application. All the rules must evaluate successfully to grant access to the user.

Table 5-10 Risk Rules

Rules

Risk Score

If rule condition is met, then

Rule 1

50

Proceed to Next Rule

Rule 2

30

Proceed to Next Rule

Rule 3

10

Exit with Risk Level as...Low

Depending on the risk score returned after evaluation of rule, risk level is assigned and action is taken.

Table 5-11 Risk Scores and Risk Levels

Total Risk Score

Risk Level

Action

0-30

Low

Allow access

31-50

Medium

Additional authentication

51-100

High

Deny access

The following table describes how the rules are evaluated:

Table 5-12 Risk Score Calculation for the Rules

Scenario

Details

Total Risk Score

Action

Rule 1, Rule 2, and Rule 3 are successfully evaluated.

As all the rules are evaluated without errors, the risk score is 0.

0

Access is allowed.

Rule 1 evaluates successfully, but Rule 2 and Rule 3 fail.

The risk score is the value assigned to the rule that failed. In this case, the risk score is 40.

40

Additional authentication is requested.

Rule 1 fails, but Rule 2 and Rule 3 evaluate successfully.

The risk score is the value assigned to the rule that failed. In this case, the risk score is 50.

50

Additional authentication is requested.

Rule 2 evaluates successfully, but rule 1 and rule 3 fail.

The risk score is the sum of risk scores of all failed rules. In this case, the risk score is 60.

60

Access is denied.

Rule 2 fails, but rule 1 and rule 3 evaluate successfully.

The risk score is the sum of risk scores of all failed rules. In this case, the risk score is 30.

30

Access is allowed.

All the rules fail.

The risk score is the sum of risk scores of all failed rules. In this case, the risk score is 90.

90

Access is denied.

5.5.7 Configuring Risk-based Authentication

For information about configuring risk-based authentication, see Section 8.7, Risk-based Policies.

5.5.8 Enabling Auditing for Risk-Based Authentication Events

For information about risk-based authentication events and how to enable these, see Section 19.2, Enabling Identity Server Audit Events.

5.5.9 Configuring an External Database to Store User History

Access Manager supports MySQL, Oracle, and Microsoft SQL Server databases for storing risk history. This section provides details about how to configure these databases.

Configuring MySQL Database

  1. Unzip the RiskDBScripts.zip file containing script to extend the database and sample configuration files. The file is located at the following location:

    On Linux: /opt/novell/nids/lib/webapp/WEB-INF/RiskDBScripts.zip

    On Windows: C:\Program Files\(x86)\Novell\Tomcat\webapps\nidp\WEB-INF\RiskDBScripts.zip.

  2. On the MySQL server, execute the following command to create database objects for risk-based authentication:

    mysql -h host -u username -p password netiq_risk_mssql_install.sql

  3. Download the JDBC connector for the MySQL database from MySQL.com.

  4. Copy the JDBC connector to the /opt/novell/nids/lib/webapp/WEB-INF/lib/ folder.

  5. Restart Identity Server.

Configuring Oracle Database

  1. Unzip the RiskDBScripts.zip file containing script to extend the database and sample configuration files. The file is located at the following location:

    On Linux: /opt/novell/nids/lib/webapp/WEB-INF/RiskDBScripts.zip

    On Windows: C:\Program Files\(x86)\Novell\Tomcat\webapps\nidp\WEB-INF\RiskDBScripts.zip.

  2. On the Oracle server, execute the following script to create database objects for risk-based authentication:

    netiq_risk_oracle_install.sql

  3. Download the JDBC connector for the Oracle database from Oracle.com.

  4. Copy the JDBC connector jar to the /opt/novell/nids/lib/webapp/WEB-INF/lib/ folder.

  5. Restart Identity Server.

Configuring Microsoft SQL Server

  1. Unzip the RiskDBScripts.zip file containing script to extend the database and sample configuration files. The file is located at the following location:

    On Linux: /opt/novell/nids/lib/webapp/WEB-INF/RiskDBScripts.zip

    On Windows: C:\Program Files\(x86)\Novell\Tomcat\webapps\nidp\WEB-INF\RiskDBScripts.zip.

  2. On the SQL Server, execute the following script to create database objects for risk-based authentication:

    netiq_risk_sql_server_install.sql

  3. Download the JDBC connector for the SQL Server database from Microsoft.com.

  4. Copy the JDBC connector file sqljdbc42.jar to the /opt/novell/nids/lib/webapp/WEB-INF/lib/ folder.

  5. Restart Identity Server.

5.5.10 Enabling Logging for Risk-Based Authentication

  1. Click Devices > Identity Servers > Edit > Auditing and Logging.

  2. Select Enabled under File Logging.

  3. In the Component File Logger Levels section, specify any one of the following options for application logs:

    • Severe: Logs serious failures that can stop system processing.

    • Warning: Logs potential failures that have minimal impact on execution.

    • Info: Logs informational events.

    • Verbose: Logs static configuration information.

      The system logs any configuration errors under one of the three primary levels: Severe, Warning, and Info.

    • Debug: Logs events for all other log levels: Severe, Warning, Info, and Verbose.

For more information, see Section 21.3, Identity Server Logging.

5.5.11 Troubleshooting Risk Rule Configuration

The following sections describe how to troubleshoot rule configuration:

Understanding How to Use the Validate Tool to Emulate Total Risk Score and Risk Levels

After configuring a risk policy and the corresponding risk scores and actions, use Validate to emulate total risk score, risk level, and action in event of rule failure. Based on the results, you can modify the configuration, if required.

Let us consider a case where you have configured a risk policy that includes five rules. The rules and the corresponding risk scores are as follows:

Table 5-13 Sample Risk Policy Configuration: Rules

Risk Policy Name

Rule

Risk Score

Demo_RiskPolicy

Demo_InNetworkAtOfficeHours

20

Demo_InternalUser

20

Demo_KnownDevice

20

Demo_PayrollSiteCookie

20

Demo_UserProfile

20

Table 5-14 Sample Risk Policy Configuration: Risk Scores and Risk Levels

Risk Score

Risk Level

Action

Less than 30

Low

Allow access

Between 30 to 60

Medium

Authenticate with class Trust Levels

Greater than 60

High

Deny access

Now, open the risk policy for which you want to emulate total risk score, risk level, and action in event of rule failure. In the risk policy page, click Actions > Toggle Validate. Specify the rules as pass or fail to see the result along with a graphical reperesentation.

For example, specify pass and fail for rules as follows:

Rule

Condition

Demo_InNetworkAtOfficeHours

Failed

Demo_InternalUser

Failed

Demo_KnownDevice

Failed

Demo_PayrollSiteCookie

Passed

Demo_UserProfile

Passed

In this case, the validation result is as follows:

You can similarly specify any other rule as failed or passed to emulate the risk score and risk levels.

Understanding How To Use the Risk Rule Validation Utility To Troubleshoot Rule Configuration

After configuring a risk policy, you can use the Risk Rule Validation utility to evaluate the configuration of rules. This helps you understand how rules are evaluated in a risk policy.

During rule evaluation if there is a match with the values configured for the rules, the rule evaluation is successful. If no match is found, the rule evaluation fails.

Using the Risk Rule Validation Utility to Test Risk Configuration

To use the risk rule validation utility for testing risk configuration, perform the following steps:

  1. In the browser address bar, type the following URL:

    https://<identity-server-base-url>:port/nidp/test/risk

    For example: https://10.1.1.1:8443/nidp/test/risk

  2. Specify the credentials to log in.

  3. Select a risk policy for evaluation. Click Submit. The risk score, risk category evaluation results and HTTP request header and related information are displayed.

  4. [Optional] If you have logged in with administrator privileges, click Details to view details about risk configuration.

    NOTE:The Risk Rule Validation utility does not display details if Record User History is enabled and a user profile rule is configured.

Troubleshooting Rule Evaluation Details By Using the Log File

You can troubleshoot rule evaluation details by performing the following details:

Prerequisite

Ensure that you have enabled logging at the application level. For more information see, Enabling Logging for Risk-Based Authentication.

Using Logs to Understand How Rules are Evaluated

If you encounter any error during risk-based authentication, check the log files to review the error code. The log file location is:

Linux: /opt/novell/nam/idp/logs/catalina.out

Windows: \Program Files (x86)\Novell\Tomcat\logs\stdout.log

Consider a scenario where you have three rules configured as described in Table 5-13. Using this scenario as an example let us see how we can use the details in catalina.out file to understand how rules are evaluated.

Scenario 1: User Profile Rule Fails

In this scenario the User Profile rule fails to evaluate successfully. All other rules in the risk policy evaluate successfully.

The following tracelist detail from catalina.out file provides more information about rule evaluation, risk score, and action:

Figure 5-20 Tracelist providing information about rule evaluation

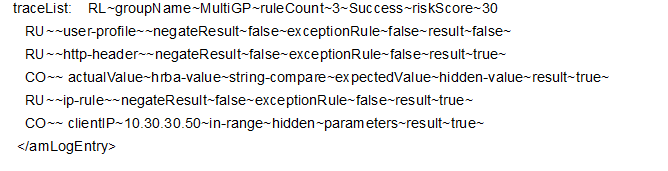
Table 5-15 Description of details recorded in the catalina.out file.

Entry

Description

user-profile~result~false

Indicates that user profile rule failed and the risk score of 30 is added to the total risk score.

http-header~result~true

Indicates that the HTTP header rule evaluated successfully.

ip-rule~result~true

Indicates that the IP address rule evaluated successfully.

Figure 5-21 Tracelist providing information about risk level and action

This log entry indicates that the as per the risk level/action configuration, the action taken is to allow authentication to the user and the risk score is 30.

Scenario 2: User Profile Rule Evaluates Successfully

In this scenario the User Profile rule evaluates successfully. As this rule is a configured to exit when conditions is met, all other rules in the risk policy are not considered for evaluation.

The following tracelist detail from catalina.out file provides more information on the rule evaluation, risk score and action.

Figure 5-22 Tracelist providing information about rule evaluation

Table 5-16 Description of details recorded in catalina.out file

Entry

Description

user-profile~result~true

Indicates that user profile rule evaluated successfully.

Figure 5-23 Tracelist providing information about risk level and action

This log entry indicates that the as per the risk level/action configuration, the action taken is to allow authentication to the user and the risk score is 0.

Scenario 3: Two rules fail and the user is asked to authenticate using additional authentication

In this scenario User Profile rule and the IP address rule fail to evaluate successfully. The HTTP header rule evaluates successfully.

The following tracelist detail from catalina.out file provides more information on the rule evaluation, risk score and action.

Figure 5-24 Tracelist providing information about rule evaluation

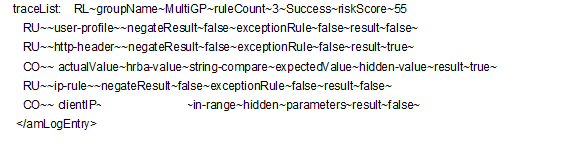
Table 5-17 Description of details recorded in the catalina.out file

Entry

Description

user-profile~result~false

Indicates that user profile rule failed and the risk score of 30 is added to the total risk score.

http-header~result~true

Indicates that the HTTP header rule evaluated successfully.

ip-rule~result~false

Indicates that the IP address rule failed and the risk score of 25 is added to the total risk score.

Figure 5-25 Tracelist providing information about risk level and action

This log entry indicates that the as per the risk level/action configuration, the action taken is additional authentication and the risk score is 55.

Scenario 4: All Rules Fail

In this scenario, all rules fail to evaluate successfully.

The following tracelist detail from catalina.out file provides more information on the rule evaluation, risk score and action.

Figure 5-26 Tracelist providing information about rule evaluation

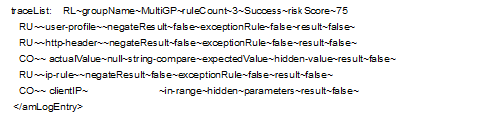
Table 5-18 Description of details recorded in the catalina.out file

Entry

Description

user-profile~result~false

Indicates that user profile rule failed and the risk score of 30 is added to the total risk score.

http-header~result~false

Indicates that the HTTP header rule failed and the risk score of 20 is added to the total risk score.

ip-rule~result~false

Indicates that the IP address rule failed and the risk score of 25 is added to the total risk score.

Figure 5-27 Tracelist providing information about risk level and action

This log entry indicates that as per the risk level/action configuration, the action is to deny access to the user and the risk score is 75.