1.5 Installing Access Manager Components in NAT Environments
This chapter provides information about deploying Access Manager components in a multi-tenant or service provider environment, where Network Address Translation (NAT) protocol is used as one of the network configuration. Topics include:
1.5.1 Network Prerequisites
Service Provider Network Setup
-
Obtain Static IP addresses for Administration Console, Identity Server, and Sentinel. If the IP address of the machine changes, the Access Manager components on that machine cannot start.
-
Install operating system, configure Network Time Protocol (NTP) server, and check connectivity.
-
NTP server, which provides accurate time to the machines on your network. Time must be synchronized within one minute among the components, or the security features of the product disrupt the communication processes. You can install your own or use a publicly available server such as pool.ntp.org.
IMPORTANT:If time is not synchronized, users cannot authenticate and access resources and data corruption can also happen in user stores.
-
An L4 switch if you are going to configure load balancing. This can be hardware or software (for example, a Linux machine running Linux Virtual Services).
-
There should be IP connectivity between different Access Manager components. Because the components can be in different private networks, you can use NAT, VPNs, or combination of both to achieve connectivity.
Customer Network Setup
-
A server configured with an LDAP directory (eDirectory 8.8.8.4 or later, Sun ONE, or Active Directory) that contains your system users. The Identity Server uses the LDAP directory to authenticate users to the system.
-
Domain name server, which resolves DNS names to IP addresses and which has reverse lookups enabled.
Access Manager devices know each other by their IP addresses, and some requests require them to match an IP address with the device's DNS name. Without reverse lookups enabled, these requests fail. In particular, Identity Servers perform reverse lookups to their user stores. If reverse lookups are not available, host table entries can be used.
-
Obtain Static IP addresses for Administration Console, Identity Server, and Sentinel. If the IP address of the machine changes, the Access Manager components on that machine cannot start.
-
There should be IP connectivity between different Access Manager components. Because the components can be in different private networks, you can use NAT, VPNs, or combination of both to achieve connectivity.
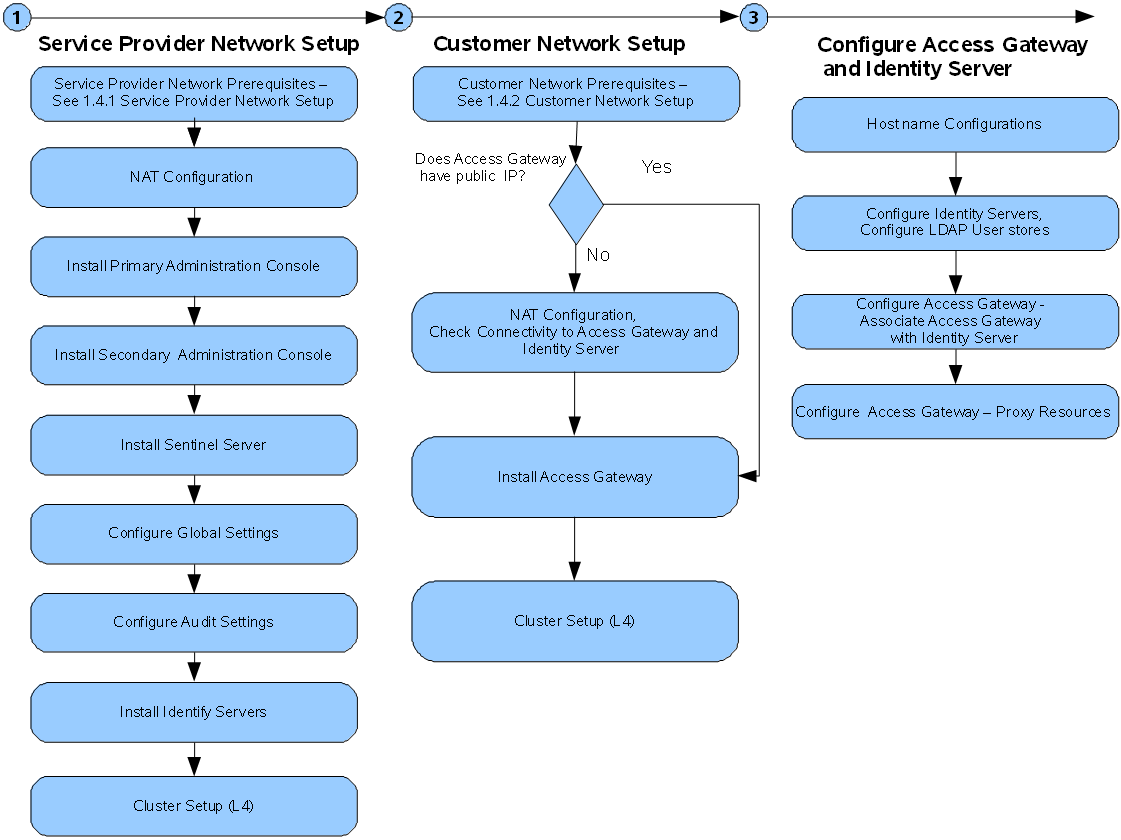
1.5.2 Network Setup Flow Chart
The network setup flow chart provides information about installing Access Manager components and configuring NAT in a multi-tenant or service provider network.
Figure 1-7 Network Setup Flow Chart
1.5.3 Installing Access Manager Components in NAT Environments
Installing Access Manager in the NAT environment consists of the following steps:
Installing the Administration Console
For installation requirements, see Installing the Administration Console.
-
Before installing Access Manager components, check the network connectivity across these machines.
-
Verify the link latency and ensure that it is less than 100 milliseconds.
If the link latency is greater than 100ms, it might lead to performance degradation.
-
Synchronize time across all Access Manager components.
The primary Administration Console should be configured to synchronize time with the corporate Network Time Protocol (NTP) server. The remaining machines should be configured to synchronize time with the primary Administration Console.
-
Add the following entry to the /etc/crontab file on the primary Administration Console:
*/5 * * * * root sntp -P no -r <corporate NTP_Server> >/dev/null 2>&1
-
Add the following entry to the /etc/crontab file of other Access Manager machines:
*/5 * * * * root sntp -P no -r <Primary_Admin_Console_IP> >/dev/null 2>&1
-
-
Install the primary Administration Consoles by providing the listening IP address for the primary Administration Console.
For more information about installing the Administration Console, see the Installing the Administration Console on Windows.
-
Install the secondary Administration Console and repeat the above procedures for secondary Administration Console IP address.
-
Continue with Configuring Global Settings to add both the primary and secondary Administration Consoles to the Global Settings configuration.
Configuring Global Settings
You need to map the private IP address of the Administration Console and to the public NAT IP address. You need to specify the NAT IP addresses before importing the Identity Server and the Access Gateway. You have to specify the NAT IP Addresses prior to importing devices. The devices that cannot reach the Private Administration Console IP address will use the NAT IP address.
-
Log in to the Administration Console.
-
Select Access Manager > Global Settings.
-
Click New.
-
Select the Administration Console Listening IP address from the drop-down list.
-
Specify the corresponding Public NAT IP address.
If you do not specify a Public NAT IP address or if a mapping already exists for the selected Administration Console IP address, the following message is displayed:
IP Address is not valid
-
Click OK to continue and apply the configuration changes.
-
Continue with Configuring Audit Server to configure auditing and logging.
Configuring Audit Server
The Secure Logging Server manages the flow of information to and from the auditing system. It receives incoming events and requests from the Platform Agents, logs information to the data store, monitors designated events, and provides filtering and notification services. You can configure the Secure Logging Server to automatically reset the critical system attributes according to the specified policy.
For more information about how to configure, see Specifying the Logging Server and Console Events in the NetIQ Access Manager 4.1 Administration Guide .
Installing and Configuring the Identity Server
For information about how to install the Identity Server, see Installing the Identity Servers.
User stores are LDAP directory servers to which end users authenticate. You must specify an initial user store when creating an Identity Server configuration. You use the same procedure for setting up the initial user store, adding a user store, or modifying an existing user store.
For information about how to configure the Identity Server, see Configuring an Identity Server in the NetIQ Access Manager 4.1 Administration Guide .
Installing and Configuring the Access Gateway
For information about how to install Access Gateway, see Installing the Access Gateway.
When you are setting up the Access Gateway to protect Web resources, you create and configure reverse proxies, proxy services, and protected resources. The authentication contract, authentication procedure, Authorization policy, Identity Injection policy, and Form Fill policy are configured at the resource level so that you can enable exactly what the resource requires.
For information about configuring Access Gateway, see Configuring the Access Gateway in the NetIQ Access Manager 4.1 Administration Guide .
1.5.4 Configuring Network Address Translation
NetIQ Access Manager can be configured by using Network Address Translation (NAT), which enables the communication between the Administration Console from local network to other Access Manager devices such as Identity Server and Access Gateway. The devices can be in the external network or in another private network. The NAT address needs be to configured in router.
See your router documentation for more information.
Configuring the Administration Console Behind NAT
-
Log in to the Administration Console.
-
Go to Access Manager > Global Settings, then click New.
-
Select an IP address from the Administration Console Public IP Address list.
This list contains primary and secondary Administration Console IP addresses.
-
Enter the respective NAT IP address for primary and secondary Administration Console in Public NAT IP Address.
NOTE:If the NAT IP address is not provided or if a mapping exists for the selected Administration Console IP, a message IP Address is not valid is displayed.
-
Click OK.
The Administration Console NAT IP is shared to other Access Manager devices.
For more information about configuring NAT, see Mapping the Private IP Address to Public IP Address in the NetIQ Access Manager 4.1 Administration Guide .
Configuring Identity Server and Access Gateway Behind NAT
During installation, the system prompts the following message to specify the NAT address for the component:
Is local NAT available for the <device name> y/n? [n]:
Enter Y and specify the NAT address. This enables the Administration Console to use this NAT address when communicating to this device.
Alternatively, if the device is already installed, then run the reimport_nidp.sh or reimport_ags.sh script to specify the NAT address.