10.11 Changing Identity Applications Client Settings
Identity Manager Dashboard allows you to modify the settings for every client configured in identity applications. An administrator must have access to page to modify the client settings.
The page also allow you to add a client settings in the identity applications. To add a new client settings, click  and specify the and . You can perform the following activities in this page:
10.11.2 Customizing the Views
The tab allows you to modify the page view for the selected client. You can also specify general settings for notifications and request forms.
Select the following options from to customize views for your client:
User Settings
The settings enable you to configure the attributes displayed in the page for the selected client.
- Card View
-
Represents the attributes that you want the application to display by default when the user selects in the page.
- Other Attributes
-
Represents additional attributes that provide details about a selected user.
- Editable Attributes
-
Represents the attributes that can be modified for a user’s details. For most attributes, you can also enter text to serve as default values or examples to aid in new user creation, as desired.
The following example allows a client user to edit Title, Manager, Telephone Number, Manager, and Direct Report attributes:
Figure 10-1 Editable Attributes
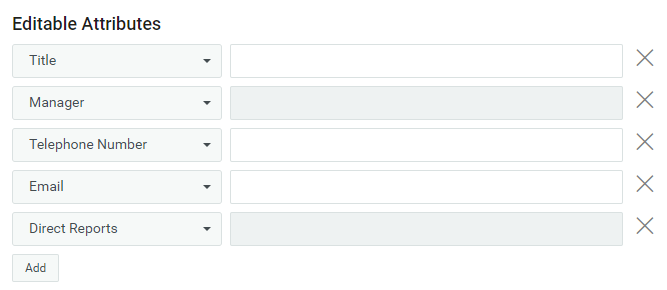
To add more attributes to the list, click . You can also select a different attribute from the list to modify the editable attributes.
- User Search Lookup Attributes
-
Represents the attributes that users can define when searching for a user or filtering search results in the page.
- User General Settings
-
Represents the default container for storing users and how the application responds when displaying search results.
-
Base Container
Specifies the container in the Identity Vault that stores a newly created user.
When creating a user, you can see this value but cannot modify it. This limitation ensures that all users are stored in the same container for that client.
-
User Search Limit
Specifies the maximum number of users that the application can list as a result of a user search.
-
View Permission Type
Enable the permission types such as , , and . This allows your client users to view or request the permission types that are selected.
By default, all the permission types are enabled.
-
General Settings
The settings specify how the client responds upon user login and when the user initiates forms.
- Notification Expiry
-
Specifies the number of days before a task or role expires that the application begins displaying a notification when the user logs in.
- Open Request Form in a New Window
-
Specifies whether the application opens a new window or a dialog box when the user makes a new request for permissions. When selected, the application opens a new window.
- Open Approval Form in a New Window
-
Specifies whether the application opens a new window or a dialog box when the user selects task to approve. When selected, the application opens a new window.
- Enable Task Bulk Approval
-
Allows the client users to approve or deny multiple requests at a time.
- Feedback Message Span
-
Specifies the period for an information message to appear on the page.
- Identity Governance URL
-
Specifies the Identity Governance URL.
- Managers Hierarchy
-
Specifies the manager’s hierarchy. This helps the helpdesk users to reassign the helpdesk tickets to the managers of the specified level. You can set the hierarchy up to 3.
Entity Settings
The Entity settings enable you to configure the attributes. The entities are created using Designer. For more information see, About Entities and Attributes in the NetIQ Identity Manager - Administrator’s Guide to Designing the Identity Applications.
To configure an entity, click the icon and select the entity type from the drop down menu. The deployed entities are displayed in the drop down menu. Click . This displays the selected entity in the tab and in the menu.
To delete an entity, select the entity from the menu and click the  icon. The deleted entity will not be listed under the tab.
- View Attributes
-
Represents the attributes that you want the application to display by default when you select the created entity in the tab
In the example shown in Figure 10-2, description, direct reports, company, language, photo, manager, city, mobile, title, and CN are selected for display by default.
Figure 10-2 View Attributes

- Editable Attributes
-
Represents the attributes that can be modified for an entity. You can add or delete attributes from the list of available entities.
In the example shown in Figure 10-3, direct reports, description, city, company, language, photo, manager, mobile, and title attributes are editable.
Figure 10-3 Editable Attributes

To add additional attributes to the list, click .
- Search Attribute
-
It represents the attributes that can be used to search an object. This setting is used to list the entities. This is a mandatory attribute.
In the example shown in Figure 10-4, CN and Description are the search attributes.
Figure 10-4 Search Attribute

- Base Container
-
Specifies the container in the Identity Vault that stores a newly created entity.
This value cannot be modified. Therefore, all entities are stored in this container for a particular client.
10.11.4 Changing the Client Branding Attributes
You can use your organization’s logo and name in the header and footer of the dashboard. You also can specify your brand colors and localize the content in the header.
In , you can specify the customized cascading style sheet (CSS).
-
Click , to download the sample Custom.css file.
-
Modify the Custom.CSS file values and click .
For more information about applying your brand to the Dashboard, click ![]() on the Dashboard and see Customize the Branding.
on the Dashboard and see Customize the Branding.
10.11.5 Configuring a Client Helpdesk
Helpdesk configuration is a two-part process. First you set up the Helpdesk contact details followed by setting up granular permission details for the Helpdesk users.
As part of configuring Helpdesk contact details, you can specify Helpdesk information such as ,, and for each of the clients configured in the system. A client user will immediately see the Helpdesk contact information when the administrator completes configuring the Helpdesk for the client.
A Helpdesk user is a user configured to perform certain tasks for the tickets raised by the client users. For more information about what tasks can be performed by a Helpdesk user, see Understanding a Client Helpdesk.
NOTE:
-
Ensure that the helpdesk admin user has access to property of the user container. For more information about adding user properties with required rights, see Verifying the User Properties in NetIQ Identity Manager Setup Guide for Windows.
-
NetIQ recommends not to assign helpdesk admin role to a team manager to avoid conflicts in between these roles.

For granting permissions, you must assign Helpdesk resources to the corresponding Helpdesk users.
NOTE:You cannot assign Helpdesk resources directly to a team or group. If you want to grant helpdesk accesses to a team or group, you must include each members from the group or team individually for the required access rights. Alternatively, you can perform the following steps:
-
Create a role for helpdesk users. See Creating a New Role.
-
Map the required helpdesk resources to the newly created role. See Mapping Resources to Roles.
-
(Conditional) Assign this role to a group. See Assigning Roles to Users.
-
(Conditional) Team Manager can request for this role on behalf of team members. Approving this role to the team allows team members to use helpdesk resources.
The Helpdesk section lists all Helpdesk resources.

- Teams Access
-
Selected users are allowed to view teams and team members configured for the respective client.
- User Catalog Access
-
Selected users can view details of any user of the respective client.
- Reassign Access
-
Selected users can reassign the user’s tasks to the approver’s manager.
NOTE:You can configure in to help the Helpdesk users to reassign the user’s tasks to the managers of the specified level, if necessary.
- History Access
-
Selected users can view request history of any user of the respective client.
- Organization Chart Access
-
Selected users can view the organization chart of the respective client.
- Group Access
-
Selected users can view groups of the respective client.
Using Helpdesk
After Helpdesk is configured, users can find the Helpdesk information in the following places:
-
(Conditional) Navigate to .
-
On the page.
-
(Conditional) At the footer.
To show the Helpdesk information in the footer, enable .
NOTE:You must ensure that the footer is enabled for the client that you have selected. To enable it, go to . For more information, click
 on the Dashboard.
10.11.6 Managing Dashboard Widgets
You can provision for a User, Group, Container, or a Role.
You also can modify the Trustees for a selected widget. For more information, click ![]() on the Dashboard.
on the Dashboard.
10.11.7 Deleting the Client Settings from Identity Applications
If you want to remove a client settings from identity applications, perform the following steps:
-
Click
 .
. -
Select the client settings from the table that you want tot delete.
-
Click
.