6.2 Installing or Upgrading Packages
Use the following list of tasks to install, add, upgrade, or import packages. For information about creating or copying packages, see Developing Packages.
6.2.1 Installing Packages
You can install packages on Identity Vaults, on driver sets, or on drivers. You can verify the packages have been imported by following the instructions in Importing Packages into the Package Catalog.
There are three different types of packages based on the package are installation target: Identity vault packages, driver set packages, and driver packages.
Driver packages are further grouped as:
-
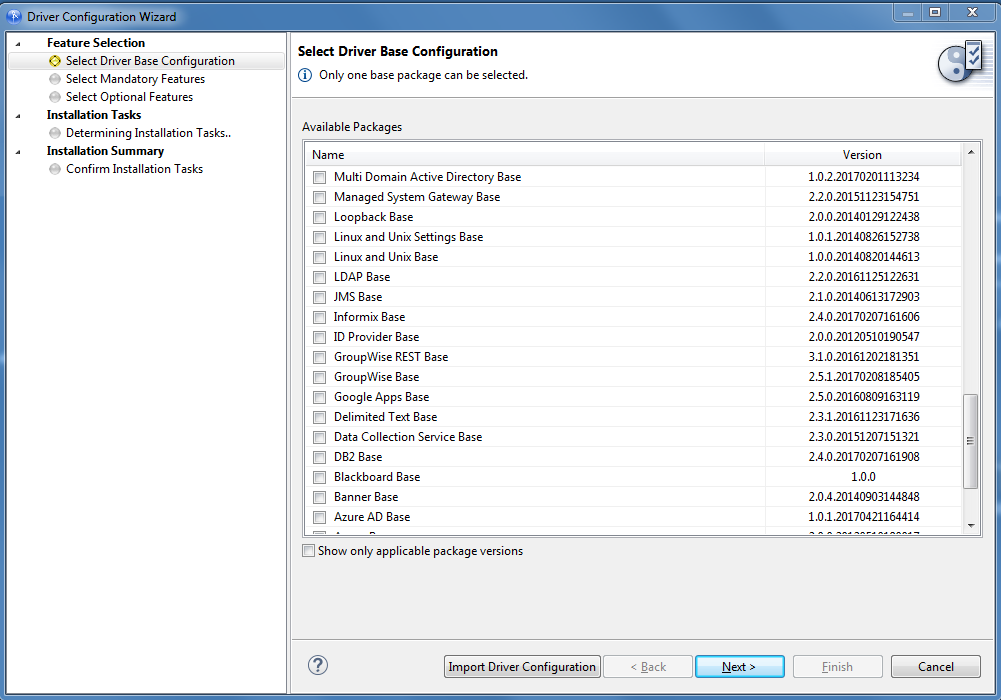
Driver Base Configuration Packages: Contains the base functionality for a driver. You must install a driver base configuration package first.
-
Mandatory Features Packages: If there is a feature that is required for a driver to function, but is not included in the driver base configuration package, it is added to a mandatory features package.
-
Optional Features Packages: Contains features for a driver that aren’t mandatory for the driver to function.
To install packages on an existing Identity Vault, driver set, or driver, see Adding Packages.
To install a new driver, including the packages that make up the driver, use the following procedure:
-
Drag and drop an application from the Palette into the Modeler.
or
Right-click the driver set in either the Outline view or in the Modeler, then click New > Driver.
-
Click the check box next to the base package you want install, then click Next.
NOTE:You can only install one base package per driver.
-
(Conditional) If you want to install any of the available optional features for the base package you selected, ensure the check box next to those packages is selected. Most options are selected by default because they are recommend for the driver.
NOTE:In most installations, you are recommended to install all optional features.
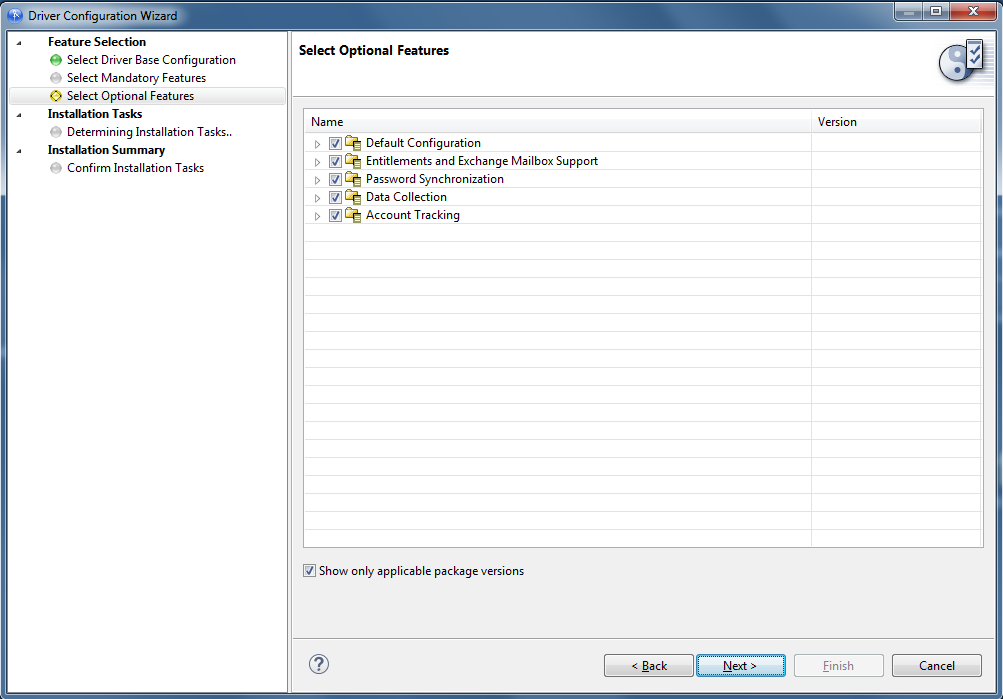
Optional packages are grouped by feature. You can expand features to see the specific packages installed for each. You must select a feature to install the packages for that feature.
-
(Conditional) If you do not want to install a particular optional feature, clear the check box for that package.
-
Click Next.
-
(Conditional) If the base package requires a dependent package, Designer prompts you to install the dependent package. Select the dependent package, then click OK.
-
Respond to any prompts, if necessary, then click Next.
The prompts are specific for each driver. Each driver guide contains the specific instructions for that driver. See the Identity Manager Driver Documentation Web site for the specific driver information.
-
Review the installation summary, then click Finish.
After the packages are installed, the driver contains the functionality included in the packages.
6.2.2 Adding Packages
You can add new functionality to an existing driver by adding new packages to an existing Identity Vault, driver set, or driver.
-
Right-click the Identity Vault, driver set, or driver, then click Driver > Properties.
-
Click Packages, then click the Add Packages icon
 .
. -
Select the packages to install. If the list is empty, there are no available packages to install.
-
(Optional) Deselect the Show only applicable package versions option, if you want to see all available packages.
This option is only displayed on drivers. By default, only the packages that can be installed on the selected driver are displayed.
-
Click OK.
-
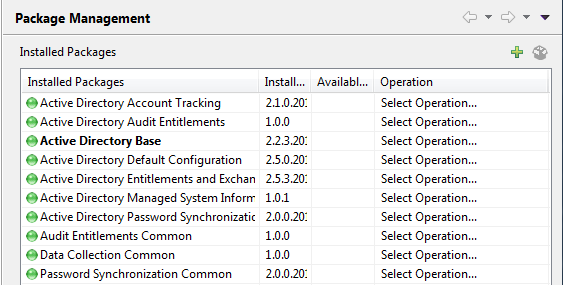
Click Apply to install all of the packages listed with the Install operation.
-
(Conditional) Fill in the prompts with appropriate information to install the package, then click Next.
Depending on which package you selected to install, you might have fields that you must fill in. For detailed information about the fields, see the specific driver guide at the NetIQ Identity Manager Drivers Documentation Web site.
-
Read the summary of the installation, then click Finish.
-
Click OK to close the Package Management page after you have reviewed the installed packages.
-
Repeat Step 1 through Step 9 for each Identity Vault, driver set, and driver where you want to add the new packages.
6.2.3 Upgrading Installed Packages
Designer provides the ability to upgrade the installed packages in two ways:
Using the Package Upgrade Method from the Properties Page
You can upgrade any package that is installed in your Identity Manager environment if there is a newer version of the package available.
Complete the following steps to upgrade an installed package:
-
Ensure you add any GCVs included in the package to a new GCV Resource object. For more information, see the
Global Configuration Value Definition Editor
in NetIQ Identity Manager - Using Designer to Create Policies. -
Right-click the Identity Vault, driver set, or driver where the package is installed that you want to upgrade, then click Driver > Properties.
-
Click Packages.
If there is a newer version of a package, there is check mark displayed in the Upgrades column.
-
Click Select Operation for the package that indicates there is an upgrade available.
-
From the drop-down list, click Upgrade.
-
Select the version that you want to upgrade to, then click OK.
NOTE:Designer lists all versions available for upgrade.
-
Click Apply.
-
(Conditional) Fill in the fields with appropriate information to upgrade the package, then click Next.
Depending on which package you selected to upgrade, you might have fields that you must fill in to upgrade the package. For detailed information about the fields, see the specific driver documentation located on the Identity Manager Drivers documentation Web site.
-
Read the summary of the installation, then click Finish.
-
Review the upgraded package, then click OK to close the Package Management page.
Using the Package Upgrade Consolidated View
The Package Upgrade Consolidated View helps you to view and upgrade the active packages of your entire Identity Manager project in a single view to the latest available versions. The provision of a single view removes the need for you to separately go to each driver, driver set, or Identity Vault in your project to view or perform an upgrade on the packages they contain.
Complete the following steps to upgrade an installed package:
-
In the Outline view, right-click Package Catalog, then select Package Upgrade.
The Package Upgrade Consolidated View dialog box appears.
-
Select one or more packages from the list, then click OK.
If your Identity Manager environment is already up-to-date, the list is empty. Otherwise, select the packages that you want to upgrade.
In addition, the Project Checker displays the list of available packages upgrades in your Identity Management environment.
6.2.4 Importing Packages into the Package Catalog
Designer adds packages to the Package Catalog dynamically. However, if you need to add a custom package to the Package Catalog, you can import the package .jar file.
Use the following procedure to import one or more packages into the package catalog.
-
In the Outline view, right-click Package Catalog, then select Import Package.
-
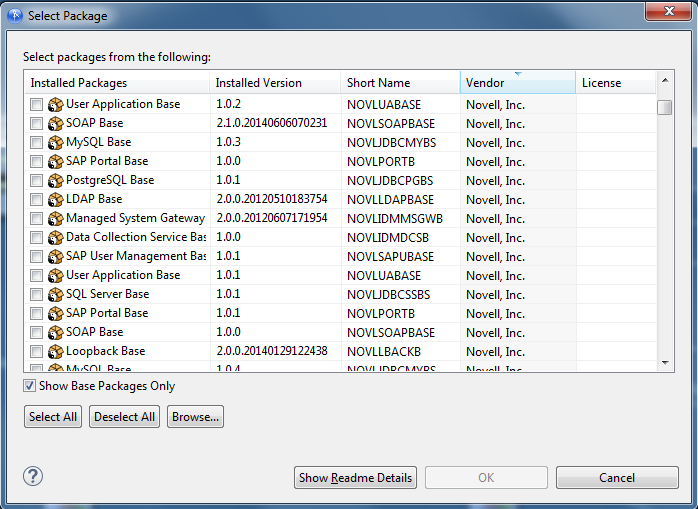
Select one or more packages from the list. If all of the available packages are already imported, the list is empty.
or
Click Browse, then browse to and select a package on the file system and click OK.
-
Click OK to import the selected packages.
-
Review the import message, then click OK.
After you import a package, you must install the package on a driver before you can use that package. Continue with Installing Packages for instructions.
6.2.5 Managing Installed Packages
The Manage Packages option allows you to manage an installed package in your Identity Manager environment. This ensures that you only have the required packages in your environment, thus improving the performance of the system.
The Manage Package window is displayed when Designer is launched for the first time. Alternatively, navigate to Help > Manage Packages.
Let us understand the usage of the Manage Package feature through an example. For example, perform the following steps to manage an installed package for the User Application driver:
-
Navigate to Help > Manage Packages.
In the Manage Packages window, select the packages you wish to retain.
NOTE:
-
The Notification and Common packages are selected by default. You cannot de-select these packages.
-
The OK button is enabled only after you select a package in addition to the packages selected by default.
Figure 6-2 Select Provisioning > User Application
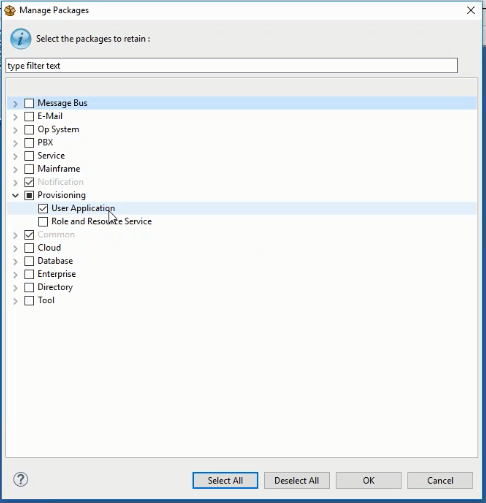
The selected packages are saved in the <Designer installed location>/packages/eclipse/plugin folder.
By default, all the dependent (mandatory and optional) packages for the User Application driver that are already deployed to the Identity Vault are retained.
IMPORTANT:
-
Administrators who use Designer to upgrade or downgrade any driver must retain all the listed packages.
-
Consultants working on any specific package(s), must retain only those packages.
-
If you delete a package, the deleted package specific to the driver continues to work in that project using the local copy.
-
The driver will not work in any other project, even if it is in the same workspace. You cannot upgrade or downgrade a package in a working project.
-
-
Click OK.
-
Click Yes on the confirmation dialogue message.
-
Click Yes to restart Designer for the package retention changes to take effect.
After Designer restarts, a pop-up window displays stating that the selected packages are successfully retained.
-
Click Yes.
-
(Conditional) To view the retained packages and their dependent packages, navigate to Help > Manage Packages. You will notice that only the User Application package is retained.
To reinstall the other packages, perform an online update and then check for package updates. For more information, see Including Existing Packages to Drivers.
Including Existing Packages to Drivers
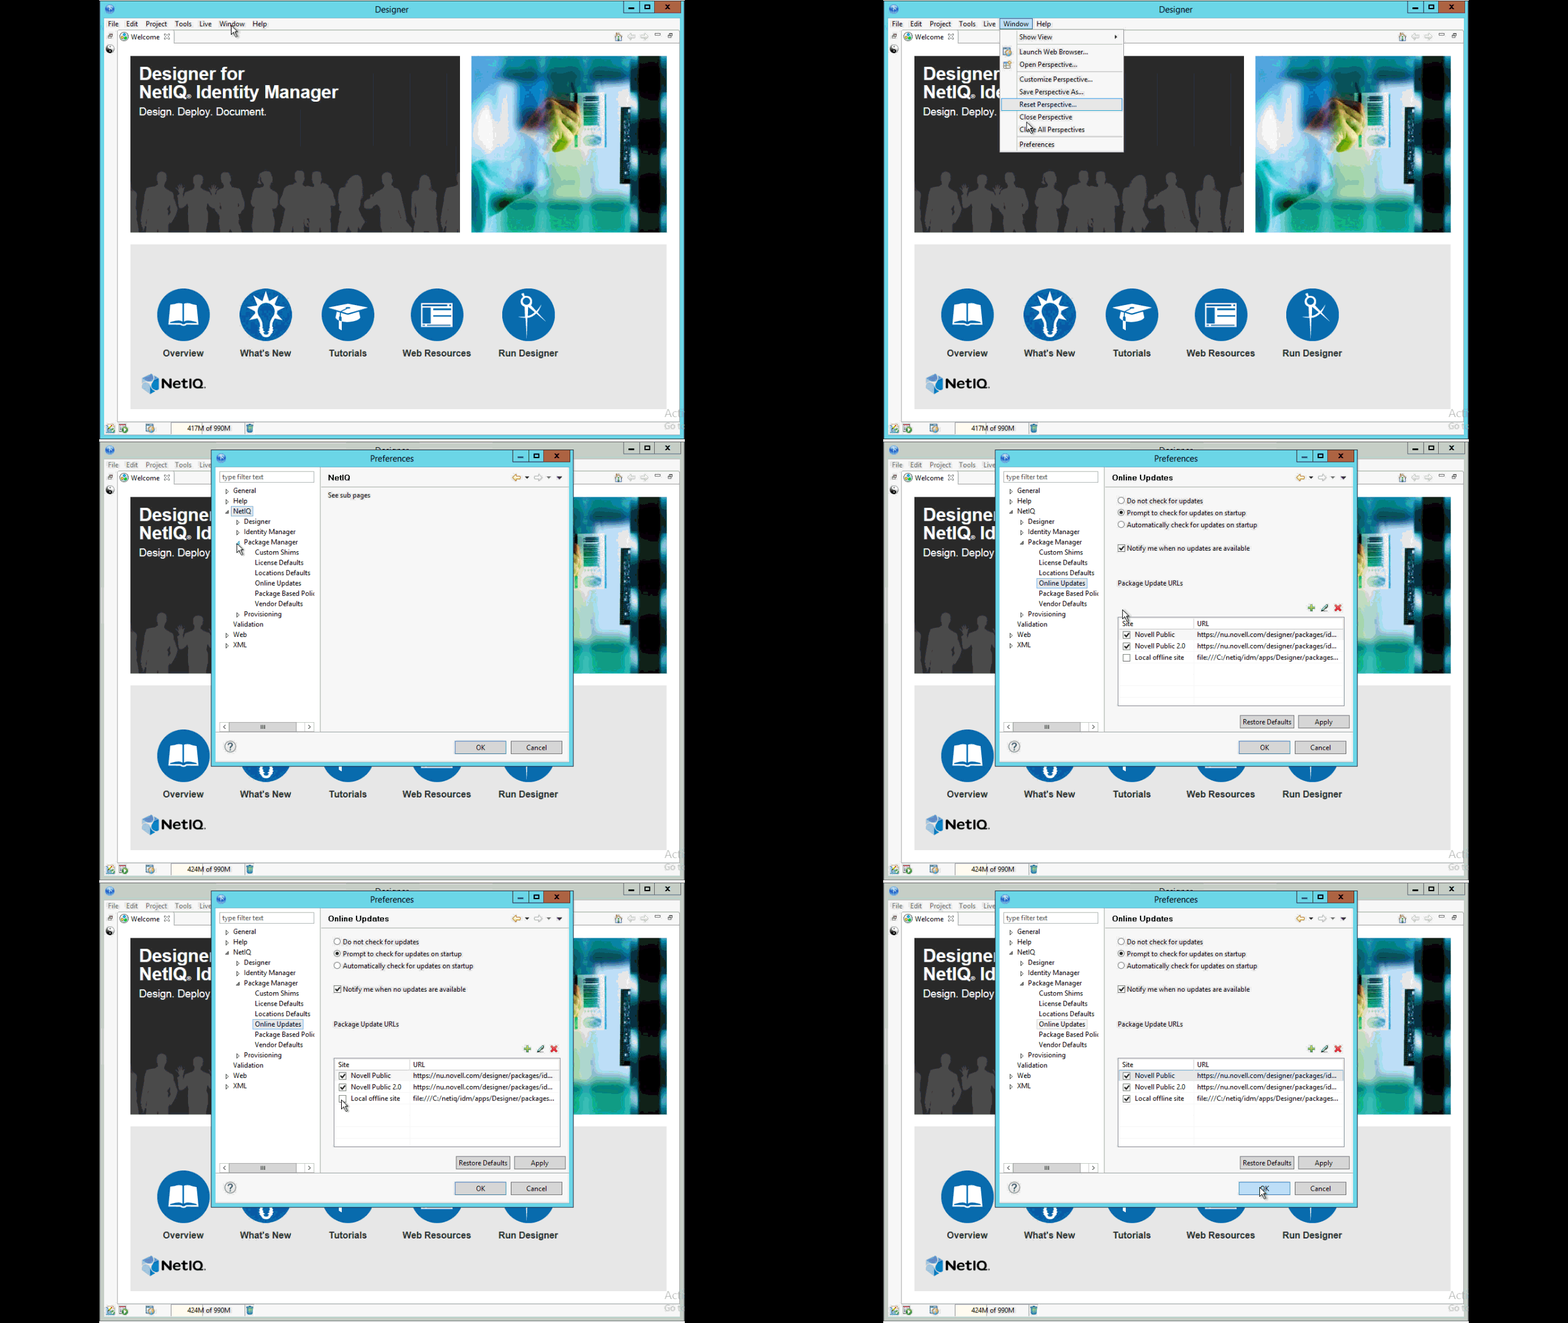
To include existing packages:
-
Navigate to Windows > Preferences > NetIQ > Package Manager > Online Updates and ensure the Local Offline site option is selected.
-
Click Apply and OK.
-
Navigate to Help > Check for package updates, select the package(s) you want to import.
NOTE:The Packages_backup folder contains only those packages that were shipped with the original version of Designer that was installed. Any packages that have been updated later are not stored in this folder. For latest package updates, perform an online update through the Preferences option. For more information, see “Online Updates”.