3.3 Configuring Network Options
SocialAccess contains a manual routing table, supports two NICs, and provides a forward proxy only for testing purposes.
3.3.1 Configuring the Forward Proxy
The forward proxy feature is only for testing purposes. The forward proxy is not supported in a production environment.
The forward proxy takes requests coming from the internal network and forwards these requests to the internet.
To configure the forward proxy:
-
Access the Admin page at https://dns_name/appliance/Admin.html, then log in with the password specified during the initialization process.
-
In the Tools palette, drag and drop the Forward Proxy icon to the bar in the middle of the Admin page.
-
Use the following information to configure the forward proxy:
Forward Proxy Server: Specify the IP address and port number for your proxy server.
Ignore List: Specify any IP addresses with the associated DNS names you want the forward proxy to ignore. For example 127.0.0.0|localhost.
-
Click OK to save your changes. Note that, as you click OK, the services restart and you must log in to the Admin page again.
3.3.2 Configuring the Second NIC
SocialAccess allows you to configure two NICs for each node in the cluster. You can configure one NIC for the administrative network and a second NIC for the public network.
When you configure the second NIC, the SocialAccess appliance has only one global DNS name. In order for your users on the private network to access the correct network with the global DNS name for the appliance, you must do additional configuration on your network.
Two options allow users on the private network to access the SocialAccess appliance with the global DNS name:
-
An entry in the local host file on each user’s computer that resolves the global DNS name of the appliance to the private network
-
A separate DNS server that routes all internal traffic to the global DNS name of the appliance
To configure the NICs:
-
Access the Admin page at https://dns_name/appliance/Admin.html, then log in with the password specified during the initialization process.
-
Click a node icon, then select Configure.
-
To configure the first NIC, click the Administration Interface tab, then change the network settings for your administrative network.
-
Click Apply to save your changes.
-
To configure the second NIC, click the Public Interface tab.
-
Select Enable Separate Public Interface.
-
Configure the network settings for your public network.
-
Click Apply to save your changes.
-
Click Close.
3.3.3 Configuring the Routing Table
SocialAccess provides a routing table for your use if your network has static routes. The routing table allows you to define the next hop in your network for the node in the cluster to reach the desired destination.
To configure the routing table for each node:
-
Access the Admin page at https://dns_name/appliance/Admin.html, then log in with the password specified during the initialization process.
-
Click the node icon, then select Configure.
-
Click the Routing tab.
-
Click the plus sign icon to add a route.
-
Define the desired route, then click OK.
-
Add additional routes if desired.
-
Click Close.
3.3.4 A Sample Network Configuration
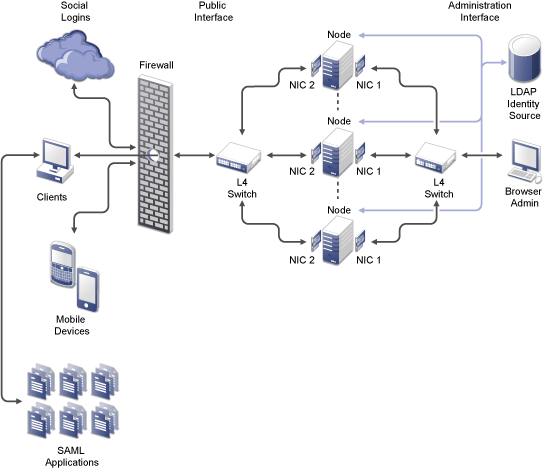
The following graphic depicts a possible network configuration using SocialAccess.
Figure 3-1 A Sample Network Diagram

The network diagram shows that each node has both NICs enabled. The first NIC is the administration interface for the node and the second NIC is the public interface of the node. All of the administration and corporate information stays on the administration interface side of the network. All user requests and application requests communicate only on the public interface. This configuration provides a layer of security for your corporate information.