5.6 Configuring Data Synchronization
Sentinel provides the ability to synchronize data to an external database, so that you can use third-party or custom reporting systems to search the data in the external database with more advanced tools than what are provided in Sentinel.
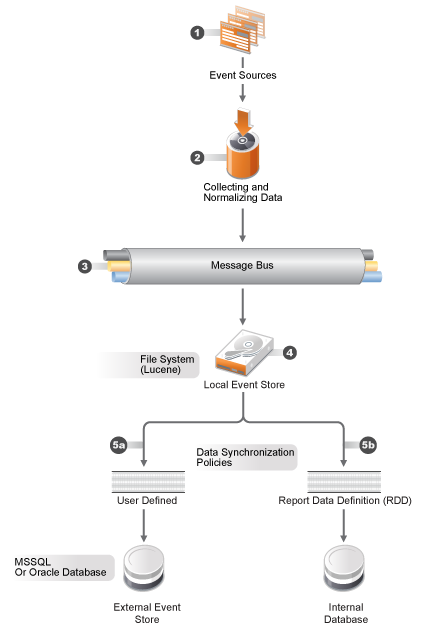
5.6.1 Overview
Sentinel can store the data in an external database by synchronizing a subset of the data that Sentinel gathers.
Sentinel uses the following process to synchronize data:
-
Sentinel gathers the events from the Event Sources through the Connectors.
-
Sentinel uses Collectors to normalize the event data.
-
The normalized event data is then sent to the Sentinel message bus.
-
The event data is then stored in the file system in the local event store and indexed by Lucene.
-
The data synchronization policies allow events in the local event store to be copied and stored in external SQL databases.
-
User-defined data synchronization policies synchronize the filtered event data to an external SQL database. The external SQL database can be either MSSQL 2008 or Oracle 11.
-
Report Data Definitions (RDD) generate system data synchronization policies that are used to copy event data into tables in the internal PostgreSQL database. These data synchronization policies cannot be edited or deleted. Reports that rely on an RDD will search internal database tables for events instead of the local event store. These kinds of reports search internal tables instead of the event store because they utilize more complex SQL SELECT statements that need to join event data to the data in other tables in the internal database.
-
Figure 5-1 Data Synchronization
Sentinel allows you to partition tables if they are in the internal PostgreSQL database. When you choose to partition a table in the internal PostgreSQL database, a new table partition is created for each days worth of data.
Partitions are only used with RDD data sync policies. Partitioning has advantages and disadvantages:
Advantages
-
If a retention period is in force, old data can be deleted quickly. When data has aged, it is much quicker to drop a partition than it is to delete individual table records.
-
Reports that query on the event time field might be quicker, because it is only necessary to search the partitions that have the specified event times.
Disadvantages
-
Reports that do not query on event time might be slower where there are multiple of partitions, because every partition must be searched.
-
Each partition causes one or more schema items to be created and managed by the database system. If there is no retention period, the number of partitions just keeps growing.
5.6.2 Creating a Data Synchronization Policy
-
Log in to the Sentinel Web interface as a user in the administrator role.
-
Click in the toolbar.
-
Click the tab.
-
Click the link to create a new data synchronization policy.
-
Use the following information to create the data synchronization policy:
Filter query: Select a saved filter to use in the data synchronization policy.
This filter determines which events are stored in the external database. For more information, see
Configuring Filters
in the NetIQ Sentinel 7.0.1 User Guide.Policy name: Specify a name for the data synchronization policy.
Retention period: Specify how many days to retain the events in the external database.
Start data synchronization time: Specify when to start synchronizing events to the external database.
Batch size: Specify how many events are sent to the external database at one time.
Sleep period: Specify the length of time that the data synchronization process sleeps before checking to see if there are more events to process.
Schedule: Select when the data is synchronized to the external database.
-
All the time: This options synchronizes events to the external database constantly.
-
Custom: This option allows you to configure specific time periods to perform data synchronization so that it does not occur when the system is busy.
If you select , fill out the following fields to set the custom synchronization time:
-
Day of the Week: Select the day of the week, or select
-
Start time: Specify the time to start the synchronization process. You can enter 24:00 hour time and it is converted to 12:00 hour time.
-
Duration: Specify the synchronization period in minutes.
-
If you do not see the data in the database tables immediately, you need to wait for the next synchronization cycle.
-
-
Use the following information to define the connection to the external database:
Database type: Select the type of external database. The options are:
-
Microsoft SQL 2008
-
Oracle 11G
Host name: Specify the host name of the server where the external database is installed.
Port: Specify the port used to connect to the external database.
User name: Specify the name of the user that authenticates to the external database.
Password: Specify the password of the database user.
Database: Specify a unique name for the external database.
Field Mapping: Allows you to map fields in the event to fields in the external database.
-
-
Click to create the data synchronization policy.
Creating a Table for Field Mapping
-
Complete Step 1 through Step 2 in Section 5.6.2, Creating a Data Synchronization Policy.
-
Select .
-
Use the following information to create the table:
Table name: Specify a name for the table.
Table Space (Optional): Specify a tablespace for the table.
Index Space (Optional): Specify a tablespace for the index.
Summarize Events: Select this option if you want a summary of events during a specific period.
Summary Period (Minutes): If you selected , you must specify the amount of time in minutes to summarize events.
-
Map the fields in the table to the desired fields.
-
Click .
Using an Existing Table for Field Mapping
NOTE:Starting from Sentinel 7.0.1 version, the InitiatiorServiceName (sp) and TargetServiceName (dp) fields size is increased from 32 to 256 characters to accommodate more characters in these fields. If you have created a Data Sync policy in Sentinel 7.0 that synchronizes either or both of the event fields, you need to modify the target column size in the external database table to reflect the increased size of the fields.
-
Complete Step 1 through Step 2 in Section 5.6.2, Creating a Data Synchronization Policy.
-
Select .
-
Browse to a select an existing table you want to use, then click .
-
(Optional) Select the option if you want a summary of events during a specific period.
-
(Optional) If you selected , specify the amount of time in minutes to summarize events.
-
Change the field mappings for the desired fields.
-
Click .
5.6.3 Managing Data Synchronization
You can edit, delete, and view the status of each data synchronization policy you create on the Data Synchronization page. If your policy is a custom synchronization policy and you perform a resynchronization, the data synchronizes during the next synchronization cycle.