4.3 Correlation Rules
Correlation rules are created, modified, renamed, deployed, and undeployed in the Correlation Rule Manager. Correlation rules are organized into rule folders, which can also be managed in the Correlation Rule Manager.
NOTE:There is no limit to the number of users that can access Correlation rules. When more than one user is editing the same rule, the last person to save overwrites all previous saves.
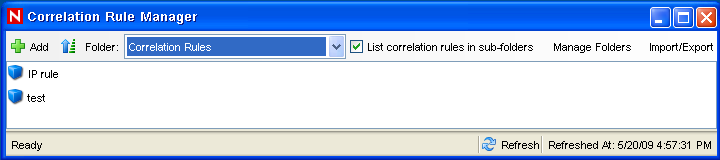
4.3.1 Opening the Correlation Rule Manager
-
Click the tab.
-
In the navigator, click Correlation Rules Manager. Alternatively, click the button in the tool bar. The Correlation Rule Manager window displays.
4.3.2 Creating a Rule Folder
-
Open the Correlation Rule Manager window and click Manage Folder.
-
Right-click a folder and select Add Folder.
-
Specify the Rule Folder name.
4.3.3 Renaming a Rule Folder
-
Open the Correlation Rule Manager window and click .
-
Select a folder and click . Change the name of the folder.
4.3.4 Deleting a Rule Folder
-
Open the Correlation Rule Manager window and click .
-
Select a folder and click . Click when the system asks for confirmation.
4.3.5 Creating a Correlation Rule
-
Open the Correlation Rule Manager window and select a folder from the Folder drop-down list to which this rule is added.
-
Click the button located on the top left corner of the screen.
-
The Rule Wizard displays. Select one of the following rule types and follow the steps for that particular rule type:
-
Simple
-
Composite
-
Aggregate
-
Sequence
-
Custom/Freeform
-
-
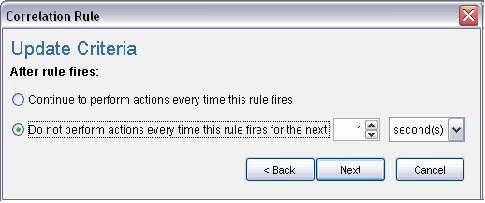
Define the update criteria for the rule.
If you select Continue to perform actions every time this rule fires, the rule fires every time the criteria is met. If you select , the event fires only once as per user-defined time period.
All the other events that match the Correlation rule within the specified time are grouped together with this correlated event. This user-defined time period can be a certain number of seconds, minutes, or hours.
-
Click .
-
Provide the rule name. The syntax of the rule is checked at the time it is created.
-
Under , select a Correlation rule folder in which to store the rule.
-
Type the description of the rule.
-
Click . The rule is created and displays in the Correlation Rule Manager window.
-
Select if you want to create another rule or select if you do not want to create another rule. Click .
The rule types and the steps to create them are described in Section 4.3.6, Creating Correlation Rules.
4.3.6 Creating Correlation Rules
Correlation rules can be defined in the Correlation Rule Wizard by walking through the wizard or by choosing the option to write the rule in the proprietary RuleLG language. All rule definitions are stored in the database in RuleLG.
Correlation rules can be defined based on any populated event field.
NOTE:When creating a rule, you can refer to a dynamic list for it. For more information, see Section 4.4.5, Using a Dynamic List in a Correlation Rule.
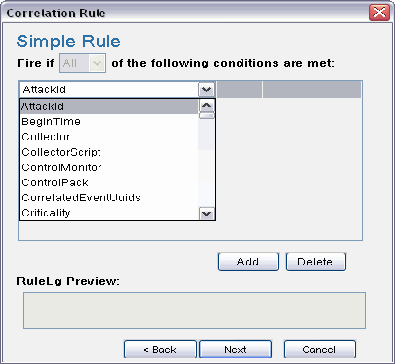
Simple Rule
A simple rule is defined by specifying the events that can trigger the rule to fire (For example, firewall events, firewall events of severity 3 or higher). The filter criteria can be intersected (using the “all”option in the GUI or the “AND” operator in RuleLG) or the filter criteria can be unioned (using the “any” option in the GUI or the “OR” operator in RuleLG).
For example, a rule might be defined so that it fires anytime an event takes place on a server that is on the critical list. Another rule might be defined to fire anytime an event of severity 4 or greater takes place on a server that is on the critical list.
A simple rule requires only one event in order to fire.
For users familiar with the Correlation rule language (RuleLG), the defining operator for a simple rule is the “filter” operator. For more information about RuleLG, see Sentinel 6.1 Rapid Deployment Correlation Engine RuleLG Language
in the Sentinel Rapid Deployment Reference Guide.
In Sentinel 6, filter criteria must be defined in the Correlation Rule Wizard. You cannot use existing public filters.
To create a simple rule:
-
Open the Correlation Rule Manager window and select a folder from the drop-down list to which this rule is added.
-
Click the button located on the top left corner of the screen. The Correlation Rule window displays. Select .
-
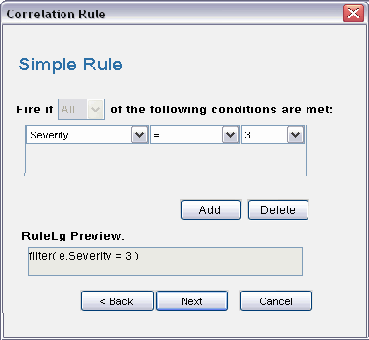
In the Simple Rule window, define a condition for this rule. Select the Property and Operator values from the drop-down lists and specify data in the value field.
-
Click to add additional definitions for this rule.
-
Preview the rule in the RuleLG preview window. For example, filter(e.sev=3).
-
Click .The Update Criteria window displays.
-
Enable the update criteria for the rule to fire and click . The General Description window displays.
-
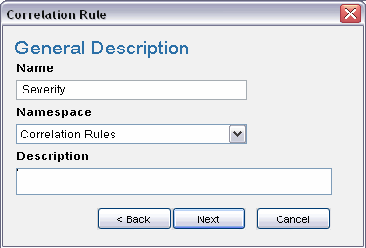
Provide a name for this rule. You have an option to modify the rule folder.
-
Provide rule description and click.
-
You have an option to create another rule from this wizard. Select your option and click .
Aggregate Rule
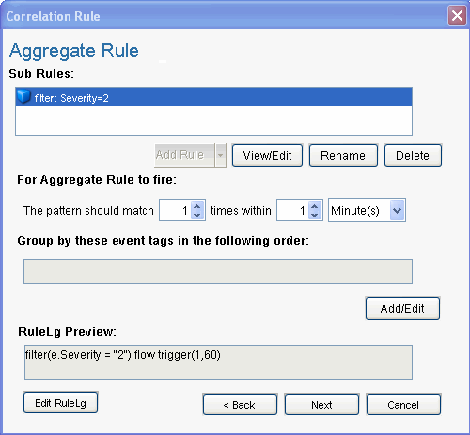
An aggregate rule is defined by specifying a subrule and the number of times the subrule must fire within a specific time window in order to trigger the aggregate rule. For example, an aggregate rule might require that a subrule fire 10 times within 5 minutes for the aggregate rule to fire.
Aggregate rules have an optional field, which can be any populated field from the events. For example, an aggregate rule might require that a subrule fire 10 times within 5 minutes where each of the 10 events has the same destination server.
NOTE:For users familiar with the Correlation rule language (RuleLG), the defining operator for an aggregate rule is the “trigger” operator. The trigger clause might also use the “discriminator” operator to define the group by field. For more information about RuleLG, see Sentinel 6.1 Rapid Deployment Correlation Engine RuleLG Language
in the Sentinel Rapid Deployment Reference Guide.
To create an aggregate rule:
-
Open the Correlation Rule Manager window and select a folder from the drop-down list to which this rule is added.
-
Click the button located on the top left corner of the screen. The Correlation Rule window displays. Select .
-
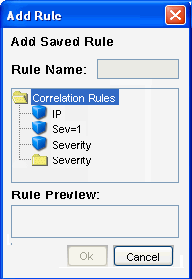
In Aggregate Rule window, click the button to select a sub rule to create an aggregate rule. The Add Rule window displays.
You can select only one sub rule when creating an aggregate rule.
-
Select a rule and click .
-
Set parameters for the rule to fire.
-
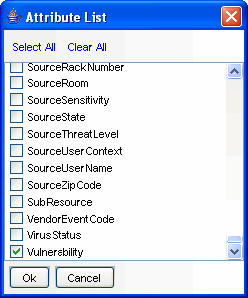
To group event tags according to the attributes, Click . The Attribute List window displays.
-
Select the attribute you want, then preview the rule in the RuleLG preview window.
-
Click .The Update Criteria window displays.
-
Update the criteria for the rule to fire and click . The General Description window displays.
-
Provide a name for this rule. You have an option to modify the rule folder.
-
Provide a rule description and click.
-
You have an option to create another rule from this wizard. Select your option and click .
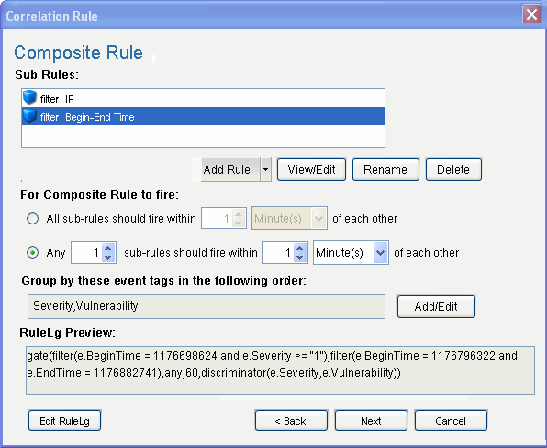
Composite Rule
A composite rule is comprised of two or more subrules. A composite rule can be defined so that all or a specified number of the subrules must fire within the defined time frame. Composite rules have an optional field, which can be any populated field from the events.
NOTE:When a subrule is used to create a composite rule, a copy of the subrule is added to the composite rule’s definition. Because a copy is added, changes to the original subrule do not affect the composite rule.
To create a composite rule:
-
Open the Correlation Rule Manager window and select a folder from the drop-down list to which this rule is added.
-
Click the button located on the top left corner of the screen. The Correlation Rule window displays. Select .
-
In the Composite Rule window, click to select sub rules to create a composite rule. The Add Rule window displays.
-
Select a rule or a set of rules and click .
-
Set parameters for the rule to fire.
-
To group event tags according to the attributes, click. The Attribute window displays.
-
Select the attribute you want, then preview the rule in RuleLg preview box.
-
Click .The Update Criteria window displays.
-
Update criteria for the rule to fire and click .
-
Provide a name for this rule. You have an option to modify the rule folder.
-
Provide a rule description and click .
-
You have an option to create another rule from this wizard. Select your option and click .
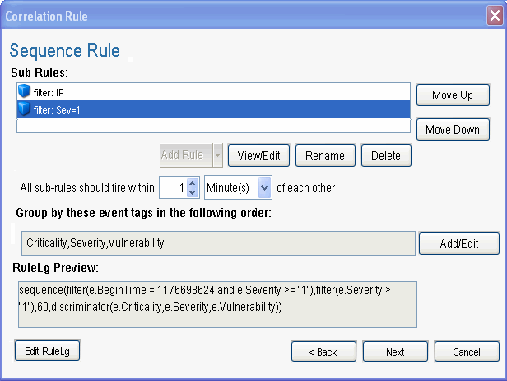
Sequence
A sequence rule is comprised of two or more subrules that must be triggered in a specific order within the defined time frame. Sequence rules have an optional field, which can be any populated field from the events.
NOTE:When a subrule is used to create a sequence rule, a copy of the subrule is added to the sequence rule’s definition. Because a copy is added, changes to the original subrule do not affect the sequence rule.
To create a sequence rule:
-
Open the Correlation Rule Manager window and select a folder from the drop-down list to which this rule is added.
-
Click the button located on the top left corner of the screen. The Correlation Rule window displays. Select .
-
In the Sequence Rule window, click the button to select a sub rule to create a sequence rule. The Add Rule window displays.
-
Select a rule and click .
-
Set parameters for the rule to fire. To group event tags according to the attributes, click . The Attribute List window displays.
-
Select the attribute you want, then You can preview the rule in RuleLg preview box.
-
Click .The Update Criteria window displays.
-
Update criteria for the rule to fire and click .
-
Provide a name for this rule. You have an option to modify the rule folder.
-
Provide rule description and click .
-
You have an option to create another rule from this wizard. Select your option and click .
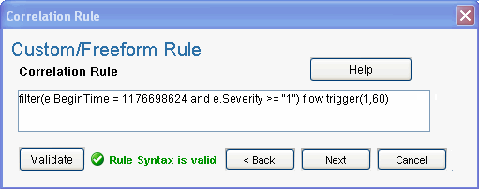
Custom or Freeform Correlation Rules
The custom or freeform rule option is the most powerful option for creating a correlation rule. This allows the user to create any of the previous types of rules by typing the RuleLG correlation rule language directly into the Correlation Rule Wizard.
Freeform rules are the only way to include certain functionality in a correlation rule. Freeform rules give you the ability to do the following:
-
Nest operations by using parentheses to specify order of operations
-
Use the inlist operator to refer to a dynamic list
-
Use the isnull operator to refer to unpopulated fields
-
Use the w. prefix for a field name in the window operation to compare an incoming event’s value to a set of previous events
HINT:You can select the functions, operators, and meta tags from the drop-down list selection. Type e. or w. in the Correlation Rule section to view the drop-down lists.
To create a custom or freeform rule:
-
Open the Correlation Rule Manager window and select a folder from thedrop-down list to which this rule is added.
-
Click the button located on the top left corner of the screen. The Correlation Rule window displays. Select .
-
In the Custom/Freeform Rule window, write the condition for the rule and click to test the validity of the rule.
-
After validation of the rule, click . The Update Criteria window displays.
-
Update the criteria for the rule to fire and click .
-
Provide a name for this rule. You have an option to modify the rule folder.
-
Provide rule description and click Next.
-
You have an option to create another rule from this wizard. Select your option and click .
4.3.7 Deploying and Undeploying Correlation Rules
Correlation rules can be deployed or undeployed from the Correlation Engine Manager or the Correlation Rule Manager. You can undeploy all rules or a single rule.
The rules can be associated with one or more actions. If no action is selected, a default correlated event is generated with the following values:
Table 4-2 Default Correlated Event Details
|
Field Name |
Default Values |
|---|---|
|
|
4 |
|
|
Same as the event name for the trigger event |
|
|
Same as the message for the trigger event |
|
|
Correlation |
|
|
<Rule Name> |
Other types of actions can be configured in the Action Manager:
-
Configure a Correlated Event replaces the default correlated event settings
-
Add to Dynamic List adds an element to a dynamic list
-
Remove from Dynamic List removes an element from a dynamic list
-
Execute a Command executes a shell or batch script
-
Execute a Script executes a script; only available for actions created in Sentinel 6.0
-
Send an Email by using default Sentinel mail settings
-
Create an Incident creates a Sentinel incident
-
Configure any Action from the Action Manager that was created from an Action plug-in that takes a correlated event as input. For more information on the Action Manager, see Section 17.0, Action Manager and Integrator.
To deploy correlation rules in the Correlation Engine Manager:
-
Open the Correlation Engine Manager window.
-
Right-click the engine you want to deploy the rule on and select .
-
In the tab, select the rule or rules you want to deploy.
-
In the tab, select the action or actions you want to associate with the rule.
-
Click . Rules are deployed in an enabled state.
To deploy correlation rules in the Correlation Rule Manager:
-
Open the Correlation Rule Manager window.
-
Select a rule and click the link. The Deploy Rule window displays.
-
In the Deploy Rule window, select the engine to deploy the rule from the drop-down list.
-
(Optional) Select an action or add a new action.
If nothing is selected, a Correlated event with default values is created.
-
Click .
To undeploy a single rule:
-
In the Correlation Engine Manager, right-click the rule and select .
or
In the Correlation Rule Manager, select the rule and click the link.
To undeploy all correlation rules:
-
Open the Correlation Engine Manager window.
-
Right-click the Correlation engine and select .
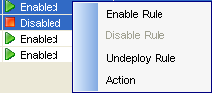
4.3.8 Enabling and Disabling Rules
-
Open the Correlation Engine Manager window.
-
Right-click the rule or set of rules and select or .
4.3.9 Renaming and Deleting a Correlation Rule
To rename a correlation rule:
NOTE:You must undeploy a rule before you rename or delete the rule.
-
Open the Correlation Rule Manager window and select the rule you want to rename.
-
If the rule is deployed, click the link to undeploy the rule.
-
Click the link. In the tab, change the name of the Correlation rule.
-
Click .
To delete a correlation rule:
-
Open the Correlation Rule Manager window and select the rule you want to delete.
-
If the rule is deployed, click the link to undeploy the rule.
-
Click the link. Click when the system prompts for confirmation.
4.3.10 Sorting Correlation Rules
To sort the list of correlation rules, click the  Sort button at the top left of the Correlation Rule Manager window.
4.3.11 Moving a Correlation Rule
-
Open the Correlation Rule Manager window and click .
-
Drag a correlation rule from one folder to another.
4.3.12 Importing a Correlation Rule
-
Open the Correlation Rule Manager window and click the
 icon.
icon.
The Import Export Rule window displays.
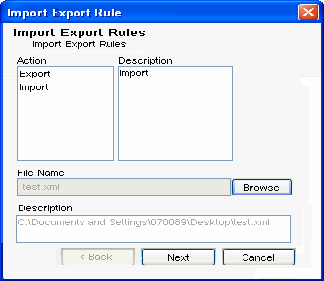
-
Select the option from the Action pane. The description in the pane changes to .
-
Click to select the Correlation rule you want to import. Select the file and click , then click . The Import Rule window displays.
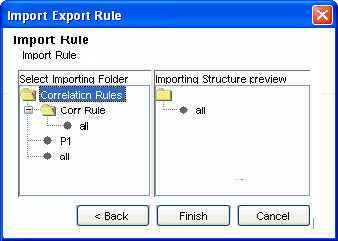
-
Select the folder you want to import the Correlation rule into, then click .
When importing a correlation rule in a folder, if a correlation rule with the same name exists, the system displays a message and does not import the file.
IMPORTANT:If you import a correlation rule using the inlist operator, the dynamic list aligned to that rule must exist or you must create the dynamic list with the same name on the system to which it is imported.
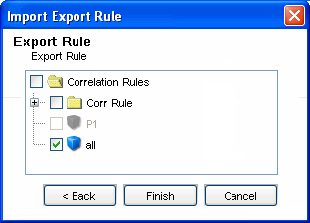
4.3.13 Exporting a Correlation Rule
-
Open the Correlation Rule Manager window and click the icon. The Import Export Rule window displays.
-
Select thet option from the Action pane. The description in the pane changes to .d
-
Click to export the rule. Specify a filename and click , then click Next. The Export Rule window displays.
-
Select the Correlation rule you want to export. Click .