17.6 Configuring Sentinel Systems for Sending Events
You can configure Novell Sentinel Log Manager, Sentinel, or Sentinel Rapid Deployment to forward events to another Sentinel system.
17.6.1 Configuring Sentinel Log Manager as a Sender
In Sentinel Log Manager, the plug-ins and the event forwarding rule by default are installed. You only need to configure the system for Sentinel link and activate the rule for sending the event data.
Follow the instructions below to configure a Sentinel Log Manager for sending the event data:
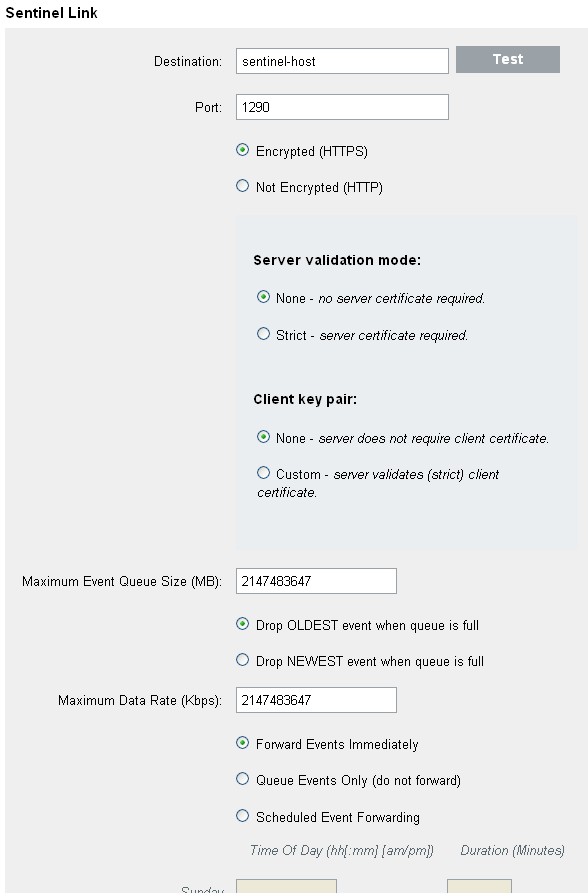
Configuring a Sentinel Link
-
Log in to the Sentinel Log Manager Web interface as an administrator.
-
Click in the upper left corner of the page.
The tab is displayed on the right panel of the page.
-
Click the link on the right side of the screen.
Scroll through the configuration settings to find the Sentinel Link settings.
-
Specify the following Sentinel Link settings, then click .
Configuring the Rule to Forward Events to Another System
The Sentinel Log Manager is installed with a rule that forwards events to another sentinel system.The rule is called Forward Events to Another Sentinel System. By default, the Forward Events To Another Sentinel System rule is configured to filter out internal system events and events with severity greater than three. This rule filters the following three types of system events:
-
Audit (A)
-
Performance (P)
-
Internal (I)
You can also change the conditions of the rule to filter more events or remove conditions to filter fewer events.
Novell recommends that you configure the rule to forward only those events that you want to store on the Sentinel system for more in-depth reporting and analysis.
Activating the Rule to Forward Events to Another Sentinel System
The Forward Events To Another Sentinel System rule is installed with Log Manager, but it is in the inactive (off) state. To forward the system events to another Sentinel system, the rule must be activated, and the Sentinel Link Integrator settings must be configured.
-
Log in to the Log Manager Web interface as an administrator.
-
Click in the upper left corner of the page.
-
The tab displays on the right panel of the page.
The Forward Events To Another Sentinel System rule displays under the tab.
-
To activate the Forward Events To Another Sentinel System rule, click the check box next to the rule.
If the rule is activated, a Successfully activated the rule message is displayed.
17.6.2 Configuring Sentinel or Sentinel Rapid Deployment System as a Sender
If Sentinel or Sentinel Rapid Deployment is the sender, you must configure the Sentinel Link Integrator plug-in and Sentinel Link Action plug-in to create a Sentinel Link configuration. You also need to create an action that forwards the selected events to the receiver system. To filter the events, set a correlation rule by using the Correlation Manager. After creating the rule, associate the action to it, and deploy the rule. You can also use Global Filters to filter the events and forward them to the receiver system.
Follow the instructions given below to configure Sentinel or Sentinel Rapid Deployment server for sending the events:
Configuring the Integrator Plug-In
The Sentinel Link Integrator allows you to forward the events to another Sentinel system.
To use an Integrator plug-in, one or more Integrator instances must be configured with valid connection information.
-
Log in to the Novell Sentinel Control Center as an administrator.
-
Select > . The Integrator Manager window displays.
-
Click the icon in the bottom left corner. The Basic Information window displays.

-
Select from the drop-down list.
-
Click to import the Integrator plug-in, if the Integrator plug-in is not already available.
The is the system-generated ID for the Integrator configuration and cannot be edited.
represents the type of Integrator plug-in selected from the drop-down.
-
Specify a name for the integrator in the field.
-
Specify a description for the integrator in the field.
-
Select an Integrator Service category from the drop-down list, or type a name in the field to create a custom service type. These services are used to group similar Integrator instances. The following table list of the Integrator Service categories:
-
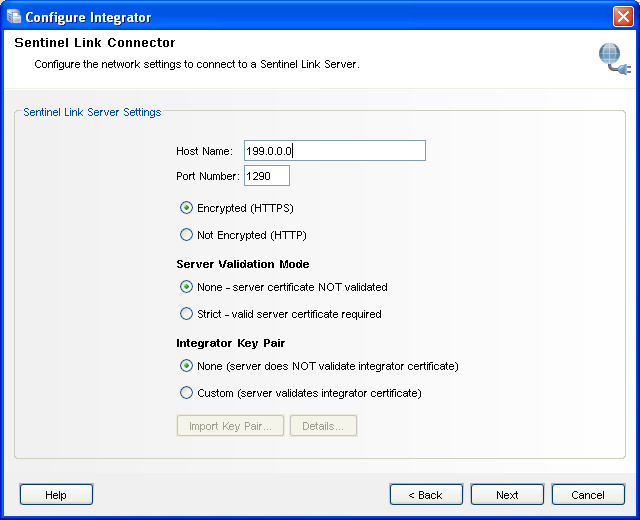
Click . The Sentinel Link Server Settings window displays.
-
Specify the IP address or hostname of the Sentinel Link server, where the Sentinel Link Connector is running.
-
Specify the port number for the sentinel system. The default port is 1290.
-
Select either of the following:
-
Not Encrypted (HTTP): Establish an unsecured connection.
-
Encrypted (HTTPS): Establish a secured connection. If you select the encrypted (HTTPS) option, you are optionally allowed to specify a Server validation mode and an Integrator key pair.
-
-
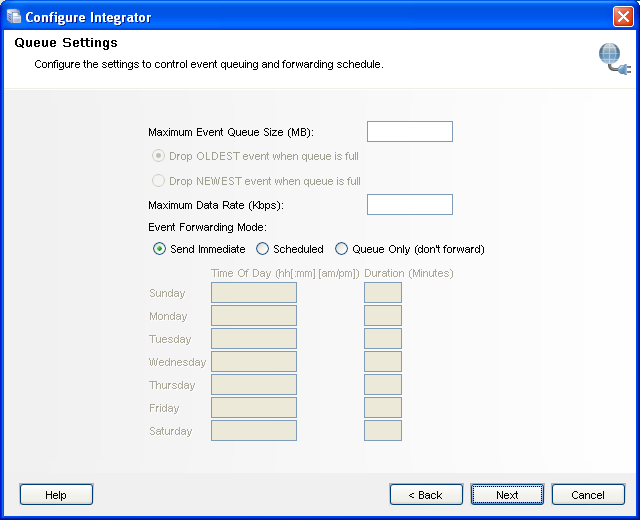
Click . The Queue Settings window displays.
-
Specify the following:
-
Click . The Integrator Properties window is displayed.
If the connection for your Sentinel Link server requires additional properties to establish a connection other than the fields provided, you can use the button to add properties. Specify the Property Name and Value. Press Enter. The Property is added to the Properties list in the Integrator Properties window. You can edit the property values if required. Repeat the steps to add more properties.
-
Click . The Integrator Configuration Summary window is displayed.
-
Click to confirm configuring the Sentinel Link Integrator.
-
(Conditional) Click to revert unsaved Integrator settings.
-
(Optional) To test the connection of the configured Sentinel Link Integrator, perform the following:
-
In the Integrator Manager window, select the Sentinel Link Integrator.
-
Click to test the configuration.
A message is displayed stating that the Integrator test was successful, then click .
NOTE:This method tests the connection without actually sending any events to the Sentinel Link server. It does not update any statistics for the Integrator.
-
Configuring the Action Plug-In
-
Log in to the Sentinel Control Center system as the administrator.
-
Select .
-
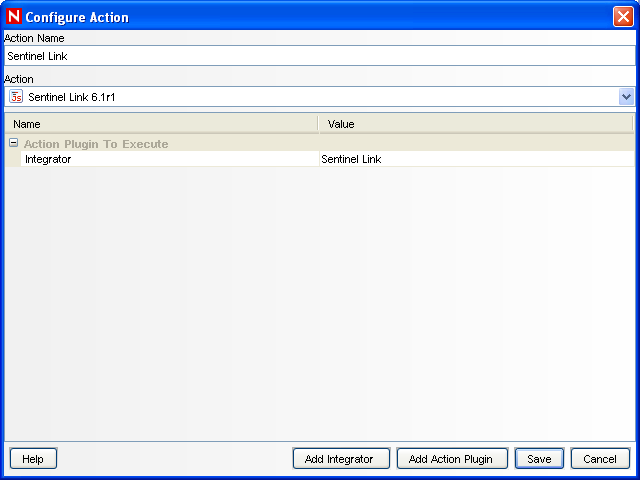
In the Action Manager window, click .
The Configure Action window is displayed.
-
Specify the following:
-
Action Name: Specify a name for the action. For example, Sentinel Link.
-
Action: Select from the drop-down.
-
Integrator: Select from the drop-down.
-
-
Click .
Filtering Events to Forward to the Receiver
To select events that you want to forward to a receiver system, you need some filtering mechanism. Use Correlation Manager or Global Filters to filter the desired events for forwarding to the receiver system.
NOTE:To forward events to another Sentinel or Sentinel Log Manager system based on simple filtering conditions, use Sentinel Link with Global Filters.
Sentinel Link can also be used wherever a JavaScript action can be executed in Sentinel such as Correlation, Incidents, and Event right-click. However, while event forwarding, the same event is likely to be forwarded more than once with these mechanisms. For example, using Correlation, you can have filter(1=1) and filter(e.sev>=3) configured, and launch Sentinel Link action to forward the events to the same receiver. When the action is triggered, the receiver gets duplicated events. Therefore, use them only when simple filtering conditions are not enough.
Note that some field values of the events are changed during event forwarding. For example, the event id is changed, but, the event name is preserved when you forward an event.
Another advantage of Global Filters over Correlation rule is that the events are sent in batches of 500 events to the receiver system. With Correlation rule, each event is forwarded to the receiver system as soon as an event is generated.
Using Correlation Manager to Forward Events to the Receiver
Use Correlation Manager to set correlation rules that filter the desired events for forwarding to the receiver system. After creating a rule, add the Sentinel Link Action, then deploy the rule.
In the following example, a simple rule is created that forward events with severity greater than 3.
-
In the Sentinel Control Center, select .
-
Click .
The Correlation Rule wizard is displayed.
-
Click . The Simple Rule windows is displayed.
-
Use the drop-down menus to set the criteria to Severity>=3, then click. The Update Criteria window displays.
-
Select and use the drop-down menu to set the time period to 1 minute. Click . The General Description window displays.
-
Name the rule as , provide a description, and click .
-
Select and click t.
-
Click .
-
Select the Correlation Rule Manager window.
-
Select and click link. The Deploy Rule window displays.
-
In the Deploy Rule window, select the Engine to deploy the rule.
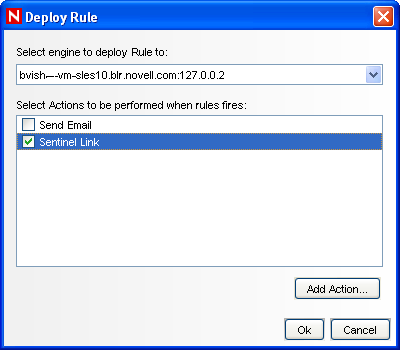
-
Select , then click .
Using Global Filters to Forward Events to the Receiver
Use Global Filters to filter the desired events for forwarding to the receiver system. In the Global Filter Configuration window, you can add the Sentinel Link Action, then deploy the rule.
NOTE:This feature is supported only on Sentinel 6.1 SP1 Hotfix 2 or later, and Sentinel 6.1 Rapid Deployment 6.1 Hotfix 2 or later.
-
In the Sentinel Control Center, select the Tab.
-
In the left navigation bar, select Global Filter Configuration.
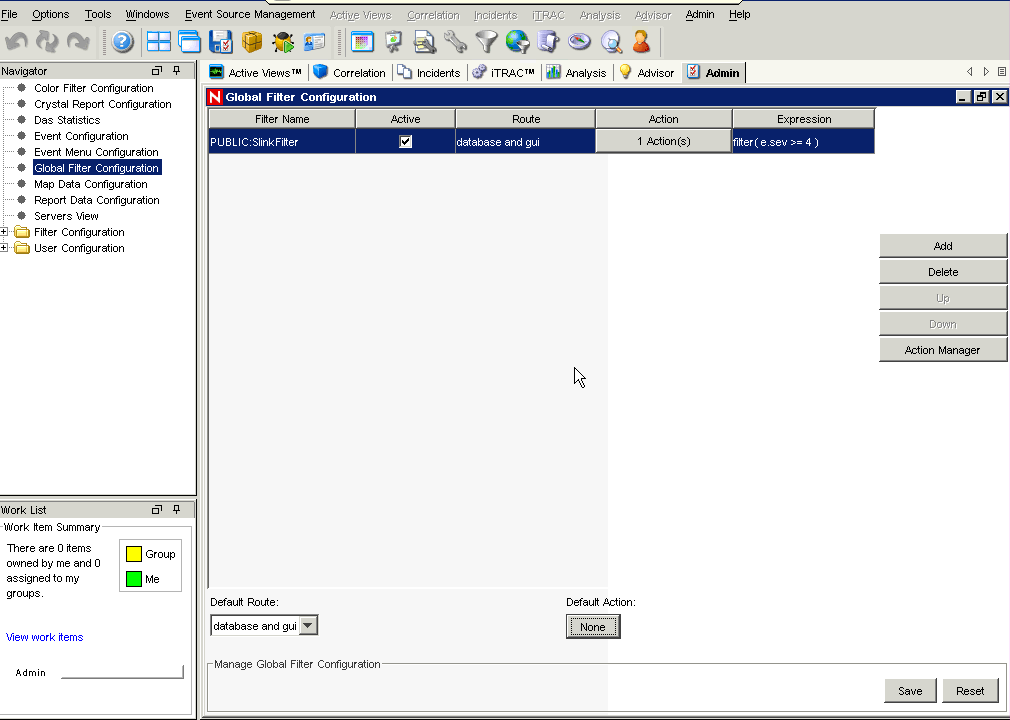
The Global Filter Configuration window is displayed.
-
Click the button on the right-side of the window.
-
Click the button below the field, then click the drop-down to set a filter.
For more information on Filters, see Filters in the Sentinel 6.1 Rapid Deployment User Guide.
-
Select the check box.
-
Select a Route from the drop-down:
Based on the selection, the events are either dropped or sent to the selected option.
-
drop
-
database only
-
database and gui
-
gui only
-
-
Click the button below the field.
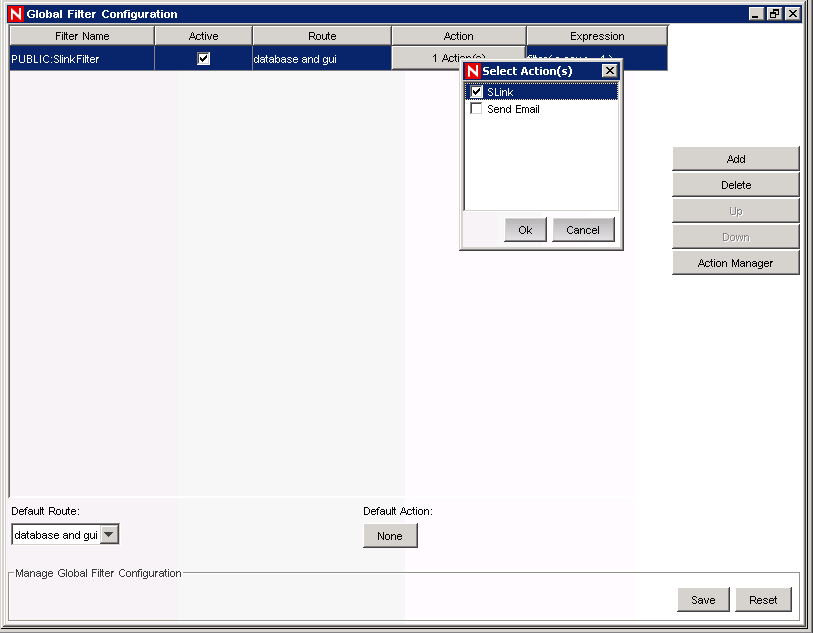
The Select Action window is displayed.
-
Select the Sentinel Link Action, then click .
If you have not created one, click button at the right-side of the window, then follow the instructions.
-
Alternatively, you can also add Sentinel Link Action as the default Action.
-
Click the button below the Default Action.
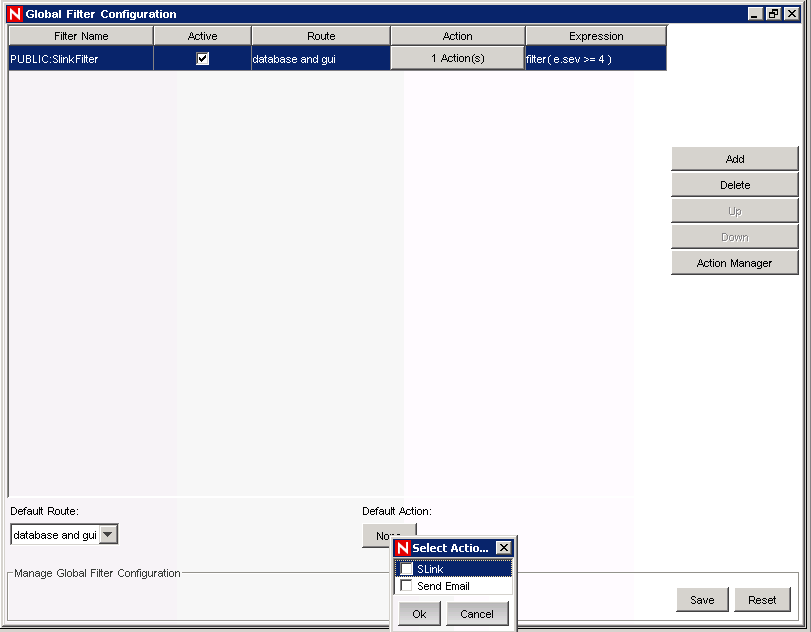
-
Select the Sentinel Link Action, then click .
-
-
Click .