15.3 Managing Solution Packs
This section states to manage solution packs.
15.3.1 Importing Solution Packs
Solution Packs are be available from several sources. They can be downloaded from Sentinel Content Web site. However, an additional license might be needed. They can be provided by one of Novell’s partners, or they can be created from content in your own Sentinel system.
The first step in using a Solution Pack is to import the .zip file into the system using the Import Plugin Wizard. When a Solution Pack is imported, the .zip file is copied to the server where the DAS (Data Access Service) components are installed. The actual contents of the Solution Pack are not available in the target Sentinel system until the Controls are installed using the Solution Manager.
If you import an updated version of a Solution Pack, you are prompted to replace the existing plugin.
To import Solution Packs:
-
Click Tool menu and select Solution Packs. The Solution Packs window displays.

-
Click Import icon in the Solution Packs window. The Import Plugin Type window displays.

Select Import Solution package plugin file (.zip). Click Next. The Choose Plugin Package File window displays.
-
Use the Browse button to the locate Solution Pack to import to the plugin repository. Select a zip file and Click Open.

If you have selected a solution pack which already exists then the Replace Existing Plugin window displays. Click Next if you want to replace the existing plugins.

Click Next. The Plugin Detail window displays.
-
The details of the plug-in to be imported are displayed. Check the Launch Solution Manager checkbox if you want to deploy the plug-in after importing the Solution Pack. If you check the Launch Solution Manager check box, the Solution Manager displays.
Click Finish
15.3.2 Opening Solution Packs
To use the Solution Manager and view the contents of a Solution Pack, a user must be assigned Solution Manager permissions. For more information, see Section 15.1.2, Permissions for Using Solution Packs.
To open a Solution Pack in the Solution Manager:
-
Click Tool menu and select Solution Packs. The Solution Package window displays:

-
Double-click a Solution Pack in the Solution Packs window. The Solution Manager window displays.

Content Comparison
When the Solution Pack is opened, the Solution Manager compares the contents of the Solution Pack to other Solution Pack content (from different Solution Packs or previous versions of the same Solution Pack).
Table 15-3 Content Status


Out Of Sync Status
The Out of Sync icon indicates that content in the newly opened Solution Pack differs from a version that was previously installed by another Solution Pack (either a different Solution Pack or a previous version of the same Solution Pack). The name, definition, or description of the content might be different.
NOTE:The Solution Manager only compares content from different Solution Packs (or different versions of the same Solution Pack) for installed content. It does not compare content that has not yet been installed. It also does not compare Solution Pack content to content in the target system; manual changes to content in the Sentinel Control Manager are not reflected in Solution Manager.
When you right-click a Solution Pack, you can select Expand Only Out of Sync Nodes. This option expands all Controls that are out of sync and collapses all Controls that are either uninstalled or in sync. This makes it easy to find the out of sync content in a large Solution Pack.
To resolve out of sync content:
-
Select the out of sync content (not the Control or Category) in the Solution Manager.
-
Right-click and select Out of sync content details. A message displays with information about which Solution Pack is the source of the out of sync content.
-
Compare the description of content item in the two Solution Packs to determine which version you want to keep.
-
Uninstall the out of sync Control from all Solution Packs. (Ideally you should resolve the out of sync issue before installing the new Solution Pack.)
-
Reinstall the Control with the content you want to keep.
-
Implement and test as required.
15.3.3 Installing Content from Solution Packs
To use the content of a Solution Pack in the Sentinel Control Center, you must install the Solution Pack or selected Controls in a Sentinel System (also known as the “target” Sentinel system).
When you install either a Solution Pack or an individual Control, all of the child nodes are installed.
To install the contents of a Solution Pack:
-
Go to Tools > Solution Packs.
-
Double-click a Solution Pack to open Solution Manager. Alternatively you can click Open with Solution Manager icon. The Solution Manager window displays.
-
Select a Solution Pack or a Control which you want to install. Click Install. Alternatively, right-click on a Solution Pack or Control and select Install. The Install Control Wizard displays. If you select a Solution Pack, all the controls in that Solution Pack displays. If you select an individual Control then that control is displayed in the Install Control Wizard window.

-
Click Next. If Correlation Rules or Reports are included in the Solution Pack, you need to proceed through several additional screens until you reach the Install Content window.

Click Install.
-
After installation the Finish button displays.
Click Finish.
If the installation fails for any content item in the Control, the Solution Manager rolls back all the contents in that control to uninstalled.
There are special considerations for installing certain types of content, including Correlation Rules and Reports; these issues are described below.
Correlation Rules and Actions
Correlation Rules are deployed to a specific correlation engine. During the Control installation, the following screen shows the correlation engines in the target Sentinel system and the rules that are already running on those engines. Based on the number and complexity of the rules running on the engines, you can decide which correlation engine to which you will deploy the Correlation Rule.
Correlation rules will deploy in an Enabled or Disabled state, depending on their status in the source Sentinel system when the Solution Pack was created.
If an Execute Script Correlation Action (created in Sentinel 6.0) is associated with the Correlation Rule, the Solution Manager attempts to install the associated JavaScript code on all correlation engines. If any of the correlation engines is unavailable, a message displays.
Figure 15-4 Install Control Wizard-Select Correlation Engine

You can cancel the Control’s installation and fix the problem or continue installation on only the available correlation engine(s).
Figure 15-5 Unavailable Correlation Engines
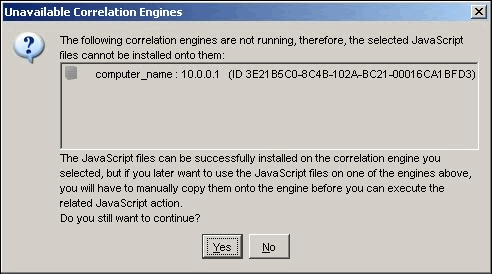
NOTE:The Execute Script Correlation Action (created in Sentinel 6.0) cannot run on a particular correlation engine if the installation of the JavaScript code fails for that correlation engine. The .js file can be manually copied to the proper directory on the correlation engine. In a default installation, the proper directory is $ESEC_HOME/config/exec or %ESEC_HOME\config\exec.
If an Execute Command Correlation Action is associated with the Correlation Rule, the Solution Manager installs the command and its arguments, but the script, batch file, or utility must be manually configured on the correlation engine(s). This might require installing the utility, configuring permissions, or manually copying a script or batch file to the proper directory on the correlation engine(s).
NOTE:In a default installation, the proper directory for the script or batch file is $ESEC_HOME/config/exec or %ESEC_HOME\config\exec.
If a JavaScript Action is associated with the Correlation Rule, the Solution Manager installs the Action configuration, the Action Plugin, and the associated Integrator configuration and Integrator Plugin (if needed).
Reports
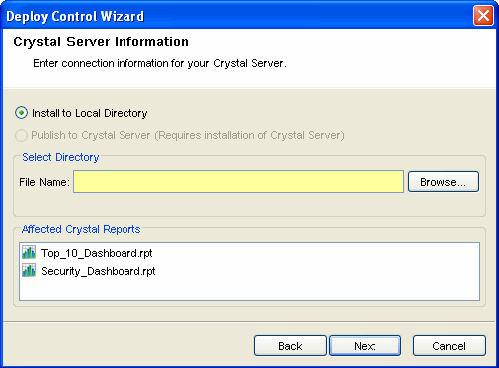
There are two options for publishing Crystal Reports. They can be installed to a local directory and then installed using the Crystal Publishing Wizard, or with additional configuration, they can be published directly from the Solution Manager to the Crystal Reports Server.
NOTE:Crystal Reports Server must be deleted in the same manner they were added. It is strongly recommended that the Notes tab of the Documentation frame be edited to indicate whether the reports are added using the local method or the Crystal Reports Server method.
To install to a local directory on the Sentinel Control Center machine, select Install to Local Directory on the screen below and then browse to the directory. Then the user must publish the reports to a SentinelReports folder using the Crystal Publishing Wizard. For more information, see Crystal Reports for Windows
and Crystal Reports for Linux
in Sentinel 6.1 Installation Guide.
Figure 15-6 Deploy Control Wizard-Crystal Reports Server Information
To publish the reports directly to the Crystal Reports Server, select Publish to Crystal Reports Server and specify the Crystal Reports Server Name, Username and Password. (In a default installation, the Username is “Administrator” and Password is blank.) When you publish directly to the Crystal Reports Server, all reports are installed in the SentinelReports folder so they will be visible from the Analysis tab of the Sentinel Control Center. Any folder hierarchy below SentinelReports is also preserved.
NOTE:The direct publishing method is only possible if you configure the Web Server as described in the“Patching Crystal Reports Server for Use with Sentinel” section of Crystal Reports for Windows
or Crystal Reports for Linux
in the Sentinel 6.1 Installation Guide.
Figure 15-7 Deploy Control Wizard-Crystal Reports Server Information

Regardless of how the reports are published, they must have the appropriate permissions configured. If this is the first time you have added any reports for Sentinel, you must set View on Demand permissions on the SentinelReports folder. If the View on Demand permissions are set, use the following procedure:
To set View on Demand Permissions:
-
On the Crystal Reports Server, click Start > Programs > BusinessObjects > Crystal Reports Server > .NET Administration Launchpad.
NOTE:When launching .NET Administration Launchpad, if you find “HTTP 404 - File or Directory not found” error, see http://support.microsoft.com/kb/315122 for resolution.
-
Click Central Management Console.
The System Name should be your host computer name. Authentication Type should be Enterprise. If not, select Enterprise.
-
Provide Administrator as the User Name. Provide your password (by default, this will be blank). Click Log On. In the Organize pane, click Folders.
-
Single-click SentinelReports.
-
Select All.
-
Click the Rights tab.
-
For Everyone, in the drop-down menu to the right under Access Level select View on Demand.
-
Click Update.
-
Logoff and close the window.
You can customize the URL’s that the Solution Manager will attempt when installing reports. The following procedure allows you to customize the URL’s:
To customize the URL:
-
Based on the operating system:
-
For Windows: Copy publish_report.jsp and delete_report.jsp files from <build unzipped directory>\reports_patch\IIS to \BusinessObjects Enterprise 11.5\Web Content\Enterprise115\WebTools\Sentinel
-
For Linux: Copy publish_report.asp and delete_report.asp files from <build unzipped directory>/reports_patch/Tomcat to /opt/crystal_xi/bobje/tomcat/webapps/esec-script/Sentinel
NOTE:You must create the Sentinel directory if it’s not available.
-
-
Browse to %ESEC_HOME%/conf/ folder.
-
Open SentinelPreferences.properties file using Notepad for editing. Add the following two new properties to supply customized URL’s for publishing and deleting reports:
com.eSecurity.Sentinel.crystal.publishURLs=http://##HOST##/businessobjects/Enterprise115/WebTools/Sentinel/publish_report.aspx http://##HOST##:8080/esec-script/publish_report.jsp

com.eSecurity.Sentinel.crystal.deleteURLs=http://##HOST##/businessobjects/Enterprise115/WebTools/Sentinel/delete_report.aspx http://##HOST##:8080/esec-script/delete_report.jsp
Each of these properties contains two URL’s separated with single whitespace.
NOTE:Report generation will fail if the proper port is not specified for the URL’s above (For example, 8080 default port for Tomcat).
The string “##HOST##” is automatically substituted with the server name specified during deployment in Deploy Control Wizard, Crystal Reports Server Installation window of Solution Manager. You can modify these properties or append them with additional URL’s.
Content Placeholders
Only fully defined Controls can be installed. For Controls that contain placeholders, the Install option is disabled:

The following warning displays in the Description frame:

Duplicate Content within Solution Pack
If two separate Controls contain identical content and one Control is deployed successfully, the status of the duplicate content in the other Control is changed to Installed. The remaining child nodes in the second Control stay uninstalled.
Each content item is only installed once. If the same content item (for example, an iTRAC workflow or a correlation rule) is included in more than one Control, it is only installed once. Therefore, if you install one of those Controls, the content displays with an installed status in the other Control. In this scenario, the Solution Manager might show that the content for the second Control is only partially installed. See Control 1.4.2 in the example below:
Figure 15-8 Duplicating Content with Solution Pack

Content with the Same Name in the Target Sentinel System
If the Solution Manager detects content with the same name but a different unique identifier in the target Sentinel system, the Solution Manager installs the content with a unique ID appended to the name. For example, the rule from the Solution Pack might be named Unauthorized Firewall Change (1). The existing rule in the Sentinel system is unchanged.
NOTE:To prevent confusion for end users, Novell recommends that one of these rules be renamed.
15.3.4 Implementing Controls
After the content installation, additional steps might be necessary to fully implement a control, such as the following examples:
-
Populate a .csv file that is used by the mapping service for event enrichment.
-
Schedule automatic report execution in the Crystal Reports Server.
-
Enable auditing on source devices.
-
Copy an attached script for Execute Command Correlation Action to the appropriate location on the correlation engine(s).
These steps should be added when the Solution Pack is created in Solution Designer.
To implement a control:
-
Open a Solution Pack in Solution Manager.
-
Select a Control.
-
Click the Implementation tab in the Documentation frame.
-
Follow all of the instructions in the Implementation tab.
-
Add notes to the Notes tab of the Documentation frame as necessary to document progress or necessary deviations from the recommended implementation steps.
-
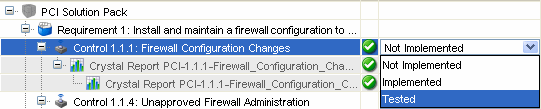
When the implementation is complete, select the Control and change the status drop-down to Implemented.
-
An audit event is generated and sent to the Sentinel Control Center.
Because of potential legal and regulatory implications, the status for a Control should only be changed after all of the implementation steps have been successfully completed.
NOTE:A Control must be installed before it can be implemented.
15.3.5 Testing Controls
After the content implementation, the content should be tested to verify that it is working as expected. Testing might require steps such as the following:
-
Run a report.
-
Generate a failed login in a critical server and verify that a correlated event is created and assigned to an iTRAC workflow.
These steps should be added when the Solution Pack is created in Solution Designer.
To test a control:
-
Open a Solution Pack in Solution Manager.
-
Select a Control.
-
Click the Testing tab in the Documentation frame.
-
Follow all of the instructions in the Testing tab.
-
Add notes to the Notes tab of the Documentation frame as necessary to document progress or necessary deviations from the recommended testing steps.
-
When the testing is complete, select the Control and change the status drop-down to Tested.
-
An audit event is generated and sent to the Sentinel Control Center.
Because of potential legal and regulatory implications, the status for a Control should only be changed after all of the testing steps have been successfully completed.
NOTE:A Control must be installed (and should be implemented) before it can be tested.
15.3.6 Uninstalling Controls
Controls are often used to meet legal or regulatory requirements. After they are implemented and tested, Controls should be uninstalled only after careful consideration.
When a Control is uninstalled, the status for the Control reverts to Not Implemented and child content is deleted from the Sentinel system. There are a few exceptions and special cases:
-
Dependencies are checked to ensure that no content that is still in use is deleted. Some examples of this include a dynamic list that is used by a correlation rule created in the target Sentinel system, a report that is used in a Control that is still installed, an iTRAC workflow template that is used in a Solution Pack that is still installed, or a folder that still contains other content.
-
Reports (.rpt files) copied to a local system cannot be removed if the uninstall is performed from a Sentinel Control Center on a different machine.
-
JavaScript files associated with Execute Script Correlation Actions remain on the correlation engine(s).
-
Maps (.csv files) and the data they contain are not deleted.
-
Roles associated with workflows are not deleted.
-
iTRAC workflow processes that are already in progress complete even if the iTRAC workflow is uninstalled.
To uninstall a Control:
-
Right click the Control you want to uninstall and select Uninstall. Alternatively, you can click Uninstall icon. The Controls To Uninstall window displays

Click Next.
-
If the Control you are uninstalling includes one or more reports, you are prompted whether to uninstall the reports from the local server or the Crystal Reports Server. Ideally, this information was recorded on the Notes tab when the reports were installed. Click Next. The Uninstall Content window displays.

-
Click Uninstall. The selected contents are uninstalled.
NOTE:Local reports cannot be uninstalled from a different Sentinel Control Center machine than they were installed or if the files were copied to a new location after installation. If the Solution Manager cannot find the .rpt files in the expected location, a message is logged in the Sentinel Control Center log file.
-
Click Finish.
15.3.7 Viewing Solution Pack Status
There are several sources of information about the status of a Solution Pack.
Viewing Status in Solution Manager
You can view the status of Solution Pack contents in the Solution Manager:
-
None/Blank: No status indicator for a Control indicates that the associated content has not been installed yet.
-
Not Implemented: When none or some of the contents of a control are installed, the control is in the Not Implemented state. If the same content is installed by another Control, a Control might be Not Implemented even if some of its child content is Installed.
-
Implemented: This status indicates that a user has completed all of the implementation steps and manually set the Control status to Implemented.
-
Tested: This status indicates that a user has completed all of the testing steps and manually set the Control status to Tested.
-
Out of Sync: This status indicates that a different version of the content in the Solution Pack is deployed in the Sentinel target system by another Solution Pack (or a previous version of the same Solution Pack.
Generating Status Documentation
The information about the Solution Pack can be exported in PDF format. The report contains details about every node in the Solution Pack, including Category, Control, and Content Group. You can select the following available options:
-
Show status: Select this option to show deployment status for each control (Not Installed, Not Implemented, Implemented, or Tested) and whether it’s Out of Sync.
-
Show individual content: Check this option to include information about the child content for each Control in the documentation.
Figure 15-9 Status Document

To generate Solution Pack documentation:
-
Open a Solution Pack for which you want to generate a status report.
-
Click Create PDF... The Report Options window displays.
-
Check the Show status and Show individual content if desired.
-
To view the documentation, click Preview. If this is the first time a PDF has been opened from your Sentinel Control Center, you might need to locate Acrobat Reader.

-
To save the PDF, click Browse. Navigate the location where you want to save the PDF and specify a filename. Click Save

Audit Events in the Sentinel Control Center
All major actions related to Solution Packs and Controls are audited by the Sentinel system, with information about which user performed the action. The following events are visible in the Sentinel Control Center and are stored in the Sentinel database:
-
Solution Pack is imported.
-
Control is installed.
-
Control status is changed to Implemented.
-
Control status is changed to Tested.
-
Control status is changed to Not Implemented.
-
Control is uninstalled.
-
Notes are modified for a Control
-
Solution Pack is deleted.
15.3.8 Deleting Solution Packs
Solution Packs are often used to meet legal or regulatory requirements. After they are implemented and tested, Solution Packs should be deleted only after careful consideration.
All deletions are audited by the Sentinel system and sent to both the Sentinel Control Center and the Sentinel database.
-
To Click Tool menu and select Solution Packs. The Solution Packs window displays.
-
Select the Solution Pack you want to delete and click the Open icon on the tool bar.
-
Select the Solution Pack node and click Uninstall. All Controls are uninstalled.
-
Close the Solution Manager
-
With the same Solution Pack selected, click Remove plugin. You are prompted for deleting the Solution Pack. Click Yes to delete.
NOTE:If you attempt to delete a Solution Pack without uninstalling the content first, you are notified that content is still deployed. You have the option to open the Solution Pack in Solution Manager and uninstall the content.