12.2 Starting the SDM GUI
There are several prerequisites to run the SDM GUI on a machine:
-
If using an Oracle database, the Oracle JDBC driver must be downloaded and placed in the $ESEC_HOME/lib (UNIX) or %ESEC_HOME%\lib (Windows) directory. As of the print date of this document, this file could be found at the following URL: http://otn.oracle.com/software/tech/java/sqlj_jdbc/index.html. This file, typically called ojdbc14.jar, will be installed by default on the machine that hosts the Sentinel DAS component.
NOTE:Sentinel 6.x does not support Oracle 9i OCI-based connections.
-
The user must know the following information:
-
Name and password for the Sentinel Database User (esecdba by default)
-
Database host server
-
Database (instance) name
-
Port used for database communications (1521 by default for Oracle and 1433 by default for SQL Server)
-
To start SDM GUI on UNIX:
-
Login to the UNIX box as a member of the esec group (for example: esecadm).
-
Go to $ESEC_HOME/sdm
-
Provide the following command line:
./sdm
To start SDM GUI on Windows:
-
Click Start > All Programs (Win XP) or Program Files (Win2000) > Sentinel > Sentinel Data Manager.
NOTE:To run the SDM from the command line, see the Section 12.3, SDM Command Line.
To connect to the Database:
-
Log into the machine with SDM installed.
NOTE:If the Sentinel Database Administrator account uses Windows Authentication, you must log into the SDM machine using the Sentinel Database Administrator account.
-
Start the SDM GUI using the appropriate procedure (for Windows or UNIX).
-
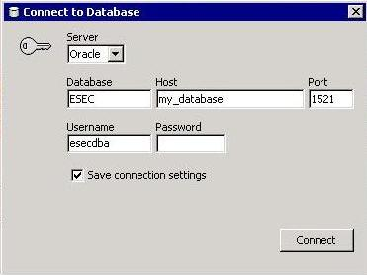
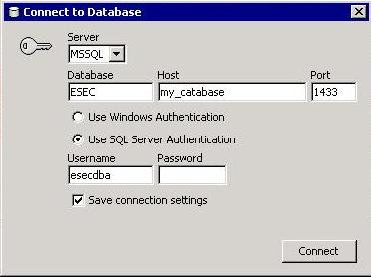
Select the database type (Oracle or MSSQL).
-
Specify the Database instance name used during the Sentinel database installation.
-
Specify the Database Host (hostname or IP address).
-
Specify the port used for database communications.
-
If using SQL Server authentication, specify the Sentinel Database Administrator username and password.
NOTE:If you select Windows Authentication, you will be authenticated to the MS SQL database as the user you are currently logged into Windows as (that is, single sign-on).
For Oracle:
For Windows:
NOTE:If you select to save your connection settings, the settings are saved to the local sdm.connect file. By default the sdm.connect file is located in $ESEC_HOME/bin directory or %ESEC_HOME%\bin folder. Next time you start the GUI, the connection settings will be re-populated from the sdm.connect file. This file can be used when running SDM from the command line.
-
Click Connect. The SDM is now ready for use.
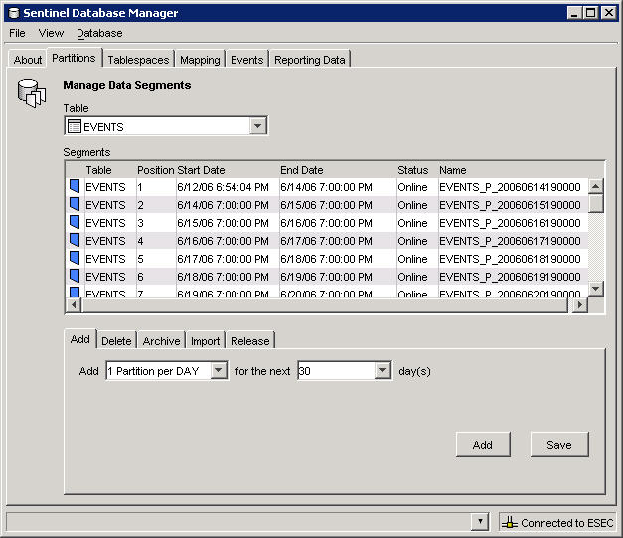
12.2.1 Partitions Tab
The Sentinel database is partitioned by time to simplify maintenance and improve the performance of the database. The Partitions tab in the SDM allows users to view and manage database partitions for the tables that hold event data, correlated event data, and summary data.
To view partitions in the GUI:
-
Click the Partitions tab.
-
Select the table in the dropdown list you want to see.
SDM displays the partitions of the currently selected Database Table.
Each row in the Segments table displays the related Database Table, Time Range, Status and Name of the partition.
The Status of each of the partitions shown in the Segments table will have one of the following states:
Table 12-1 Partition States
NOTE:If you delete a partition without archiving it, it is deleted from the partition list in the GUI.
At the bottom of the Partitions tab, there are several smaller tabs that allow the user to perform the following operations:
-
Add empty partitions to the database
-
Delete partitions from the database
-
Archive data from partitions to flat files in a specified, pre-existing directory
-
Import Partitions
-
Drop Partitions
Many of these operations can be executed automatically in the database using stored procedures, but this tab allows the administrator to perform these tasks manually.
To manage partitions:
-
Click the Partitions tab.
-
Select the table in the dropdown list.
NOTE:Sentinel partitioned tables are organized into 2 groups. One is the EVENTS table group, which includes EVENTS and CORRELATED_EVENTS; the other is the summary table group, which includes all summary, or aggregate, tables. If any one of the tables in the group is selected then the changes will apply to all the tables in the group.
-
Select the tab in the bottom of the window that relates to the operation that you want to perform – Add, Delete, Archive, Import or Release.
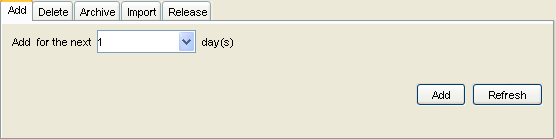
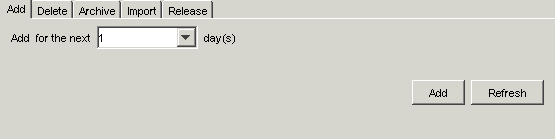
To add partitions:
-
Select the Add partitions tab.
-
Specify the number of days over which to add the partitions.
NOTE:You can specify the number of partitions in Partition Configuration in SDM GUI.
-
Click Add.
NOTE:In case of MS SQL (MS SQL 2000/2005/2008) databases, maximum number of online partitions allowed is 255. Therefore, you must schedule the offline delete / archive operations in such a way that the online partitions should not exceed 255.
To delete partitions:
-
Select the Delete partitions tab.
-
Specify the number of days for which older partitions will be deleted.
-
Click Delete.
To import partitions:
-
Select the Import partitions tab.
-
Select the partition in the Segment table into which the data will be imported.
NOTE:You can specify the input directory in the “Archive Destination” field in Partition configuration tab in SDM GUI.
-
Click Import.
To release imported partitions:
-
Select the Release partitions tab.
-
Select the partition in the Segment table that will be released.
-
Click Release.
Archiving
Events, correlated events, and aggregation (or summary) tables can all be archived using SDM. There are several requirements for archiving:
-
The directory to which the partitions are archived must already exist on the database server (not the machine running SDM); SDM does not create the directory.
-
On UNIX systems, archiving cannot be to the /root directory.
-
On UNIX systems, the oracle user must have permissions to write to the archive directory.
-
On Windows systems, owner of the SQL Server Agent service must have permissions to write to the archive directory.
To archive partitions:
-
Select the Archive partitions tab.
-
Specify the number of days for which older partitions will be archived.
NOTE:You can specify the archive directory in the Archive Destination field in Partition configuration tab in SDM GUI.
-
Click Archive.
Oracle Archive Partitions tab:
Microsoft SQL Archive Partitions tab:
12.2.2 Tablespaces Tab
The Tablespaces tab in the SDM allows users to view the current database space utilization, including:
-
Total space allocated for each tablespace
-
Space used by each tablespace
-
Space available (free) for each tablespace.
NOTE:All the tablespaces are set to Autogrow.
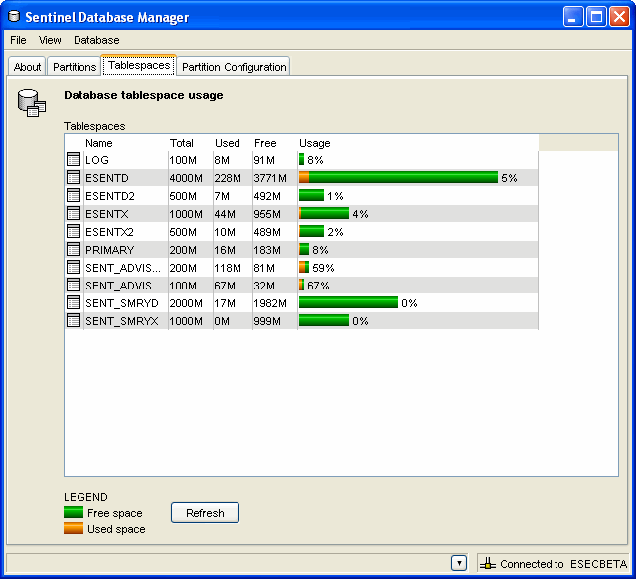
Color coded bar graphs help to visualize the total space allocated for each tablespace and the percent used of each tablespace.
NOTE:On Microsoft SQL Server, “tablespace” usage represents “filegroup” usage.
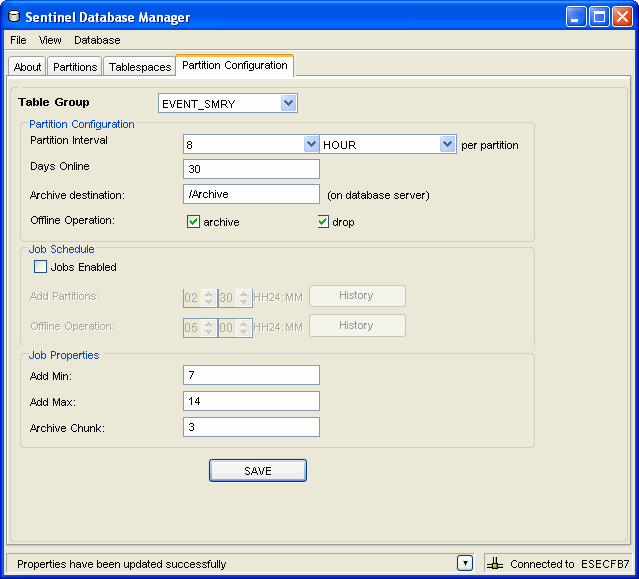
12.2.3 Partition Configuration
The Partition Configuration tab in the SDM allows you to set parameters to auto-archive partitions. It also allows you to auto-add partitions.
To configure auto-archive parameters:
-
Click the Partition Configuration tab. The Partition Configuration window displays.
-
Select the table group from the drop-down list.
-
Specify the following partition configuration information:
-
Partition Interval: Specify the time interval to create a partition per day or per hour.
-
Days Online: Number of days of data to keep online in the database.
-
Archive destination: Specify the destination to store the automatically archived data and the manually archived data.
-
Offline operation: Select archive and/or drop the data.
NOTE:Data that is dropped without archiving cannot be retrieved using SDM. You should almost always select the archive option.
-
-
Specify the Job Schedule parameters:
-
Check J checkbox if it’s not selected. By default, the checkbox is checked if you have selected this feature during the installation.
-
Schedule adding partitions and offline operation parameters, then click .
NOTE:Partitioning Job scheduling through SDM is reflected only after the partition refresh interval. The default refresh interval is 5 minutes. To change the refresh interval, edit the partitionJobRefreshInterval specified in the /opt/novell/pilin_1.0_x86-64/config/das_core.xml file and restart the Sentinel service.
/etc/init.d/sentinel stop/etc/init.d/sentinel start -
Click to view the Job History.
-
-
Specify the Job Properties:
-
Add Min: Minimum number of days of partitions for future data that should exist in the database at any time
-
Add Max: Maximum number of days of partitions for future data that should exist in the database at any time
-
Archive Chunk: Minimum number of days of partitions that will account to total number of days of partitions for Archive.
NOTE:If the fewer than Add Min days partitions exist in the database, partitions are added until there are enough partitions for Add Max days. Archiving also is done in chunks of days so that these database operations are not necessary every day.
-
-
Click Save.