11.9 Event Configuration
NOTE:In order to use the Event Configuration, your configuration.xml file must be pointing to a Communication Server that also has DAS_Binary and DAS_Query connected to it. This will normally be the case, by default, as long as your Communication Server and DAS processes are running.
11.9.1 Event Mapping
Event Mapping is a mechanism that allows you to add data to an event by using data already in the event to reference and pull in data from an outside source. The outside data source is a map, which is defined usingMap Data Configuration. The data already in the event that should be used as the reference into the map and the data to be pulled from the map into the event are specified using the Events tab.
Because virtually any data set can be made into a map, Event Mapping is useful for incorporating into the event stream data from elsewhere in your organization. Some opportunities Event Mapping provides are:
-
Regulatory Compliance monitoring
-
Policy compliance
-
Response prioritization
-
Enable security data to be analyzed related to business operations
-
Enhance accountability
When an Event Mapping is defined, it is applied system-wide to all events from all Collectors. Additionally, Sentinel will automatically distribute map data to all processes that perform event mappings as well as keep the map data in these processes up-to-date. For these reasons, Event Mapping provides significant capabilities to support enterprise deployments.
Event Mapping comprises of four main parts:
-
Controller: Stores all map information
-
Distributor: Automatically redistributes modified maps to those processes that registered for the map
-
Monitor: A monitor to detect changes in map source data
-
Generator: Generates maps from source data
One application of Event Mapping is Sentinel's Asset Data functionality. For example, asset information is collected and stored in the Sentinel Database asset schema and is represented by a Physical Asset Entry. Soft assets, such as services and applications, are represented by an entry that is linked to a Physical Asset. The primary automated update mechanism for asset data is through an asset Collector reading data from a scanner such as Nmap. The asset Collector automates the retrieval of asset information by reading asset data from the scanner and populating the asset schema tables with this data. For Event Mapping, asset information is mapped from the destination IP and source IP.
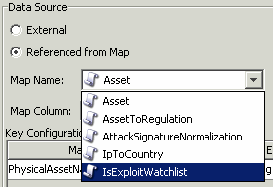
There are two types of data sources:
-
External: A Collector populates that value in the event tag.
-
Referenced from Map: Data is retrieved from a map to populate the tag.
Figure 11-15 Data Sources

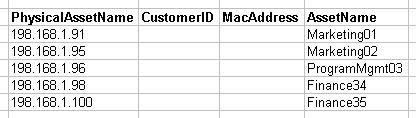
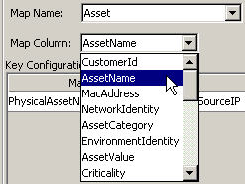
In the above illustration, the SourceAssetName tag is populated from the map called Asset (which has asset.csv as its map data source file). The specific value for SourceAssetName is taken from the AssetName column from the Asset map. The PhysicalAsssetName column is set as the key. When the InitIP tag of the event matches one of the source IP values in the PhysicalAsssetName column of the map, the row with the matching key is used to intersect the AssetName Column. For instance, in the below example the IP corresponds to AssetName Finance35.
NOTE:When a column is set as a key, it will not appear in the Column drop down field.
Figure 11-16 Physical Assent Name corresponds to Asset Name
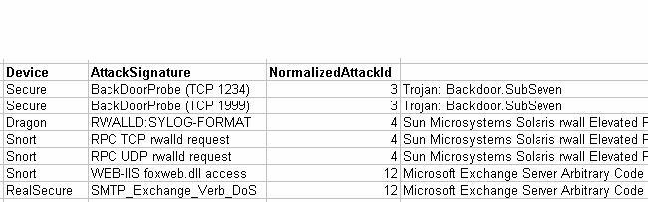
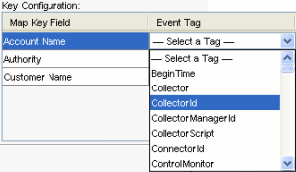
You can have more than one column set as a key as you do not want the map to be a Range Map (Range Maps can only have one key column, with that column type set to NumberRange). For instance (with column type set to String) the AttackId tag has the DeviceName (name of the security device) and DeviceAttackName columns set as keys and uses the NormalizedAttackID column in the AttackNormalization map for its value. In a row where the DeviceName event tag matches the data in Device map column and the DeviceAttackName matches the data in the AttackSignature map column, the value for AttackId is the value in the NormalizedAttackID column. The configuration for Event Mapping just described is:
Figure 11-17 Event Mapping Configuration
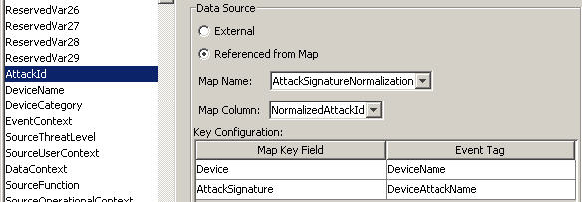
Figure 11-18 Device and Attack Signature corresponds to Asset Name
To Configure Event tags (columns) to use Mapping:
-
Navigate to Admin tab and click Event Configuration in the navigation pane or click Event Configuration button.
-
Highlight an event tag entry from the Event Columns list.
NOTE:The original Event Tag name displays above the Label field. In addition, the description of the event column is provided.
-
Click Referenced from Map to configure the event tag to be populated with data from a map. Click External to keep whatever value the Collector put in the event tag (if any).
-
Click the Map Name field down arrow.
Select one of the available default maps or a map you have created.
-
Click the Map Column field down arrow and select a Map Column name. Depending on your Map Name choice in the previous step, these values will vary.
-
_EXIST_ : This is a special Map Column that exists in every map. If this Map Column is selected, a “1” will be put in the event tag if the key is in the map data. If the key is not in the map data, a “0” will be put in the event tag.
-
All other choices: Names of active columns within the map definition that are not set as a key (for example, CustomerId column in Asset or NormalizedAttackId column in AttackNormalization)
-
-
In the Key Configuration, for each row in the table select the event tag in the Event Tag column that will be matched against the map key column specified in the corresponding Map Key Field column. The rows in the Key Configuration table will depend on the Map Name selected.
NOTE:A key is a unique identifier for the row of data in the map data.
-
Click Apply.
NOTE:Clicking Apply saves the changes you made for the currently selected event column in a temporary buffer. If you don't click Apply, when you select a different event column the changes you made to the previously selected event column are lost. Changes won’t be saved to the server until you click Save.
-
If you want to edit the Event Mapping of another Event column, repeat the steps above. Remember to click Apply after editing the Event Mapping of each Event column.
-
Click Save.
NOTE:Clicking Save will save your changes to the server. The save function saves all changes stored in the temporary buffer (when you clicked Apply).


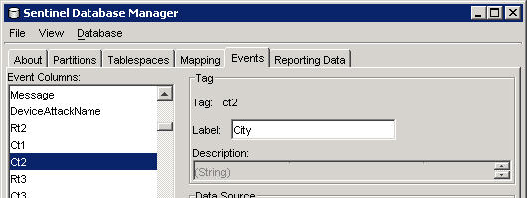
11.9.2 Renaming Tags
The Event Configuration window also allows you to assign names to existing event tag labels. For example, you can rename the label for event tag Ct2 to City. Doing this will result in the event tag that formally appeared in Sentinel Control Center as “Ct2” to now appear as “City”. Some places where event tags appear in Sentinel Control Center are filters, correlation rules, and Active Views.
Renaming tags does not change the name of the variable in Collector scripts or in internal Sentinel representations of the tag, however. For example, even if the event tag labeled Ct2 is renamed to City, the variable that must be used in a Collector script to reference this meta-tag will still be s_CT2. Any references to this variable in correlation or filters will still work, even if they were originally written using Ct2.
Below is a before and after illustration of this feature in an Active View.
Figure 11-19 Active View window-Before illustration

Figure 11-20 Active View window-After illustration

To rename an event column:
-
Click Event Configuration in the navigation pane or click the Event Configuration button.
NOTE:The original Event Column name displays above the Label field. In addition, the description of the event column is provided.
-
Highlight an event column entry.
-
Specify a new value for your Event Column in the Label field.
-
Click Apply.
NOTE:Clicking on Apply saves the changes you made for the currently selected event tag in a temporary buffer. If you don't click Apply, when you select a different event tag, the changes you made to the previously selected event tag are lost. Changes won’t be saved to the server until you click Save.
-
Click Save.
NOTE:Clicking Save will save your changes to the server. The save function saves all changes stored in the temporary buffer (when you clicked Apply).
-
In order for changes to be visible in Sentinel Control Center, running Sentinel Control Centers must be closed and reopened.