7.8 Publishing Crystal Report Templates
Many report templates have been created by Novell for use in the and tabs of the Sentinel Control Center. The most recent reports can be downloaded from the Sentinel 6 content Web pages.
The core set of Sentinel reports are distributed in the Sentinel Core Solution Pack.
Use any of the following methods to add reports to the system:
-
Download a Solution Pack from the tab and use the Solution Manager to install one or more controls that include reports.
-
Download a Collector Pack from the tab and use the Solution Manager to install one or more controls that include reports.
-
Use the Crystal Publishing Wizard to add one or more report templates (.rpt files).
-
Use the Crystal Reports Central Management Console to add one or more report templates (.rpt files).
IMPORTANT:To run any Top 10 reports, aggregation must be enabled and the EventFileRedirectService in the DAS_Binary.xml must be set to ON. This is already configured in a default Sentinel installation. For information on how to enable aggregation, see the Report Data Configuration
section of Admin
in the Sentinel 6.1 User Guide.
-
Section 7.8.1, Using the Solution Manager to Publish Report Templates
-
Section 7.8.2, Using the Crystal Publishing Wizard to Publish Report Templates
-
Section 7.8.3, Using the Central Management Console to Publish Report Templates
-
Section 7.8.5, Configuring Report Permissions and Testing Connectivity
-
Section 7.8.7, Configuring the Sentinel Control Center to Integrate with Crystal Reports Server
7.8.1 Using the Solution Manager to Publish Report Templates
If the Web server and Crystal Reports Server are configured properly, you can use the Solution Manager to directly publish the reports included in a Solution Pack or Collector Pack to the Crystal Reports Server. To configure the system, you must download the Sentinel Core Solution Pack, available in the tab at Sentinel 6.1 Content Web site.
The Sentinel Core Solution Pack includes auxiliary files that must be applied to both the Web server and the Crystal Reports server. These auxiliary files are available in the Solution Manager after you import the Core Solution Pack. When you select the Global Setup control, the auxiliary file attachments are available in the lower right corner of the screen.
Figure 7-1 Core Solution Pack in Solution Manager Showing Crystal Auxiliary Files

7.8.2 Using the Crystal Publishing Wizard to Publish Report Templates
Sentinel reports are now distributed through Solution Packs, but the method in this section can be used to publish report templates that are from a source other than a Solution Pack.
NOTE:If you want to publish your report templates again, delete your previous import of the report templates.
-
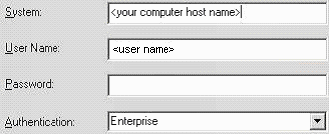
Click > > > > , then click and log in.
should be the hostname of the machine where Crystal is installed, and should be Enterprise. can be Administrator.
-
For security reasons, you should create a new user instead of using Administrator. Specify your password and click .
Publishing reports as an Administrator user allows all users to access the reports.
-
Click .
-
(Optional) Select .
-
Navigate to the location of the report templates. Click , then click .
-
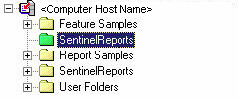
In the Specify Location window, click at the upper right corner and create a folder called SentinelReports if it does not exist already. Click .
-
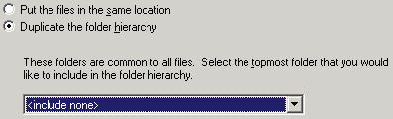
Select , then click the down-arrow and select <include none>.
-
Click .
-
In the Confirm Location window, click .
-
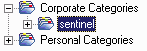
In the Specify Categories window, specify a category name (for example, sentinel), select the name, then click the + button.
-
Click .
After you click , only the first report displays in the category.
-
In the Specify Schedule window, ensure that is selected, then click .
-
In the Specify Repository Refresh window, click , then click .
-
In the Specify Keep Saved Data window, click , then click .
-
In the Change Defaults Values window, ensure that is selected, then click .
-
Click to add your objects.
A published list displays.
-
Click .

When the Sentinel templates for Crystal Reports are published to Crystal Reports Server, the templates must reside within the SentinelReports directory, or they are not displayed in the Sentinel Control Center.
7.8.3 Using the Central Management Console to Publish Report Templates
Sentinel reports are now distributed through Solution Packs, but the method in this section can be used to publish report templates that are from a source other than a Solution Pack.
-
Open a Web browser and provide the following URL:
http://<hostname_or_IP_of_web_server>/businessobjects/enterprise115/WebTools/adminlaunch -
Click .
-
Log in to your Crystal Reports Server.
-
In the pane, click .
-
On the upper right corner, click.
-
Create a SentinelReports folder (if it does not exist already), then click .
Ensure that the folder name is SentinelReports.
-
Click .
-
Click and create subfolders if required. If you are manually adding the Sentinel core reports, create the following subfolders:
-
Advisor_Vulnerability
-
Dashboards
-
Incident Management
-
Internal Events
-
Security Events
-
Top 10
-
-
Click > > .
-
On left side of the page, select .
-
Click and browse to the location of the report templates you want to add. Pick a folder and select a report.
-
Select , then click .
-
Select the appropriate folder for the report, then click .
-
Click .
-
To add the remaining reports, repeat Step 9 through Step 14 until all reports have been added.
7.8.4 Setting a Named User Account
The license key supplied with Crystal Reports Server is a Named User account key. The Guest account must be changed from Concurrent User to Named User.
-
On the Windows desktop, click > > > > .
-
Click .
The should be your host computer name. The should be Enterprise.
-
Specify Administrator as the User Name. Specify your password (by default, this is blank).
-
Click . In the pane, click .
-
Click .
-
Change the connection type from to .
IMPORTANT:You should use the Named User License account to generate unlimited reports.
-
Click .
7.8.5 Configuring Report Permissions and Testing Connectivity
Configuring Permissions
You use the .NET Administration Launchpad to configure the permissions to allow you to view and modify reports on demand.
-
On the Windows desktop, click > > > > .
If you see an HTTP 404- File or Directory not found error when you launch the .NET Administration Launchpad, see http://support.microsoft.com/kb/315122 for resolution.
-
Click .
The should be your host computer name. The should be Enterprise.
-
Specify Administrator as the User Name. Specify your password (by default, this is blank).
-
Click . In the pane, click .
-
Click , then select .
-
Click .
-
From , select .
-
Click .
Testing the Web Server Connection to the Sentinel Database
-
On your Windows desktop, click > > > > .
-
Click .
-
Specify Administrator as the User Name. Specify your password (by default, this is blank).
-
Click .
-
Navigate to > > .
-
Select , then click .
-
Depending on your system, login as esecrpt or as the Sentinel Report User.
-
From the drop-down menu, select .
-
Click to display a report.
Testing Connectivity to the Web Server
-
Go to another machine that is on the same network as your Web server.
-
Open a Web browser and provide the following URL:
http://<hostname_or_IP_of_web_server>/businessobjects/enterprise115/WebTools/adminlaunch/default.aspx
You should see a Crystal BusinessObjects Web page.
7.8.6 Disabling the Sentinel Top 10 Reports
By default, the Sentinel Top 10 Reports are enabled. If you do not want to use these reports, you can reduce database storage and CPU usage by disabling them.
To disable to the Sentinel Top 10 Reports, you must turn off aggregation and disable EventFileRedirectService.
Turning Off Aggregation
-
Log in to Sentinel Control Center.
-
Click , then click .
-
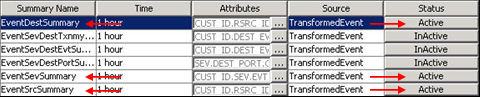
Disable the following summaries:
-
EventDestSummary
-
EventSevSummary
-
EventSrcSummary
-
-
In the column, click until it changes to .
Disabling EventFileRedirectService
-
At your DAS machine, using the text editor, open the following file:
For UNIX:
$ESEC_HOME/config/das_binary.xml
For Windows:
%ESEC_HOME%\config\das_binary.xml
-
For EventFileRedirectService, change the status to off:
<property name="status">off</property>
-
Restart the DAS component:
On Windows: Use the Service Manager to stop and start the Sentinel service
7.8.7 Configuring the Sentinel Control Center to Integrate with Crystal Reports Server
You can view Crystal Reports from Sentinel Control Center by integrating Crystal Reports Server to the Sentinel Control Center
To enable Sentinel Control Center integration with Crystal Reports Server, perform the following instructions:
NOTE:This configuration must be performed only after Crystal Reports Server has been installed and Crystal Reports have been published to it.
-
Log in to Sentinel Control Center as a user who has privileges to access the tab.
-
In the tab, select .
-
In the field, provide the following:
http://<hostname_or_IP_of_web_server>/GetReports.asp?APS=<hostname>&user=Guest&password=&tab=Analysis
<hostname_or_IP_of_web_server> must be replaced with the IP address or hostname of Crystal Reports Server. The URL does not work as expected if the Automated Process Scheduler (APS) is set to the IP address. It must be the host name of Crystal Reports Server.
-
Click , which is next to the field.
-
If you have Advisor installed, provide the following in the field:
http://<hostname_or_IP_of_web_server>/GetReports.asp?APS=<hostname>&user=Guest&password=&tab=Advisor
<hostname_or_IP_of_web_server> must be replaced with the IP address or hostname of Crystal Reports Server. The URL above does not work as expected if the APS is set to the IP address. It must be the host name of Crystal Reports Server.
-
Click , which is next to the field, then click .
-
Log out and log in to the Sentinel Control Center. The Crystal Report trees in the tab and tab (if Advisor is installed) are displayed in the Navigator window.