3.2 Creating an Application Definition for a Web Application
A Web application is an application that runs on a Web browser. You can create an application definition for a Web application by accepting the default selections in the wizard, or you can manually select the attributes required for the application definition.
3.2.1 Prerequisites
-
Close all open Novell SecureLogin prompts.
-
Verify if you have permissions to create an application definition. See Section 5.0, Setting the Wizard Mode Preference.
-
Ensure that Novell SecureLogin is running on your workstation.
3.2.2 Using the Default Selections for an Application Definition
-
Ensure that you have completed the prerequisites in Section 3.2.1, Prerequisites.
-
Launch the Web application for which you want to enable single sign-on.
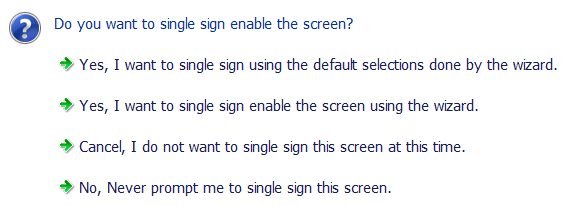
Novell SecureLogin detects the application and prompts you to enable single sign-on.
-
Select .
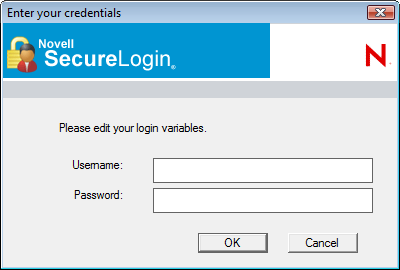
The Enter your Credentials dialog box is displayed.
-
Specify your credentials, then click .
Novell SecureLogin saves your credentials in the directory. The next time you launch the application, Novell SecureLogin provides the credentials for you.
Example: Using the Default Selections to Enable Yahoo! Mail for Single Sign-On
-
Ensure that you have completed the prerequisites in Section 3.2.1, Prerequisites.
-
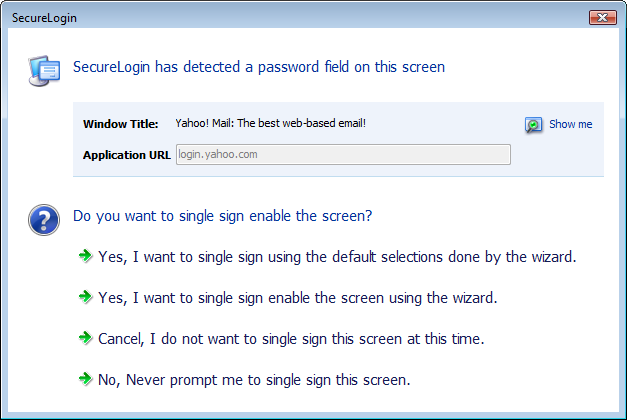
Launch Yahoo!* Mail.
Novell SecureLogin detects the application and prompts you to enable it for single sign-on.
-
Select .
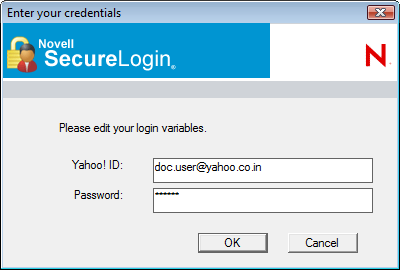
The Enter your credentials dialog box is displayed.
-
Specify your Yahoo! ID and password.
-
Click .
If you have specified the correct credentials, you are logged in to Yahoo! Mail.
For subsequent logins, Novell SecureLogin provides the credentials and logs in.
3.2.3 Manually Defining the Attributes for an Application Definition
-
Ensure that you have completed the prerequisites in Section 3.2.1, Prerequisites.
-
Launch the Web application for which you want to create an application definition.
Novell SecureLogin detects the application and prompts you to enable the screen for single sign-on.
-
Select . The Application Definition Wizard page is displayed.
-
Configure the following attributes to create an application definition.
Identifying the Screens
Use the tab to identify the login screen. If the Application Definition Wizard identifies the login screen correctly, a check mark  displays next to . Click to verify if the screen is correctly identified.
Figure 3-3 Identifying the Login Screen
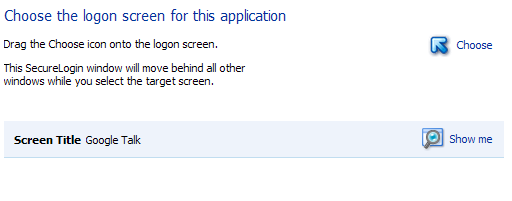
If the screen is not correctly identified, drag the  icon to the login screen to select it.
Specifying the Credentials Source
Use the tab to define the source of the credentials for the applications.
Some applications use their own credential set to log in. However, some applications might reuse credentials from another source, such as the user's network password or a one-time password.
Figure 3-4 Specifying the Credential Source
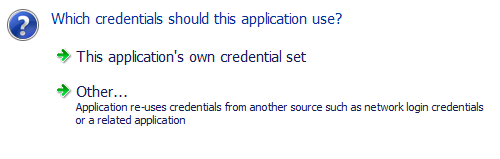
-
Select to use the application's credential set to log in. If you select this option, Novell SecureLogin creates a discrete set of credentials to enable the application. The credential set has the name of the application.
-
Select to define another source of credentials. If you select this option, select the source of credentials for the application.
The options for the credential source are:
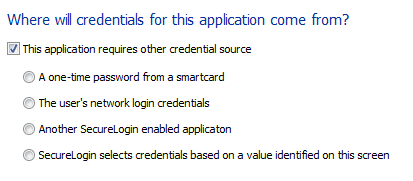
Using a One-Time Password
-
Select to use a one-time password from a smart card.
Using the User’s Network Login Credentials
-
Select to use the user's directory credentials to log in.
Using Credentials from Another Single Sign-On-Enabled Application
-
Select to use the credentials of another application enabled for single sign-on. Select the application from a list of available applications enabled for Novell SecureLogin.
Selecting Credentials Based on a Value Identified on the Screen
-
Select to provide the credentials based on the presence of a particular value on the login screen. This option uses a text entry. Regular expressions are supported in the text entry.
For example;
Connecting to server (.*)
where (.*) specifies the value that must be captured to define the credentials.
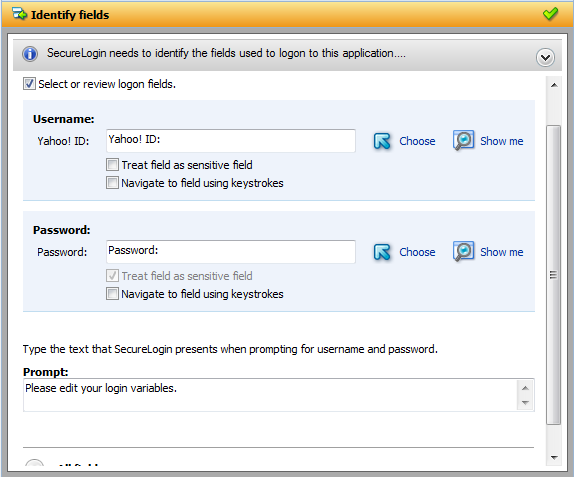
Identifying the Fields
Novell SecureLogin must identify the fields on the login screen before it can log in to the application. Typically, these are the username and password fields. You can also configure fields such as radio buttons or edit boxes on the login screen. Use the menu to view the selected field.
Figure 3-5 Selecting or Reviewing the Login Fields
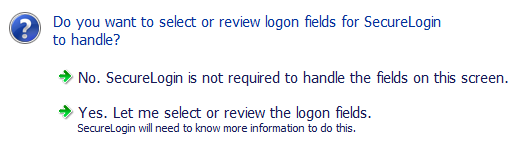
Not Allowing Novell SecureLogin to Handle the Fields
-
Select if you do not want Novell SecureLogin to handle the login fields on the screen.
You can use this option to create a credential set, which can be used with other application screens. Similarly, you can use the credential set to link to other application definitions and use to identify the application screens.
Reviewing the Fields
-
Select to review the fields selected by the wizard . By default, Novell SecureLogin uses the field names as the prompts in the dialog boxes. You can edit the field names to make them clear and user-friendly.
-
If the login fields are not identified correctly, identify them manually by dragging the icon to the fields and clicking the icon. The selected fields are highlighted.
-
If does not highlight the correct control, update it by dragging and dropping the icon to the button you want.
or
Use the option:
-
Click .
-
Specify the keystrokes.
-
Select to return to the menu.
-
Select to stop the recording.
The next time you log in to the application, the keystrokes are used to log in.
-
-
Select to treat the username field like a password field and disguise the characters with asterisks. This is optional for the username but mandatory for the password.
-
(Optional) Specify the text that Novell SecureLogin presents when prompting the user for username and password.

Reviewing Other Fields
-
Click to show other fields detected by the wizard on the login screen. Each control is listed by type and name (if known).
Select the field you want Novell SecureLogin to use in managing the login for the application, then specify the actions for Novell SecureLogin.
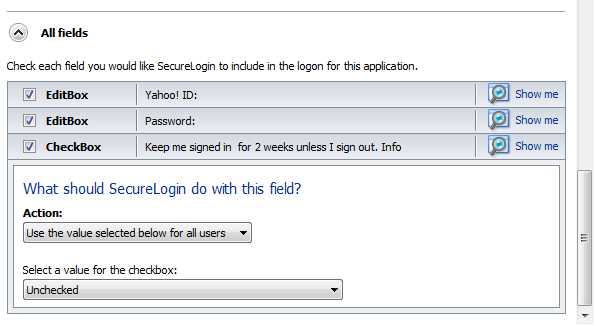
Depending on the application, any or all of the following fields are displayed.
-
Edit box
-
Check Box
-
Combo Box
-
Radio Button
For information on configuring Novell SecureLogin to use these additional fields, refer All Fields.
-
Specifying Reauthentication Rules
-
Use the menu to specify if users must reauthenticate with their network credentials or an authentication device.
-
If you select , Novell SecureLogin does not prompt users to reauthenticate before providing credentials to the application.
-
If you select , users must specify credentials in order to reauthenticate.
-
From the drop-down list, select the method Novell SecureLogin must use. You can select from:
-
Use same Credentials as Network Login: Use the network login credentials.
-
Default: The method the user used to log in to the application.
-
Password: The network password.
-
Smart Card: After the PIN is verified, Novell SecureLogin checks to see if the smart card belongs to the user or not.
-
-
You must also specify the action Novell SecureLogin takes when the users cancels the reauthentication.
You can define one of the following actions:
-
Click this button: Select a button on the application that Novell SecureLogin clicks when a user cancels the reauthentication dialog box. Select the button by dragging the
icon to the button you want and clicking .
-
Type the following keystrokes: Define the commands or keystrokes Novell SecureLogin enters when a user clicks in the reauthentication dialog box. To record keystrokes:
-
Click .
-
Specify the .
-
After you have recorded the keystrokes, click .
-
-
Re-direct the user to this website: Specify a URL to go to when a user cancels the prompt for credentials. You can redirect users to the login screen and force them to specify the login credentials again.
-
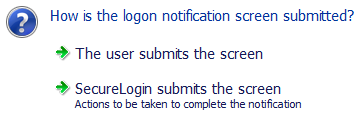
Defining the Submit Options
-
Use the menu to define how Novell SecureLogin submits the login screen.
-
If you select , Novell SecureLogin does nothing and the user must manually submit the login screen.
-
If you select , specify the action Novell SecureLogin takes to submit the login screen.
You can specify one of the following actions:
-
Click this button: Select a button on the application that Novell SecureLogin clicks when a user submits the screen. Select the button by dragging the
icon to the button you want and clicking .
-
Type the following keystrokes: Define the commands or keystrokes Novell SecureLogin enters to submit the login notification screen. To record keystrokes:
-
Click .
-
Specify the keystrokes.
-
After you have recorded the keystrokes, click .
-
-
Re-direct the user to this website: Specify a URL to go to when a user submits the login notification screen.
-
-
You can also specify the action Novell SecureLogin uses when users cancel a prompt to save their credentials. For this, select .
You can specify one of the following actions:
-
Click this button: Select a button on the application that Novell SecureLogin clicks when a user submits the screen.Select the button by dragging the
icon to the button you want and clicking .
-
Type the following keystrokes: Define the commands or keystrokes Novell SecureLogin enters to submit the login screen. To record keystrokes:
-
Click .
-
Specify the keystrokes.
-
After you have recorded the keystrokes, click .
-
-
Re-direct users to this website: Specify a URL to go to when users cancel the change password prompt.
-
Defining the Matching Criteria
Novell SecureLogin must uniquely identify each application screen in order to run an application definition. If Novell SecureLogin cannot uniquely identify a particular application screen, you can manually define the matching criteria.
-
Use the menu to define the matching criteria.
-
If you select , Novell SecureLogin uses the rules defined in previous attribute panels to identify and handle the password change.
-
If you select , you can add, modify, or remove rules. Your matching criteria must include at least one rule. After you select this option, the following screen appears:
-
By default, is selected. The text box lists the controls that are detected by Novell SecureLogin. You can add new rule by dragging the
icon to a specific control and clicking to confirm that Novell SecureLogin has identified the correct control.
To modify a rule for a control:
-
Select the rule you want to edit, then click
-
Define what Novell SecureLogin must match. You can set the following matching rule:
-
SecureLogin is to match value displayed: If you select this option, Novell SecureLogin only matches those screens that exactly match the displayed text and rules identified.
-
-
To verify if your regular expression is correct:
-
Click .
If a regular expression does not match any control on the application screen, Novell SecureLogin prompts you to verify your regular expression and select the correct control.
To delete a rule:
-
To delete a rule, select the rule, then click .
You have successfully completed creating an application definition for a Web application. The next time you launch the application, Novell SecureLogin provides the credentials for you.