9.2 Enabling Terminal Emulator Applications
You can configure terminal emulators for single sign-on in the application definition editor in the Administrative Management utility, in the Novell SecureLogin Client Utility, and the Terminal Launcher tool.
To enable a terminal emulator for single sign-on, you must run tlaunch.exe, which you configure in Terminal Launcher, and link to the configuration in an application definition.
Terminal Launcher helps you configure terminal emulator applications for single sign-on.
Contact Novell Support for information on using a ViewNow terminal emulator.
The following sections document these procedures:
In the following sections, we use Eicon Aviva. Although these procedures apply to most terminal emulators, the application definition and other configuration information might differ for each emulator application. Contact Support for help.
Typically, the session file already exists and you need to configure Terminal Launcher to point to the relevant file.
9.2.1 Creating and Saving a Terminal Emulator Session File
Prior to enabling any terminal emulator for single sign-on, you must identify or create a session file that includes all the required settings for the server connection and any other parameters required for deployment to users. Terminal Launcher is configured to run this session file when launching the emulator. Any modifications to the session must be saved to this file. The session file can be saved locally or on the server.
-
Start the terminal emulator application.
-
Connect to the required host.
-
Change the terminal emulator settings as required.
-
Save the session. The default directory is usually the application’s installation directory.
-
On the menu, click .The session file remains loaded, but you have disconnected from the host.
-
On the menu, click [session name] to save changes to the session file.
-
Exit the terminal emulator application.
9.2.2 Building a Terminal Emulator Application Definition
-
Open the Novell SecureLogin Client Utility of SecureLogin by double-clicking
 , or by selecting
-
Select . The New Application dialog box is displayed.
-
Select .
-
In the drop-down list, click .
-
In the field, specify a name for the application definition (in this example, Eicon Aviva), then click . The new application definition is added to the Applications pane.
-
Double-click the new application definition. The tab is displayed.
-
Click the tab. The application definition editor is displayed.
-
Delete the default text displayed in the text box: # place your application definition here
-
In this example for Attachmate, type the following in the text box:
WaitForText "WELCOME TO ATTACHMATE"
Type @E
WaitForText "ENTER USERID -"
Type $Username
Type @E
WaitForText "Password  ===>"
Type $Password
Type @E
WaitForText " Welcome to Attachmate"
WaitForText "***"
Delay 1000
Type @E
You must type the screen syntax accurately in the application definition editor; otherwise it will fail to operate. Wherever possible, cut and paste the text directly from the emulator screen into the editor.
-
Click the tab.
-
Ensure that the check box is selected.
-
Click .
9.2.3 Running a Terminal Launcher
Terminal applications require Terminal Launcher to execute for single sign-on. After you create the application definition in the Management utility, you must configure it to start Terminal Launcher. A shortcut is created to enable the user to run Terminal Launcher and the terminal emulator from the desktop with automated single sign-on to the application or server.
IMPORTANT:For successfully using Terminal Launcher on Windows XP SP3, the screen resolution must be 1024 by 768 pixels.
-
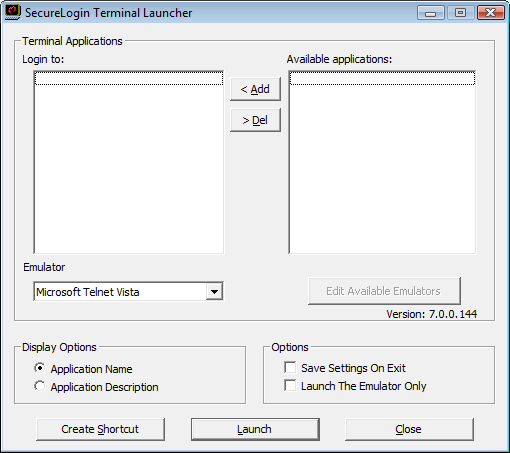
Select . The Terminal Launcher dialog box is displayed.
This release of Novell SecureLogin provides two Terminal Launcher shortcuts : one each for 32-bit and 64-bit. To launch or , click > > > or .
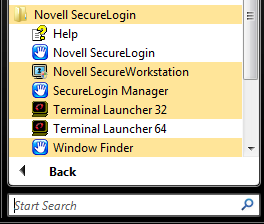
Use to to enable 32-bit emulator sessions. Use to enable 64-bit emulator sessions.
-
In the , click the required application definition (in this example, Eicon Aviva).
-
Click to move the selected application to the list.
-
Click . The Available Emulators dialog box is displayed.
If you launch Terminal Launcher as a normal user on Microsoft Windows Vista 32-bit or 64-bit platforms, the button is dimmed. You must have administrator rights to edit the TLaunch.ini file. To edit the TLaunch.ini file:
-
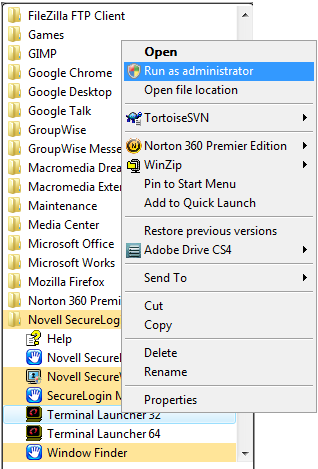
Click > > , select or .
-
Right-click on or , then select .
-
-
In the list, click .
-
Click . The HLLAPI Emulator Configuration dialog box is displayed.
-
In the field, specify the emulator executable’s location.
-
In the field, specify the emulator’s home directory.
-
In the field, specify the file name and path.
-
In the field, select and delete the current session files.
-
Click . The Emulator Session File dialog box is displayed.
-
Browse and select the configured session file.
-
Click to close the Emulator Session File dialog box.
-
Click to close the HLLAPI Emulator Configuration dialog box.
-
Click to close the Available Emulators dialog box.
-
In the Terminal Launcher dialog box, ensure that Eicon Aviva is selected in the Emulator drop-down list.
-
Under , select the check box.
-
Click .
You can choose to start emulator applications in Terminal Launcher; however, users might not have access to Terminal Launcher. To simplify login for users, a desktop shortcut is created.
To successfully automate single sign-on, Terminal Launcher must start before the terminal emulator application, so the desktop shortcut includes the command to run Terminal Launcher first and then the emulator application.
IMPORTANT:Record the exact name given to the terminal emulator in the Terminal Launcher dialog box, because it is referred to in the desktop shortcut.
9.2.4 Creating a Terminal Emulator Desktop Shortcut
Using a terminal emulator, you can create a shortcut either for a 32-bit or 64-bit version of the same emulator. However, you cannot create a shortcut for both the 32-bit and 64-bit version of the same emulator. Any attempt to create a shortcut for the other version overwrites the existing shortcut.
For example, creating a shortcut for an emulator of 64-bit overwrites an already existing shortcut for the same emulator of 32-bit.
Do the following to create a shortcut for an application or a server:
-
Select . The Terminal Launcher dialog box is displayed.
-
Click . The Terminal Launcher Shortcut Options dialog box is displayed.
-
Select .
-
Select the appropriate options from
NOTE: and are the default options.
-
In the field, ensure that the following parameters are included (in this example, /auto /e"Attachmate" /pAttachmate /q /s):
Parameter
Description
/auto
Indicates to Terminal Launcher that the following is a parameter requesting the execution of a terminal emulator application that is configured for single sign-on.
This parameter is mandatory.
/e[application name]
Initiates the execution of the terminal emulator.
/p[Terminal Launcher config name]
Initiates execution of the application created in Terminal Launcher.
/q
Quiet mode (no Cancel dialog box).
/s
Suppress errors.
-
Add additional parameters as required.
-
Click .
The shortcut is created on the desktop and you can deploy it to users in the preferred mode for your organization.
-
Click to close the Terminal Launcher dialog box.
-
Double-click the short cut.
The terminal emulator application is executed with Terminal Launcher and the Enter your credentials dialog box is displayed.
-
In the fields, specify your username and password.
-
Click .
SecureLogin stores the login credentials and uses them to log on to the application or a server. Subsequently, double-clicking the desktop shortcut logs the user directly on to the application or a server.
9.2.5 Setting Terminal Launcher Command Line Parameters
To run the required terminal emulator, Terminal Launcher command line parameters are included in the desktop shortcut command. For more information, see Section 9.2.4, Creating a Terminal Emulator Desktop Shortcut.
The following table lists the parameters (also referred to as switches) you can set in conjunction with commands.
Table 9-2 Terminal Launcher Command Line Parameters
|
Parameter |
Description |
|---|---|
|
/auto |
Indicates to Terminal Launcher that the following is a parameter requesting the execution of a terminal emulator application that is configured for single sign-on. For example: C:\<....>\TLaunch.exe /auto /pApplication1 NOTE:This parameter is mandatory. |
|
/p[platform/application/Application Definition name] |
Initiates the execution of the terminal emulator as listed in the field. To run multiple applications from the same command, add /p[TL application/Application Definition name] You can run up to fifteen applications simultaneously from the shortcut command line. For example: C:\<....>\TLaunch.exe /auto /eAttachmate /pApplication1 /pApplication2 NOTE:You must type the emulator name exactly as it appears in the drop-down list. |
|
/b |
Specifies the background authentication mode. |
|
/e[emulator name] |
The parameter /e[Terminal Launcher config name] initiates the execution of the terminal emulator as listed in the drop-down list. NOTE:You must type the emulator name exactly as it appears in the drop-down list. |
|
/h[hllapi short name] |
Commands TLaunch.exe to connect to the specified HLLAPI session. |
|
/k[executable name] |
Quits (kills) the specified executable prior to launching the terminal emulator. |
|
/m |
Enables multiple concurrent connections to specified sessions. This parameter is required for background authentication. |
|
/n |
Starts the selected terminal emulator without executing a SecureLogin application definition. For example: C:\<....>\TLaunch.exe /auto /n NOTE:This parameter does not function with VBA emulators. It overrides /p option. |
|
/n[number 1-15] |
Starts the specified number of terminal emulator sessions without executing SecureLogin application definition. For example: C:\<....>\TLaunch.exe /auto /n3 NOTE:This parameter does not function with VBA emulators. It overrides /p option. |
|
/q |
(no Cancel dialog bSox). For example: C:\<....>\TLaunch.exe /auto /q |
|
/s |
Suppress errors. |
|
/t |
Unlimited timeout during connection. For example: C:\<....>\TLaunch.exe /auto /eAttachmate /pBackground /b /t /m /hA /s /q |
|
/x [Shared Access Rights] |
Setting EHLLAPI shared access for read and write permission between multiple EHLLAPI sessions. For example: C:\<....>\TLaunch.exe /auto /eAttachmate /pBackground /b /t /m /hA/s /q /xSUPER_WRITE |
|
/c |
Allows the application to close iin case of any errors. For example: C:\<....>\TLaunch.exe /auto /c /Application Application refers to the terminal emulator application configured for single sign-on. |
|
/hwnd |
Use this parameter to pass an application handle to the terminal launcher. This parameter indicates the application window the terminal launcher should interact with. For example: This is an application definition script that uses GetHandle command to get the handle and passes it to TLaunch.exe using the /hwnd parameter. GetReg "HKLM\Software\Microsoft\Windows\CurrentVersion\App Paths\SLProto.exe\Path" ?SLLocation If ?SLLocation eq "<NOTSET>" EndScript EndIf GetHandle ?PuttyHWND Strcat ?TLaunch ?SLLocation "tlaunch.exe" Strcat ?TLaunchHWND "/hwnd" ?PuttyHWND Run ?TLaunch "/auto" "/ePutty" "/l" "/pPutty - Detection and Login" "/t" "/q" "/s" ?TLaunchHWND |
Table 9-3 List of session options for EHLLAPI shared access support
|
Parameter |
Description |
|---|---|
|
/xWRITE_WRITE |
By default the application has write access and allows only supervisory application to concurrently connect to its presentation space (WRITE_SUPER). Using WRITE_WRITE parameter allows other applications with predictable behavior to share the presentation space. For example: C:\<....>\auto /e"Attachmate" /Tlaunch_script /q /s /xWRITE_WRITE |
|
/xSUPER_WRITE |
Allows other applications to have write access permissions, while the originating application may only perform supervisory functions. |
|
/xWRITE_SUPER |
Allows other applications to perform supervisory functions, while the originating application has complete control of the session. |
|
/xWRITE_READ |
Allows other applications that perform read-only functions to share their session, while the originating application has complete control of the session. |
|
/xWRITE_NONE |
Does not allow any other applications to share the presentation space. |
|
/xREAD_WRITE |
Allows other applications to write to the session, while the originating application has read-only access. |
For more information, see Emulator Programming.