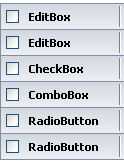
2.1 The Application Screens Pane
The pane is shown on the left side of the Application Definition Wizard interface.
The pane has a list of the application forms enabled for single sign-on, change password, notifications, and others.
The advanced options are displayed only if you select them.
Figure 2-2 The Application Screens Pane
The pane contains the following menus:
2.1.1 Logon
You can create application definitions for a login screen, through the screen. For this, you must complete the following tasks:
These are displayed in the Attributes Pane.
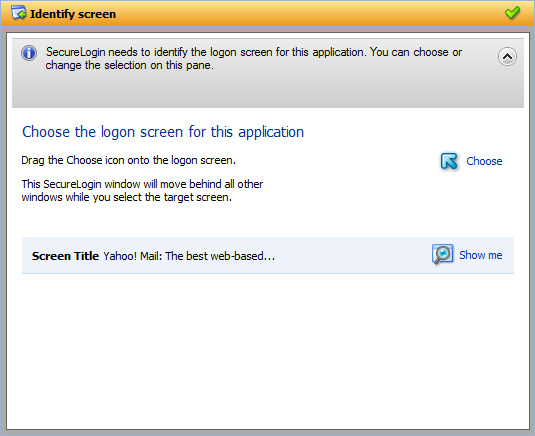
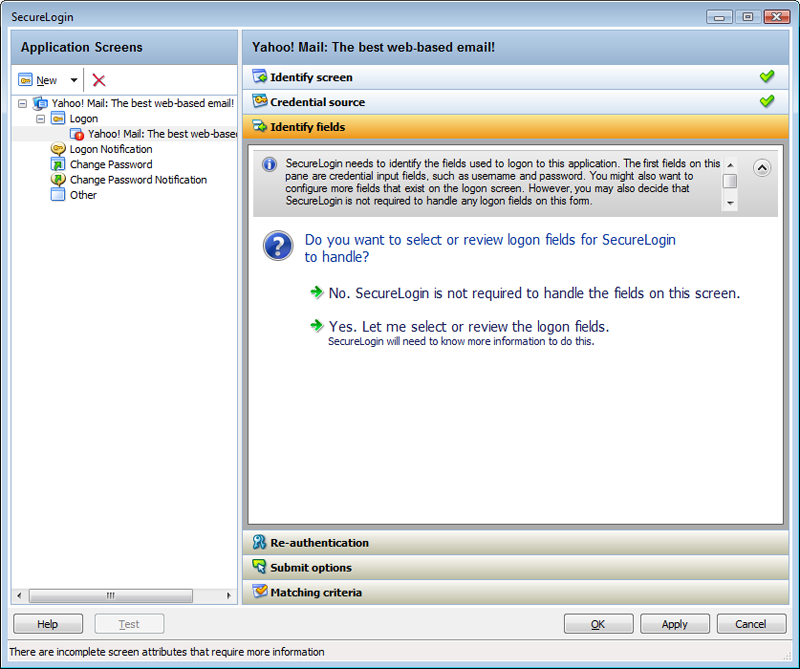
Identifying the Screen
SecureLogin identifies the login screen of the application for which you want to enable single sign-on. You can use the attribute to select or change the login screen of the application.
Figure 2-3 The Identify Screen
-
In the Application Screens pane of the wizard, select the login screen by dragging the
 icon to the login screen.
-
Click the
 icon to highlight the selection made by the wizard.
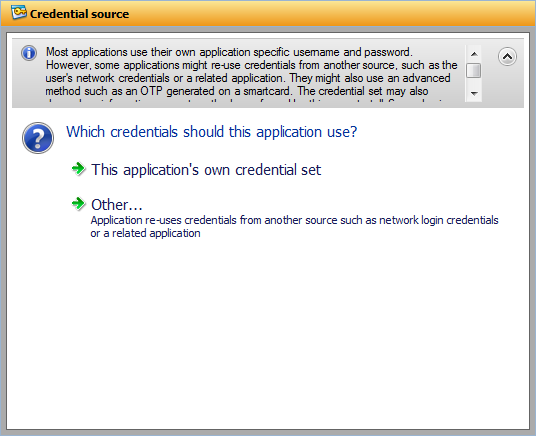
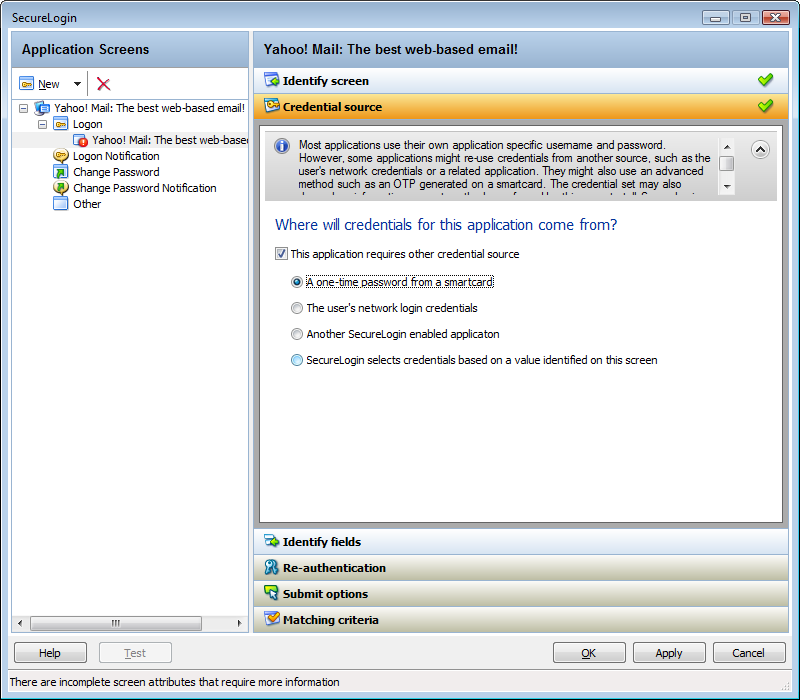
Selecting the Credential Source
-
Use the menu to select the credentials that SecureLogin must use in an application. Typically, you can have only one credential set for an application. If a second login is enabled with different credential set, it replaces the first set of credentials.
-
Select to allow SecureLogin create a discrete set of credentials for the application. The credential set is recognized by the name of the application.
-
Select to choose another source of credentials for the application. You choose from the following sources.
-
A one-time password from a smart card: Select this option to use a one-time password from a smart card to log in to the application.
-
The user's network logon credentials: Select this option to use the user’s directory credentials to log in to the application.
-
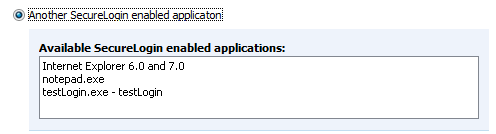
Another SecureLogin enabled application: Select this option to use the credentials of another application that is already enabled for single sign-on. Select a credential set from the list of applications displayed under .
Figure 2-4 Selecting Another Application’s Credentials
-
SecureLogin selects credentials based on a value identified on this screen: Select this option when the login information for an application is determined by the presence of a particular value in the login screen. You can specify a text value in the field.
Regular expressions are supported. For example, you can specify a regular expressions such as:
Connecting to server (.*)
The (.*)specifies the value that must be captured to define the credentials. You can have one credential set for each regular expression value.
Figure 2-5 Selecting Credentials Based on a Value

-
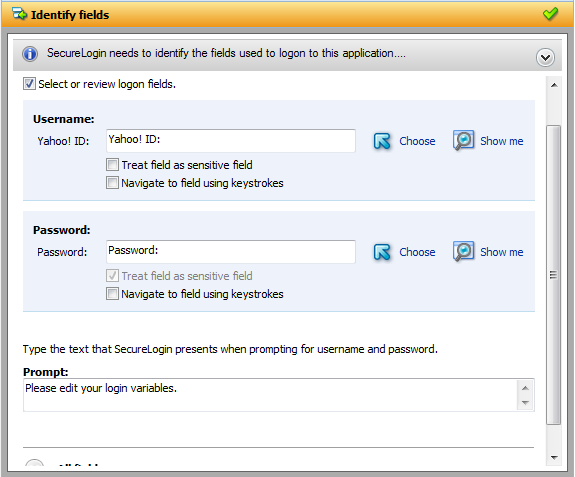
Identifying the Fields
-
Use the menu to review or change the selection of fields recognized by the wizard.
-
If you select , SecureLogin does not handle any fields detected on the application. Use this option to create a common credential set that you can use with several applications. You can link other application definitions to this common credential set.
-
If you select , you can review and confirm if the fields are selected correctly by the wizard.
By default, SecureLogin uses the field names as the prompts in its dialog boxes. You can edit the field names for more clear and user-friendly names.
-
If the fields are not identified correctly, drag the
icon to the fields and click . The identified fields are highlighted.
-
Select to hide the characters with asterisks. This choice is optional for a username, but selected by default for a password.
-
Select , if you cannot identify the correct field through other methods.
-
Click .
-
Specify the keystrokes.
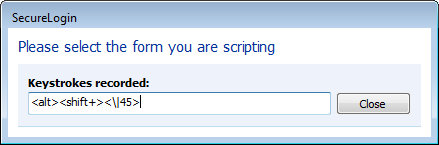
-
Click to return to the menu.
-
Click to stop the recording.
SecureLogin begins using the specified keystrokes at the subsequent login.
-
All Fields
-
Click to show other fields detected by the wizard on the login screen. Each control is listed by type and name (if known).
When the Application Definition Wizard retrieves the default controls such as the username and password fields, they are identified as primary controls and identified in menu. See Figure 2-8.
These controls are also listed with all other controls in the menu. By default, they are selected and dimmed. However, if you use the menu to set the control definitions for primary controls selected in menu, the selections made in the menu is updated.
The other fields are:
Edit Box
-
If an edit box is detected, use the drop-down list to configure SecureLogin to:
-
Ask the user to enter a value into field: If you select this option, specify a user-friendly name and the message to prompt users to specify a value.
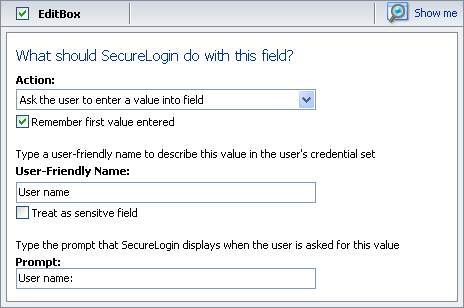
NOTE:If you select , SecureLogin saves the first value entered in this field and automatically enter it on all subsequent logins.
The is also used as the variable name in the SecureLogin Client Utility.
Select to treat the username field like a password field and hide the characters with asterisks.
-
Use the value selected below for all users: If you select , specify the message that SecureLogin displays.
-
Check Box
-
If a check box is detected, use the action to select whether the check box is to be selected or deselected.

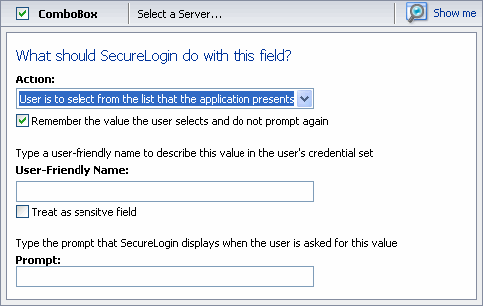
Combo Box
-
If a drop-down list box or any other kind of combination box is detected, use the drop-down list to configure SecureLogin to:
-
Use the value selected below for all users: If you select , specify the option SecureLogin selects. This is the only option available for combo boxes in Web applications.
-
Ask the user to select from the list that the application presents: If you select , specify a name for the value and the text used to prompt users. This option is not available for Web applications.
If you select , SecureLogin stores and automatically enter this value into this screen in the future.
Figure 2-6 Specifying Values for a Combo Box
-
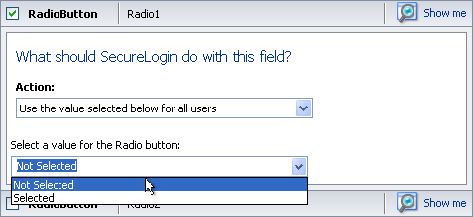
Radio Button
-
If a radio button is detected, use the action to select whether the radio button is selected or not.
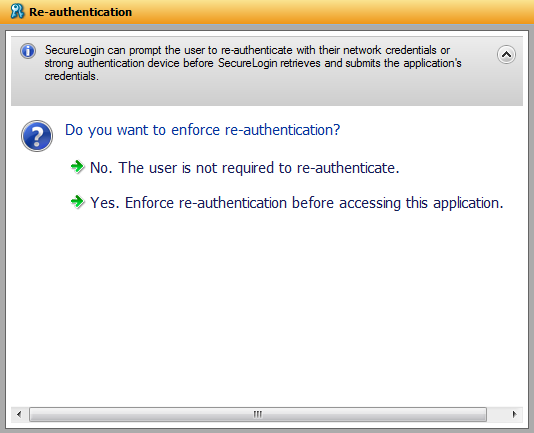
Specifying Re-authentication
-
Use the menu to specify how users must reauthenticate. Specify whether they must reauthenticate with their network credentials or by using an authentication device.
-
If you select , SecureLogin does not prompt users to reauthenticate before providing the credentials to the application.
If you select , users must specify the credentials that SecureLogin uses to reauthenicate the user’s identity.

-
From the drop-down list, select the method SecureLogin must use to authenticate the credentials. You can select one of the following options:
-
Default: The method the user used to log in to the application.
-
Use same credentials as network login: Use the network login credentials.
-
Password: The network password.
-
Smart card: After the PIN is verified, SecureLogin checks to see if the smart card is available to the user.
You must also specify the action for SecureLogin to take when the user cancels reauthentication. You can define one of the following actions:
-
Click this button: Select a button on the application that SecureLogin clicks when a user cancels the reauthentication dialog box. Select and highlight the button by dragging the
icon to the button you want and clicking .
-
Type the following keystrokes: Define the commands or keystrokes that SecureLogin enters when a user clicks on the reauthentication dialog box. To record keystrokes:
-
Click .
-
Specify the keystrokes.
-
After you have recorded the keystrokes, click .
-
-
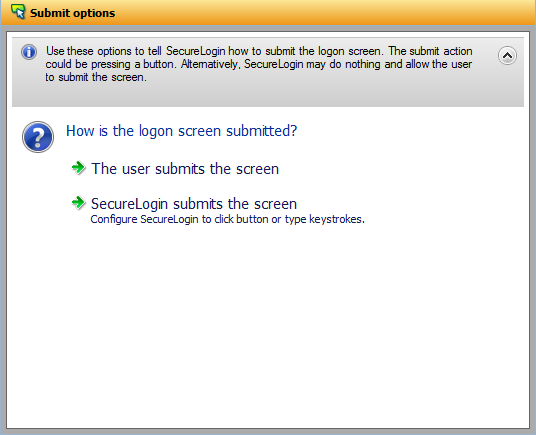
Selecting the Submit Options
-
Use the menu to define how SecureLogin submits the login screen.
-
If you select , SecureLogin does nothing and the user must manually submit the login screen.
-
If you select , specify the action that SecureLogin must take to submit the login screen.
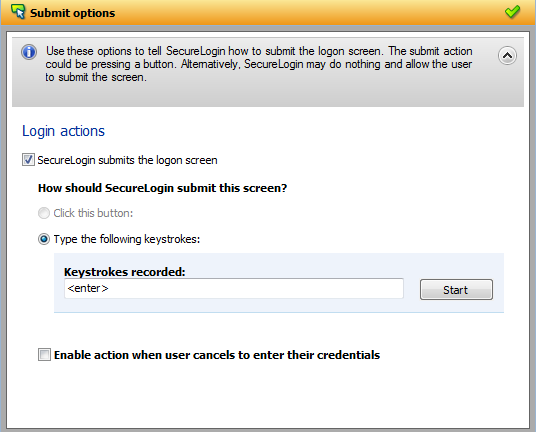
You can specify one of the following actions:
-
Click this button: Select a button on the application that SecureLogin clicks when a user submits the screen. Select and highlight the button by dragging the
icon to the button you want and clicking .
-
Type the following keystrokes: Define the commands or keystrokes that SecureLogin enters to submit the login screen. To record keystrokes:
-
Click .
-
Specify the keystrokes.
-
After you have recorded the keystrokes, click .
-
-
Enable action when user cancels to enter their credentials: If you select this option, specify the action SecureLogin takes when a user cancels credential entry.
You can specify one of the following actions:
-
Click this button: Select a button on the application that SecureLogin clicks when a user cancels the prompt for credentials. Select and highlight the button by dragging the
icon to the button you want and clicking .
-
Type the following keystrokes: Define the commands or keystrokes that SecureLogin enters when a user cancels the prompt for credentials. To record keystrokes:
-
Click .
-
Specify the keystrokes.
-
After you have recorded the keystrokes, click .
-
-
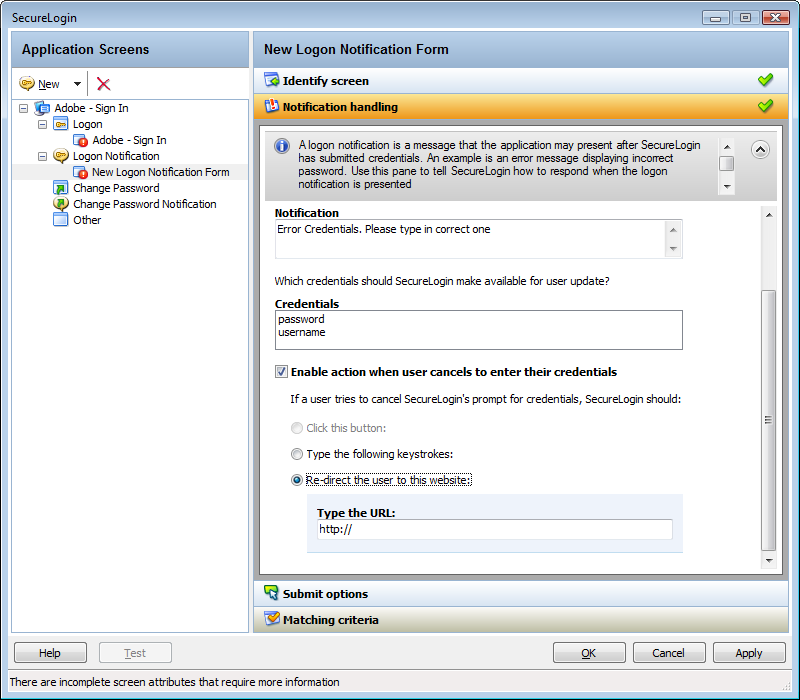
Re-direct the user to this website: Specify a URL to go to when a user cancels the prompt for credentials. You can redirect users to the login screen and force them to specify the login credentials again.
-
-
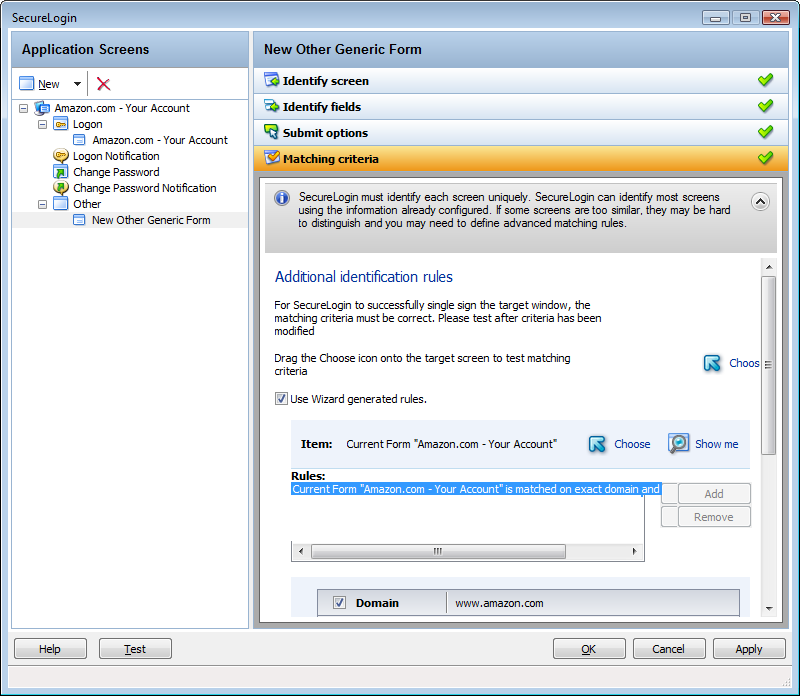
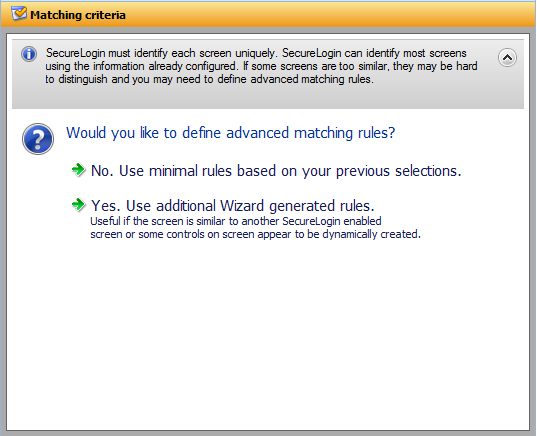
Determining the Matching Criteria
-
SecureLogin must uniquely identify each application screen in order to run an application definition. If SecureLogin cannot uniquely identify a particular application screen, you can manually define the matching criteria.
-
If you select , SecureLogin uses the rules defined in previous attribute panels to identify and handle an application.
-
If you select , you can add, modify, or remove rules. Your matching criteria must include at least one rule. After you have selected this option, the following screen appears:
By default, is selected. The text box lists the controls detected by SecureLogin. You can add a new rule by dragging the icon to a specific control and clicking to confirm that SecureLogin has identified the correct control.
To modify a rule for a control:
-
Select the rule you want to edit, then select
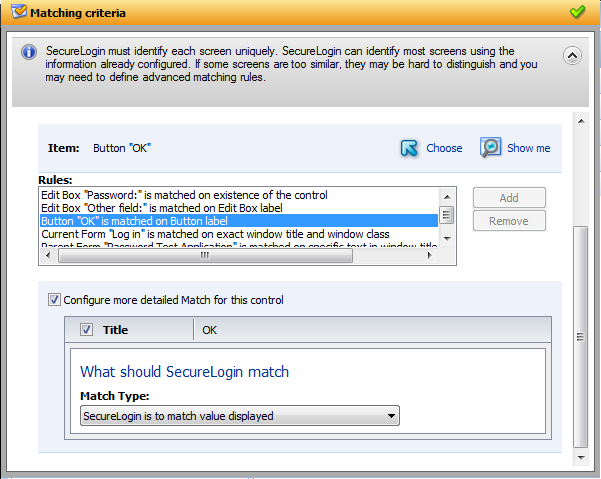
-
Define what SecureLogin must match. You can set one of the following matching rules:
-
SecureLogin is to match value displayed: If you select this option, SecureLogin only matches those screens that exactly match the displayed text and rules identified.
-
SecureLogin is to match specific part of the identified ctrl: If you select this option, you must use a regular expression to define and match the screen features. You cannot use special characters in a regular expression.
-
To test a regular expression:
-
To verify if your regular expression is correct, click .
If a regular expression does not match any control on the application screen, SecureLogin prompts you to verify your regular expression and select the correct control.
To delete a rule:
-
Select the rule, then click .
2.1.2 Login Notification
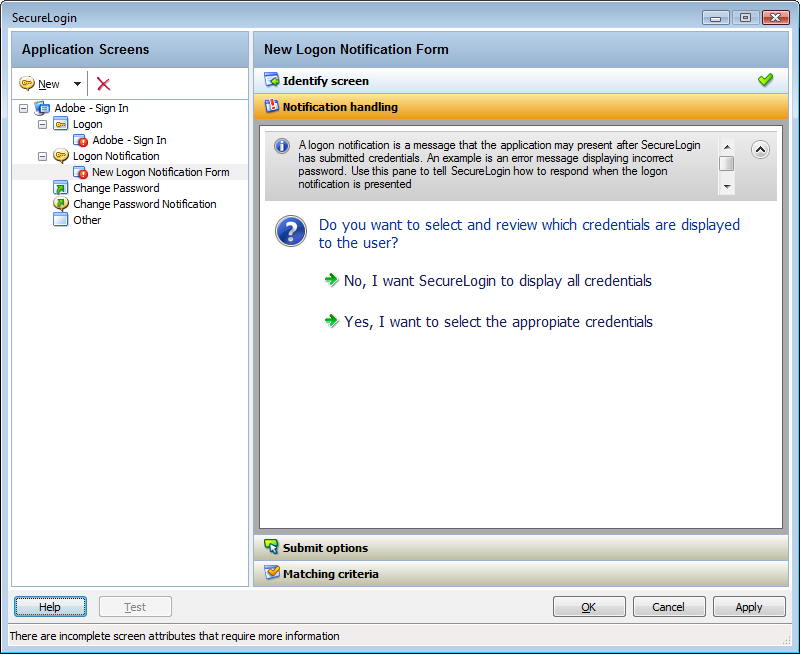
A login notification is a message that the application displays after SecureLogin has submitted the credentials, such as an error message indicating an incorrect password. Use the options to define how SecureLogin handles notifications in your application definition.
Figure 2-7 Login Notification Screen
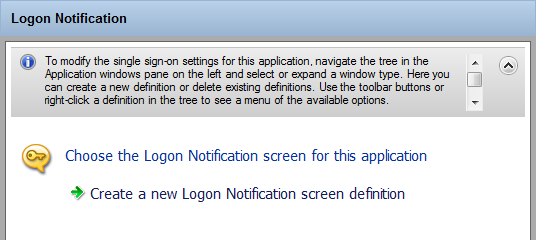
To define an application definition or login notifications, You must complete the following tasks:
These are displayed in the Attributes Pane.
Identifying the Screen
SecureLogin identifies a login screen for which you want to create an application definition. You can use the attribute to select or review the login screen selected by the wizard.
Figure 2-8 The Identify Screen
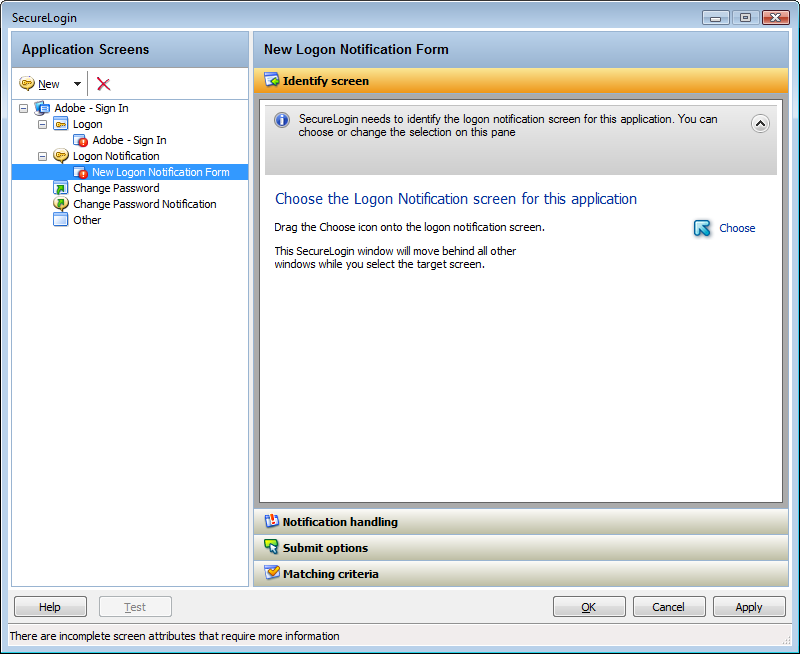
-
Select the login screen by dragging the
icon to the login screen or by recording keystrokes. The title of the login screen is displayed. Click the icon to highlight the selection made by the wizard.
Defining Notification Handling
-
Through the menu, specify how SecureLogin must respond when a login notification screen is displayed.
-
Click to prompt the users to enter their credentials again. SecureLogin uses the notification from the application.
-
Click to select the credentials to display to the user for updating. If you select this option, you must specify the prompt displayed to the users. You can select an existing prompt, or you can specify a cutomized prompt and error message. You must also specify the credential that users provide for the application.

-
If you select , specify the action that SecureLogin must take when a user cancels credential entry
You can specify one of the following actions:
-
Click this button: Select a button on the application that SecureLogin clicks when a user cancels the prompt for credentials. Select and highlight the button by dragging the
icon to the button you want and clicking .
-
Type the following keystrokes: Define the commands or keystrokes that SecureLogin enters when a user cancels the prompt for credentials. To record keystrokes:
-
Click .
-
Specify the keystrokes.
-
After you have recorded the keystrokes, click .
-
-
Re-direct the user to this website: Specify a URL to go to when a user cancels the prompt for credentials. You can redirect users to the login screen and force them to specify the login credentials again.
-
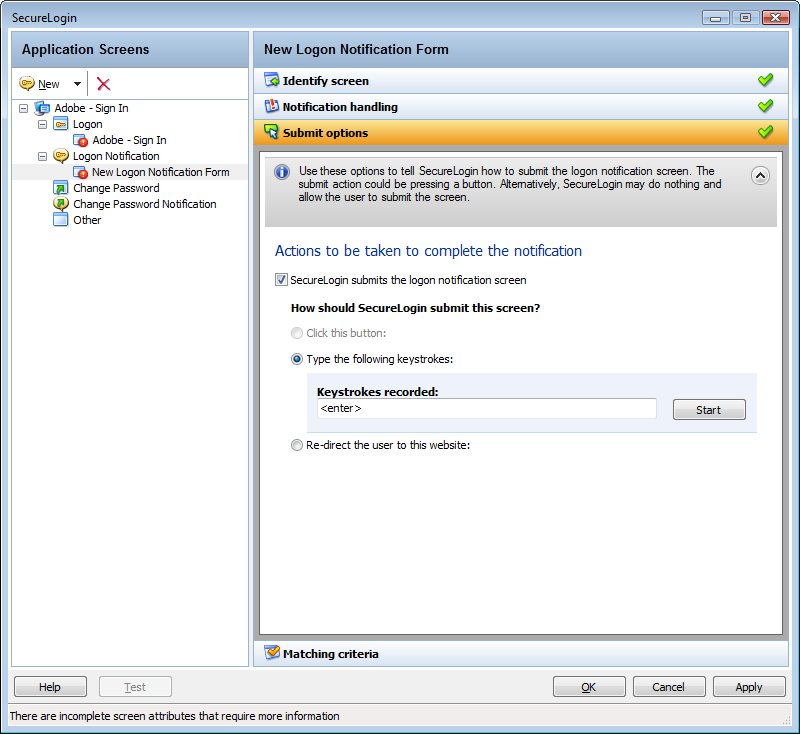
Defining the Submit Options
-
Use the menu to define how SecureLogin submits the login notification screen.
-
If you select , SecureLogin does nothing and the user must manually submit the login screen.

-
If you select , specify the action that SecureLogin takes to submit the login notification screen.
You can specify one of the following actions:
-
Click this button: Select a button on the application that SecureLogin clicks when a user submits the screen. Select and highlight the button by dragging the
icon to the button you want and clicking .
-
Type the following keystrokes: Define the commands or keystrokes that SecureLogin enters to submit the login notification screen. To record keystrokes:
-
Click .
-
Specify the keystrokes.
-
After you have recorded the keystrokes, click .
-
-
Re-direct the user to this website: Specify a URL to go to when a user submits the login notification screen.
-
Defining the Matching Criteria
SecureLogin must uniquely identify each application screen in order to run an application definition. If SecureLogin cannot uniquely identify a particular application screen, you can manually define the matching criteria.
If you select , you can add, modify, or remove rules. Your matching criteria must include at least one rule. After you have selected this option, the following screen appears:
Figure 2-9 Setting the Matching Criteria
If you select , SecureLogin uses the rules defined in previous menus to identify and handle an application.
Figure 2-10 Defining Additional Rules

By default, is selected. The text box lists the controls detected by SecureLogin. You can add new rule by dragging the icon to a specific control. Click to confirm that SecureLogin has identified the correct control.
To delete a rule, select the rule, then click .
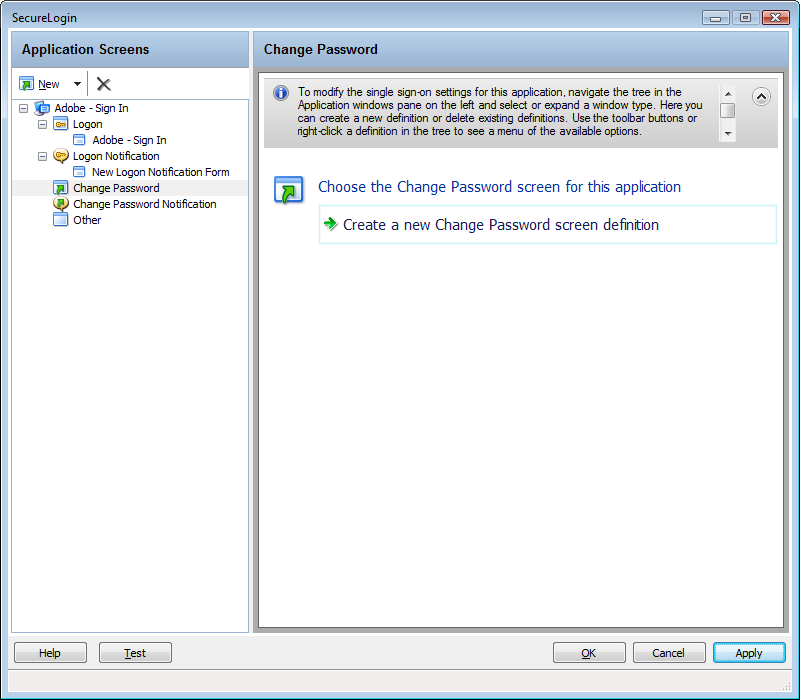
2.1.3 Change Password
You can use the menu of the Application Definitions Wizard to create an application definition to include instructions for changing the password for an application.
You can allow SecureLogin to generate new passwords that match your password policies or let users choose their passwords. You can also customize the change password prompts displayed to the users.
To define an application definition for changing passwords, complete the following tasks:
Identifying the Change Password Screen
-
In the Application Screens pane of the wizard, click to create an application definition for changing a password.
Identifying the Change Password Fields
-
Through the menu, select or change the selection of fields for changing a password. Depending on the application, there might be one or more fields.
If the label text for a particular control is empty or incorrect;
-
Click to verify if the selected control is correct.
-
If does not highlight the correct control, use the
icon to drag and drop to identify the correct control. If an application is built without ordering the labels in accordance with the controls, the icon does not update the label.
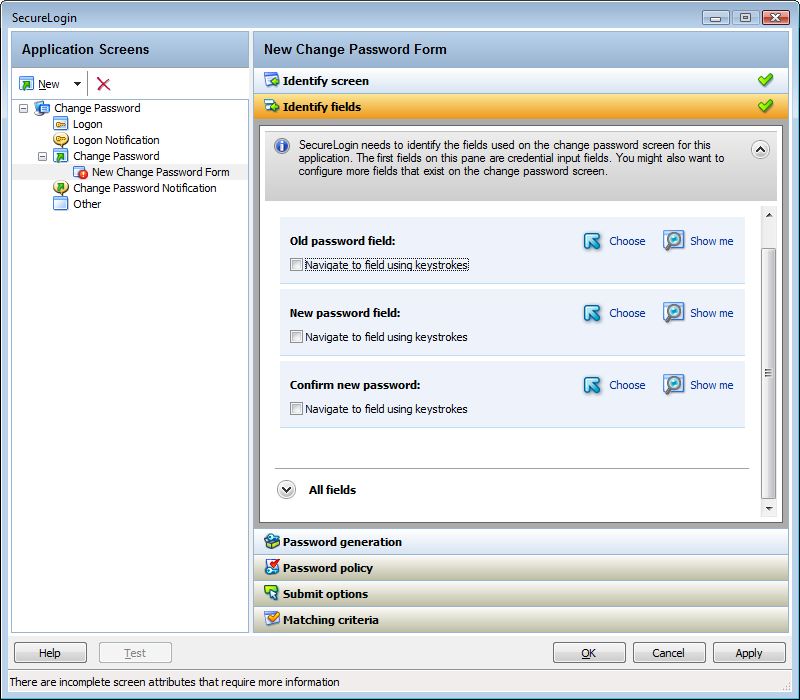
Alternatively, you can use the to select the correct fields. To record keystrokes:
-
Click .
-
Specify the keystrokes.
-
After you have recorded the keystrokes, click .
If necessary you can also define the other fields on the screen. You can define how SecureLogin handles the any radio buttons or edit boxes displayed on the screen.
-
-
Generating Password
SecureLogin can generate a random password or you can allow users to specify a new password.
Figure 2-11 The Password Generation Options
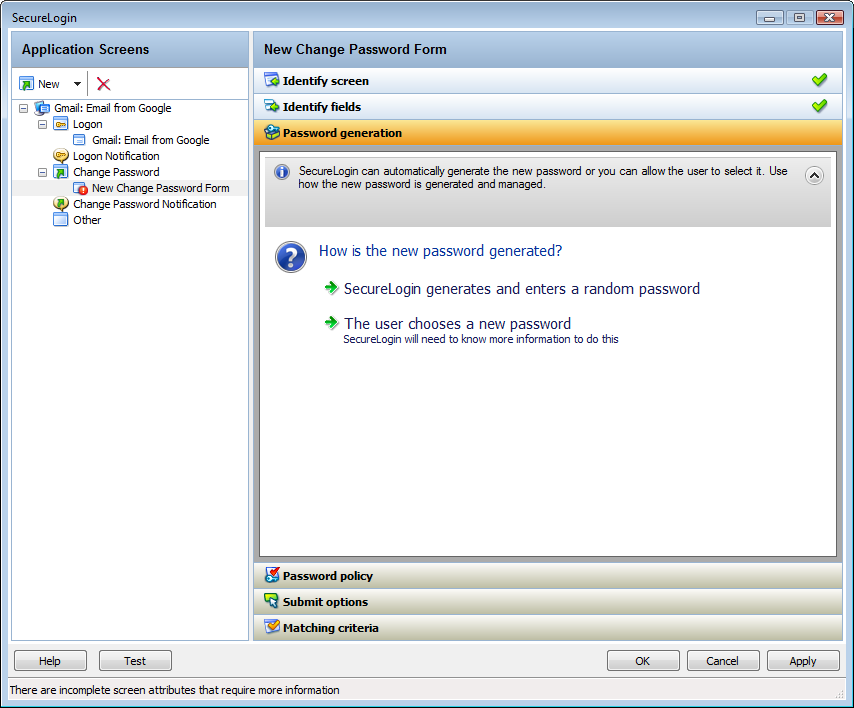
-
If you select , SecureLogin generates a random password.
-
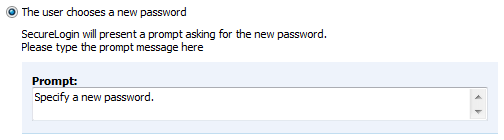
If you select , specify how to manage the password generation. SecureLogin prompts the user to for a new password. You must specify the prompt that is displayed to the user.
Selecting a Password Policy
-
Use the menu to apply a password policy to an application. You can create a new policy or apply an existing password policy.
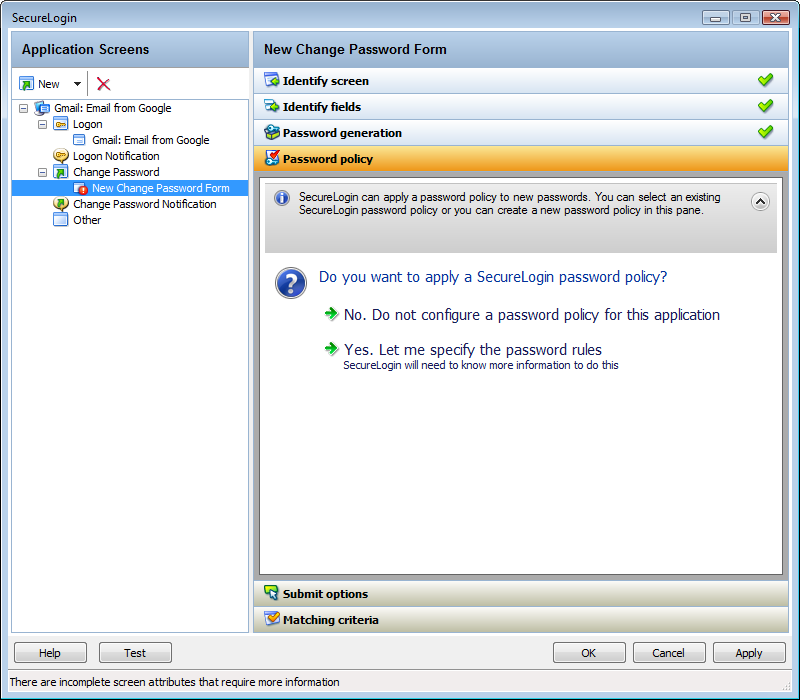
-
If you select , SecureLogin does not validate the password specified by the user.
-
If you select , you can define any or all of the following options:
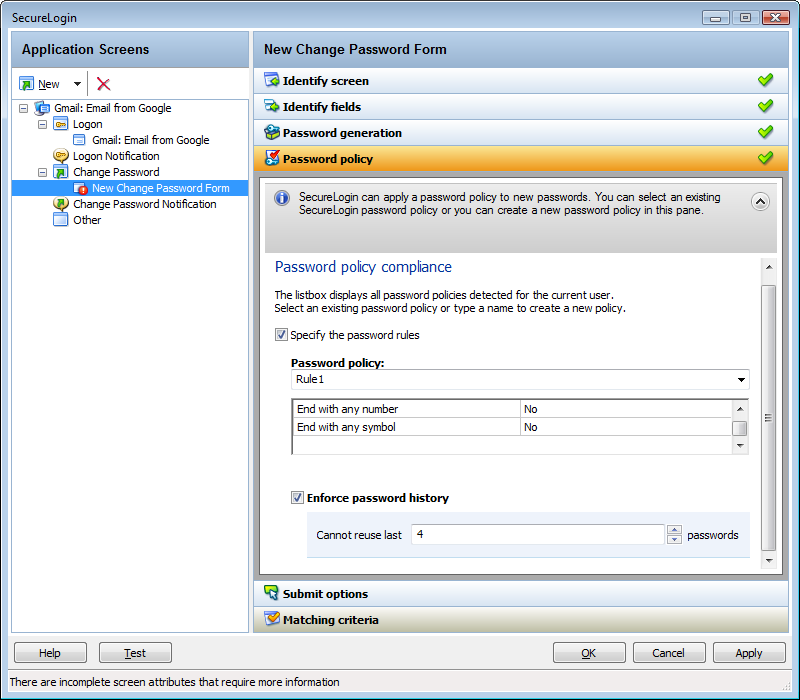
-
Create a New Password Policy: Creates a new password policy.
-
In the field, specify a name for the policy.
-
Specify the rules for the policy.
Refer Table 2-1, Setting Password Policy for information on setting the password policy rules.
-
-
Select an Existing Policy: If you have previously configured a password policy, select the policy in the drop-down list.
-
Enforce Password History: Select this option to stop users from reusing a previous password. You can specify the number of previous passwords that must not be used.
Table 2-1 Setting Password Policy
Rule
Value to Be Provided
Description
Whole number
Defines the minimum length of the password; that is, the number of characters required for the password.
Whole number
Defines the maximum length of the password; that is, the maximum number of characters allowed in password.
Punctuation characters
Defines the minimum number of punctuation characters allowed in a password. Value to be provided should be a whole number.
Punctuation characters
Defines the maximum number of punctuation characters allowed in a password. Value to be provided should be a whole number.
Whole number
Defines the minimum number of uppercase characters allowed in a password.
Whole number
Defines the maximum number of uppercase characters allowed in a password.
Whole number
Defines the minimum number of lowercase characters allowed in a password.
Whole number
Defines the maximum number of lowercase characters allowed in a password.
Whole number
Defines the minimum number of numeric characters allowed in a password.
Whole number
Defines the maximum number of numeric characters allowed in a password.
//
Disallows the use of repeated characters, or the use of the same character in succession.
If this option is set to , characters can be repeated. This is the default value.
If this option is set to , the same alphabetic characters in a different case are considered as different characters. For example, A and a are different.
If this option is set to , the successive use of the same alphabetic characters in a different case is not allowed.
//
//
//
Disallows the use of successive characters in alphabetical order.
If this option is set to , sequential characters are allowed. This is the default value.
If this option is set to , sequential characters in a different case are considered as non-sequential. For example, a and B are non-sequential.
If this option is set to , sequential characters in different cases are disallowed.
/
Enforces the use of an uppercase alphabetic character as the beginning character of a password.
The default value is .
If this option is set to , all other policies that indicate that a password must begin with a particular character or in a specific manner are disabled.
IMPORTANT:Only one type of character can be designated as the first value of a password.
/
Enforces the use of an uppercase letter at the end of a password.
The default value is .
If this option is set to , all other policies that indicate that a password must end with a particular character or in a specific manner are disabled.
Keyboard characters
Defines a list of characters that cannot be used in a password.
NOTE:There is no need of a separator in the list of prohibited characters. For example, @#$%&*
/
Enforces the use of an alphabetic character at the beginning of a password.
The default value is .
If this option is set to , it automatically disables all other policies that specify what the first character of the password should be.
/
Enforces the use of a numeric character as the first character of the password.
The default value is .
If this option is set to , it automatically disables all other policies that specify what the first character of the password should be.
/
Enforces the use of a symbol character as the first character of the password.
The default value is .
If this option is set to , it automatically disables all other policies that specify what the first character of the password should be.
/
Enforces the use of an alphabetic character as the last character of the password.
The default value is .
If this option is set to , it automatically disables all other policies that specify what the password should end with.
/
Enforces the use of a numeric character as the last character of the password.
The default value is .
If this option is set to , it automatically disables all other policies that specify what the password should end with.
/
Enforces the use of a symbol character as the last character of the password.
The default value is .
If this option is set to , it automatically disables all other policies that specify what the password should end with.
-
Defining the Submit Options
-
Use the menu to define how SecureLogin submits the change password screen.
-
If you select , SecureLogin does nothing and the user must manually submit the screen.
-
If you select , specify the action that SecureLogin must take to submit the screen.
You can specify one of the following actions:
-
Click this button: Select a button on the application that SecureLogin clicks when a user submits the change password screen. Select and highlight the button by dragging the
icon to the button you want and clicking .
-
Type the following keystrokes: Define the commands or keystrokes that SecureLogin enters to submit the change password screen.
To record keystrokes:
-
Click .
-
Specify the keystrokes.
-
After you have recorded the keystrokes, click .
-
-
Re-direct users to this website: Specify a URL to go to after users submit the change password screen.
You can also specify the SecureLogin action when users cancel saveing their credentials. For this, select . You can specify one of the following actions:
-
Click this button: Select a button on the application that SecureLogin clicks when a user submits the screen. Select and highlight the button by dragging the
icon to the button you want and clicking .
-
Type the following keystrokes: Define the commands or keystrokes that SecureLogin enters to submit the login screen.
To record keystrokes:
-
Click .
-
Specify the keystrokes.
-
After you have recorded the keystrokes, click .
Re-direct users to this website: Specify a URL to go to when users cancel the change password prompt.
-
-
-
Defining the Matching Criteria
SecureLogin must uniquely identify each application screen in order to run an application definition. If SecureLogin cannot uniquely identify a particular application screen, you can manually define the matching criteria.
Figure 2-12 Setting the Matching Criteria
-
If you select , SecureLogin uses the rules defined in previous attribute panels to identify and handle changing a password.
-
If you select Use additional Wizard generated rules, you can add, modify, or remove rules. Your matching criteria must include at least one rule.
-
By default, is selected. The text box lists the controls that are detected by SecureLogin. You can add new rule by dragging the
icon to a specific control and clicking to confirm that SecureLogin has identified the correct control.
2.1.4 Change Password Notification
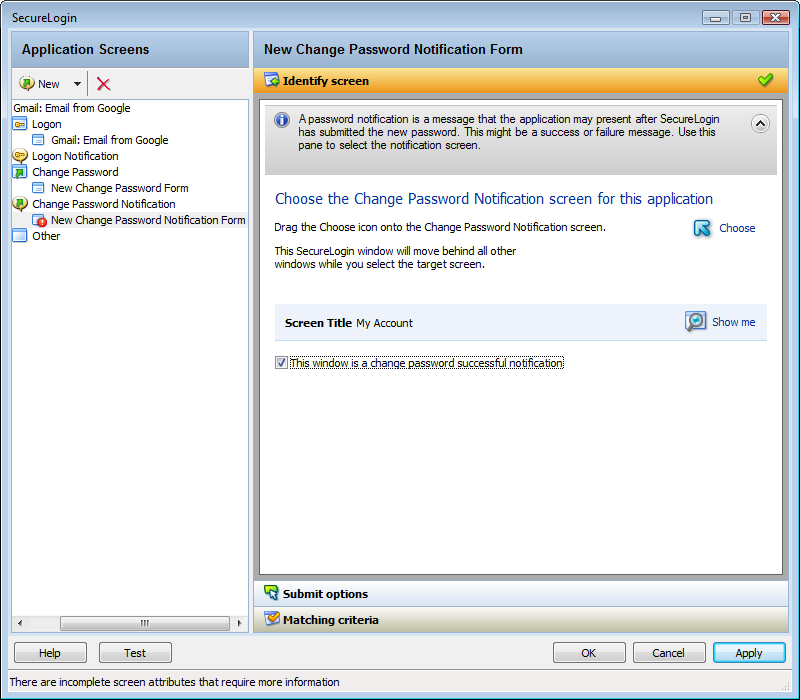
A change password notification is a message that an application displays after the user submits the new password. This might be either a confirmation or error message.
IMPORTANT:A change password notification cannot be created if a change password form is not defined.
The change password notification lets users know whether the password is successfully changed. If a change password notification is not defined, SecureLogin prompts the user to verify if the password is changed successfully.
To handle change password notifications, You must complete the following tasks:
Identifying the Screens
SecureLogin must uniquely identify the change password notification screen to handle the notification. You can the attribute to select or change the notification screen.
Figure 2-13 The Change Password Notification Screen
-
Select the Change Password Notification screen by dragging the
icon to the screen. The title of the screen is displayed.
-
Click the
icon to highlight the selection made by the wizard.
-
If you select , you must next define the submit options. See Defining the Submit Options.
-
If you do not select , define Handling Errors.
SecureLogin updates the credentials for the application immediately after a password is changed successfully. It does it either automatically or by asking the user.
Defining the Submit Options
-
Use the to define what to do when the change password notification is displayed.
-
Select to allow users to handle any change password notification screens.
-
If you select , specify what SecureLogin must do to handle a change password notification screen.
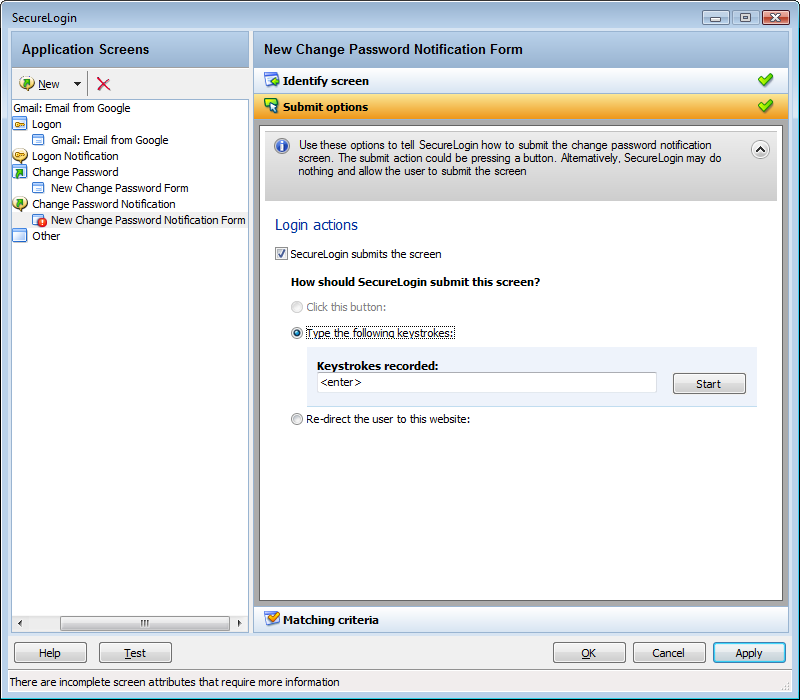
You can specify one of the following actions:
-
Click this button: Select a button on the application that SecureLogin clicks when a user submits the screen. Select and highlight the button by dragging the
icon to the button you want and clicking .
-
Type the following keystrokes: Define the commands or keystrokes that SecureLogin enters to submit the login screen.
To record keystrokes:
-
Click .
-
Specify the keystrokes.
-
After you have recorded the keystrokes, click .
-
-
Re-direct the user to this website: Specify a URL to go to when a user cancels the prompt for credentials. You can redirect users to the login screen and force them to specify the login credentials again.
NOTE:If the label text for the control is empty or incorrect:
-
Click to check if the selected control is correct.
-
If does not highlight the expected control, update it by using the icon or by using the option.
The icon might not update the label if the application is built without ordering labels in accordance with controls.
-
-
Enable action when user cancels to enter their credentials: If you select this option, specify what action SecureLogin takes when a user cancels credential entry.
You can specify one of the following actions:
-
Click this button: Select a button on the application that SecureLogin clicks when a cancels the promptfor credentials. Select and highlight the button by dragging the
icon to the button you want and clicking .
-
Type the following keystrokes: Define the commands or keystrokes that SecureLogin enters when the user cancels the prompt for credentials.
To record keystrokes:
-
Click .
-
Specify the keystrokes.
-
After you have recorded the keystrokes, click .
-
-
Re-direct the user to this website: Specify a URL to go to when a user cancels the prompt for credentials. You can redirect users to the login screen and force them to specify the login credentials again.
-
-
Handling Errors
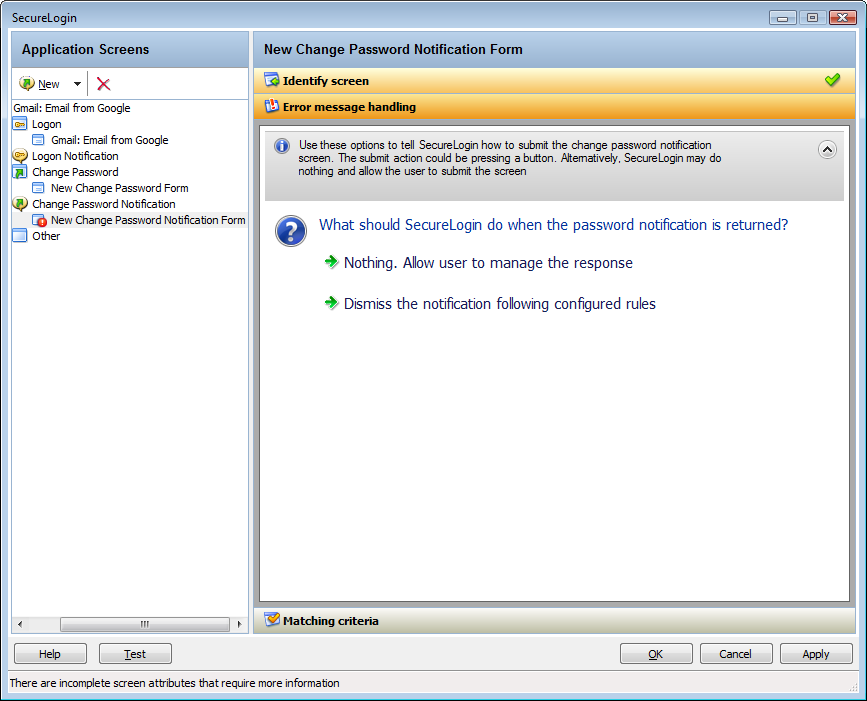
If a change password notification screen does not confirm a password change, you must define rules for SecureLogin to handle the notification.
Figure 2-14 The Change Password Notification Screen
-
If you select , it displays the notification from the application. Users can manage the response.
-
If you select , define the action that SecureLogin must take.
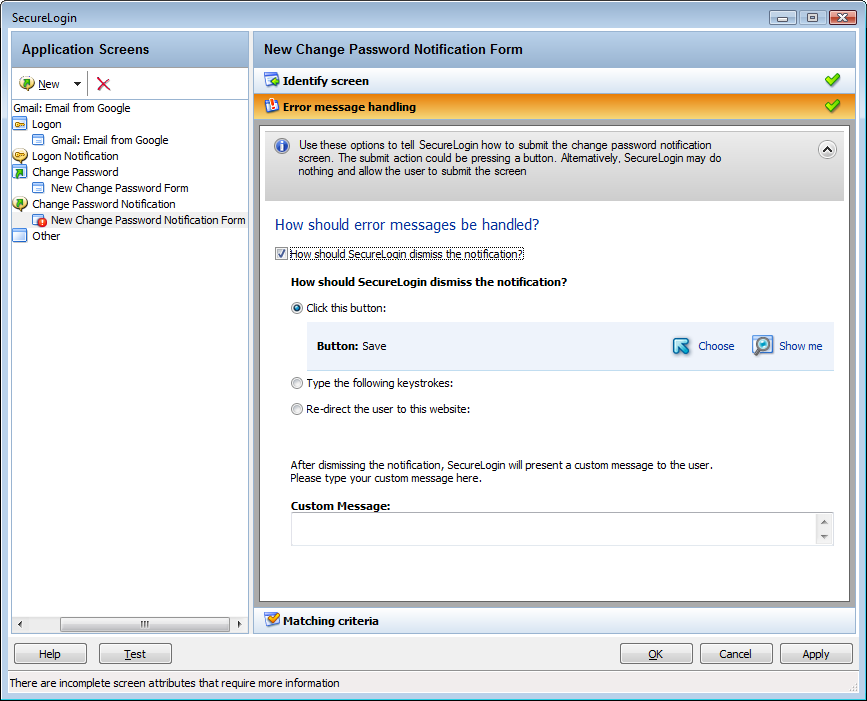
You can do any of the following:
-
Click this button: Select a button on the application that SecureLogin clicks when a user submits the screen. Select and highlight the button by dragging the
icon to the button you want and clicking .
-
Type the following keystrokes: efine the commands or keystrokes that SecureLogin enters to submit the login screen.
To record keystrokes:
-
Click .
-
Specify the keystrokes.
-
After you have recorded the keystrokes, click .
-
-
Re-direct the user to this website: Specify a URL to go to when a user cancels the promptfor credentials. You can redirect users to the login screen and force them to specify the login credentials again.
In the text field, specify a custom message to be displayed to the users.
-
Defining Matching Criteria
SecureLogin must uniquely identify each application screen in order to run an application definition. If SecureLogin cannot uniquely identify a particular application screen, you can manually define the matching criteria.
Figure 2-15 Setting the Matching Criteria
-
If you select , SecureLogin uses the rules defined in previous attribute panels to identify and handle an application.
-
If you select Yes. Use additional Wizard generated rules, you can add, modify, or remove rules. Your matching criteria must include at least one rule. After you have selected this option, the following screen appears:
By default, is selected. The text box lists the controls detected by SecureLogin. You can add a new rule by dragging the
icon to a specific control and clicking to confirm that SecureLogin has identified the correct control.
To modify a rule for a control:
-
Select the rule you want to edit, then click
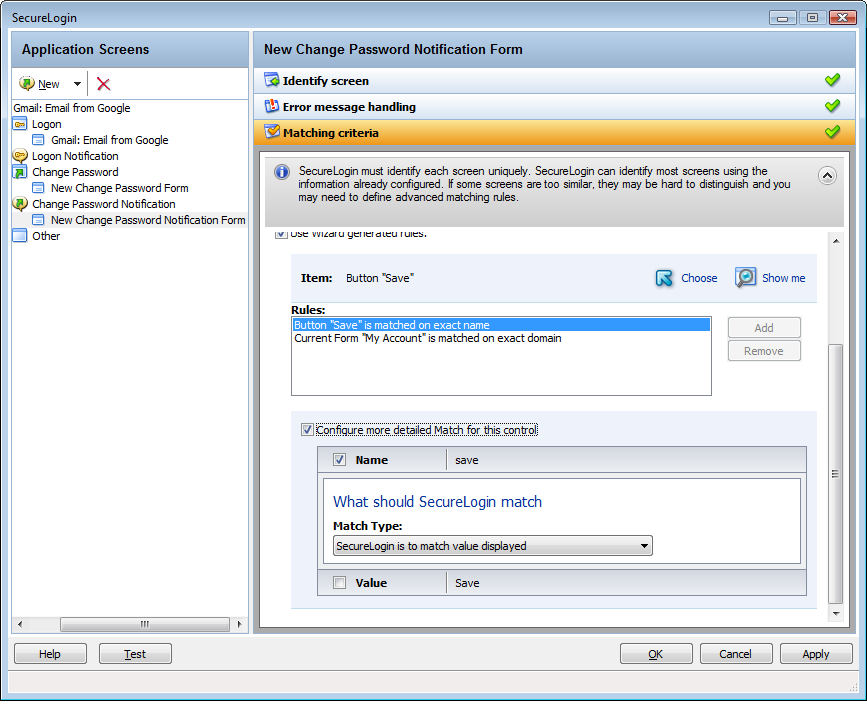
-
Define what SecureLogin must match. You can set the following matching rule:
-
SecureLogin is to match value displayed: If you select this option, SecureLogin only matches those screens that exactly match the displayed text and rules identified.
-
To test a regular expression:
-
Click to verify if your regular expression is correct. If a regular expression does not match any control on the application screen, SecureLogin prompts you to verify your regular expression and select the correct control.
To delete a rule:
-
Select the rule, then click .
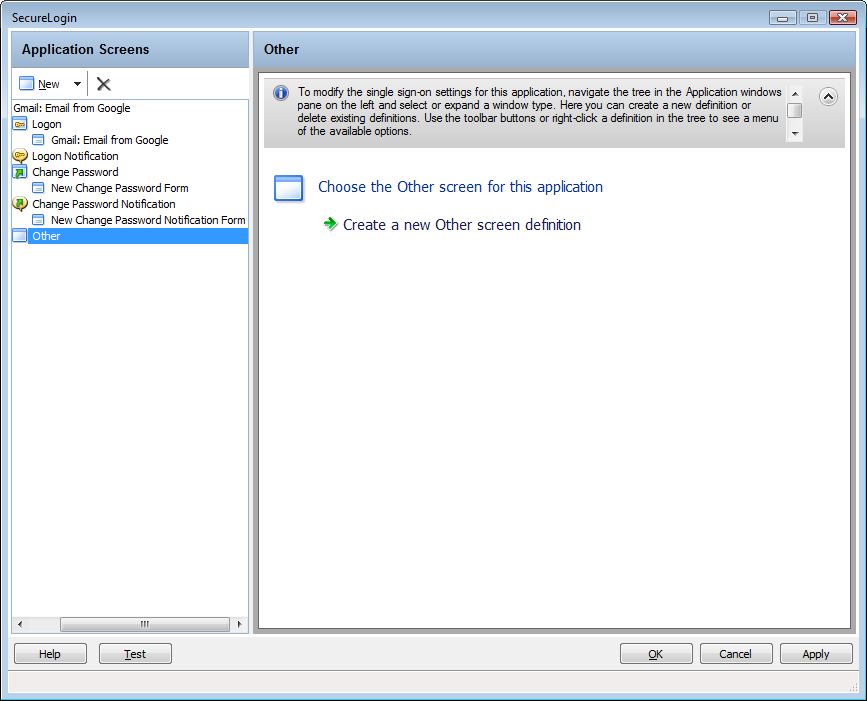
2.1.5 Other
Use menu to define rules for the application definition to handle any other application screens, such as splash screens, automating menu navigation, or redirecting users to a Web site. To handle such screens, You must complete the following tasks:
Identifying the Screen
SecureLogin identifies a login screen for which you want to create an application definition.
-
You can use the attribute to select or review the login screen selected by the wizard.
-
Select the login screen by dragging the
icon to the login screen or by recording keystrokes. The title of the login screen is displayed.
-
Click the
icon to highlight the selection made by the wizard.
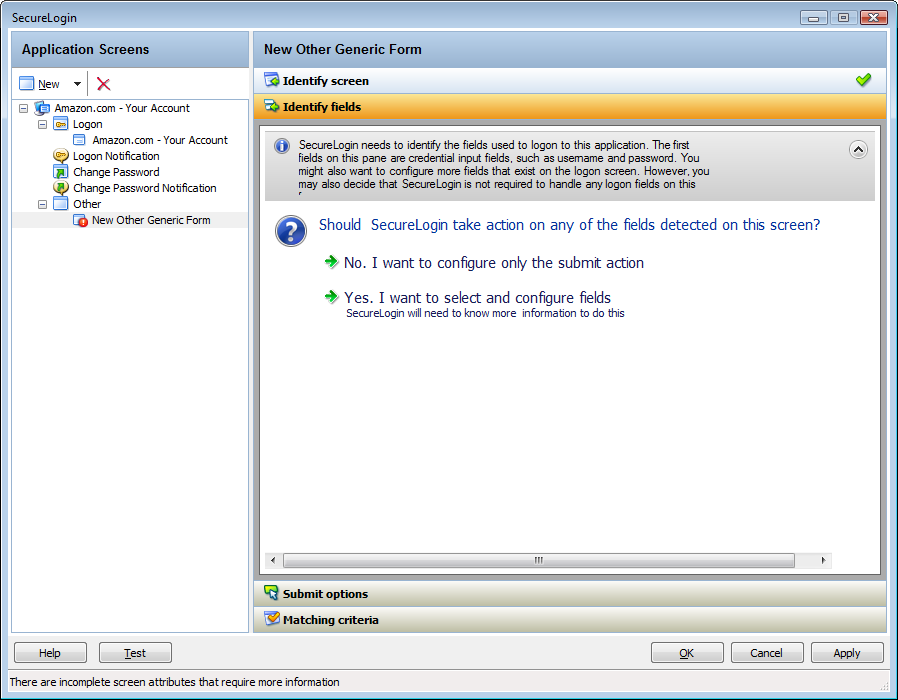
Identifying the Fields
By default, SecureLogin does not select any fields on the screen. You must define the selection.
NOTE:If the screen you have selected does not contain any controls, is automatically selected.
Figure 2-16 Selecting a Screen
-
After selecting a screen, define what SecureLogin must do when it detects any fields on the screen.
-
If you select , define only the submit options. Continue with Defining the Submit Options to define the submit options.
-
If you select , then you must identify the controls you want SecureLogin to handle and the actions it should take. The actions that can be taken depend on the control types that are identified.
Defining the Submit Options
-
Use the menu to define how SecureLogin must submit the login screen.
-
If you select , SecureLogin does nothing and the user must manually submit the login screen.
-
If you select , specify the action that SecureLogin must take to submit the login screen.
You can specify one of the following actions:
-
Click this button: Select a button on the application that SecureLogin clicks when a user submits the screen. Select and highlight the button by dragging the
icon to the button you want and clicking .
-
Type the following keystrokes: Define the commands or keystrokes that SecureLogin enters to submit the login screen. To record keystrokes:
-
Click .
-
Specify the keystrokes.
-
After you have recorded the keystrokes, click .
-
-
Re-direct the user to this website: Specify a URL to go to when a user cancels the prompt for credentials. You can redirect users to the login screen and force them to specify the login credentials again.
-
Enable action when user cancels to enter their credentials: If you select , specify what action SecureLogin takes when a user cancels to enter their credentials.
Figure 2-17 Defining Action When User Cancels Prompt for Credentials
You can specify one of the following actions:
-
Click this button: Select a button on the application that SecureLogin clicks when a cancels the prompt for credentials. Select and highlight the button by dragging the
icon to the button you want and clicking .
-
Type the following keystrokes: Define the commands or keystrokes SecureLogin enter when user cancels the prompt for credentials. To record keystrokes:
-
Click .
-
Specify the keystrokes.
-
After you have recorded the keystrokes, click .
-
-
Re-direct the user to this website: Specify a URL to go to when a user cancels the prompt for credentials. You can redirect users to the login screen and force them to specify the login credentials again again.
If you select this option, you must also specify the action SecureLogin when users cancel when prompted to save their credentials. You can specify one of the following actions:
-
Click this button: Select a button on the application that SecureLogin clicks when a user submits the screen. Select and highlight the button by dragging the
icon and clicking .
-
Type the following keystrokes: Define the commands or keystrokes that SecureLogin enters to submit the login screen. To record keystrokes:
-
Click .
-
Specify the keystrokes.
-
After you have recorded the keystrokes, click .
-
-
-
Re-direct the user to this website: Specify a URL to go to when a user cancels the prompt for credentials. You can redirect users to the login screen and force them to specify the login credentials again.
-
Defining Matching Criteria
SecureLogin must uniquely identify each application screen in order to run an application definition. If SecureLogin cannot uniquely identify a particular application screen, you can manually define the matching criteria.
-
If you select , SecureLogin uses the rules defined in previous attribute panels to identify and handle an application.
-
If you select , you can add, modify, or remove rules. Your matching criteria must include at least one rule. After you have selected this option, the following screen appears:
-
By default, is selected. The text box lists the controls that are detected by SecureLogin. You can add new rule by dragging the
icon to a specific control and clicking to confirm that SecureLogin has identified the correct control.
To modify a rule for a control:
-
Select the rule you want to edit, then click .
-
Define what SecureLogin must match. You can set one of the following matching rules:
-
SecureLogin is to match value displayed: f you select this option, SecureLogin only matches those screens that exactly match the displayed text and rules identified.
-
SecureLogin is to match specific part of the identified ctrl: If you select this option, you must use a regular expression to define and match the screen features. You cannot use special characters in a regular expression.
-
-
Click to verify if your regular expression is correct.
If a regular expression does not match any control on the application screen, SecureLogin prompts you to verify your regular expression and select the correct control.
-
To delete a rule:
-
Select the rule, then click .