3.2 Configuring
SecureLogin uses the directory structure and administration tools to provide centralized management and deployment of users. In the Active Directory environment, SecureLogin installs an additional tab to the Active Directory Users and Computers User Properties dialog box. This dialog box provides administrative functionality in the same utility you currently use to manage your Active Directory users.
Before you install SecureLogin, you must first extend the Active Directory schema. You can also configure the user’s environment or create roaming profiles.
3.2.1 Extending the Active Directory Schema and Assigning Rights
SecureLogin leverages the directory to store and manage SecureLogin data. SecureLogin extends the directory schema to add six SecureLogin schema attributes where SecureLogin data is stored.
After you extend the directory schema, you must give permissions to access objects, including group policy, organizational units, and containers. Authorizing read or write rights to the SecureLogin directory schema attributes is referred to as assigning user rights.
The SecureLogin Microsoft Active Directory schema extension executable extends the schema on the server and enables you to assign user rights. You must determine which containers and organizational units need SecureLogin access, and you must know their distinguished name (DN), because you must assign rights to each container and organizational unit separately.
You can also extend the Microsoft Active Directory schema to the root of the domain and assign rights to each container and organizational unit below the root.
IMPORTANT:Keep the following information in mind as you extend the schema:
-
If SecureLogin version 3.5.x is installed, you do not need to extend the directory schema, because the attributes are the same. However, any new directory objects such as organizational units still require you to assign rights.
-
If the Microsoft Active Directory instance is deployed by copying and running the adsscheme.exe file from another location, you must copy the entire folder containing the Microsoft Active Directory schema and configuration files to the new preferred location. The Microsoft Active Directory schema and configuration files must be located in the same folder in order for the Active Directory instance to successfully deploy.
Extending the Schema
The following instructions apply to the configuration of the Microsoft Active Directory instance stored and administered on a separate server from the Active Directory server domain controller.
-
Log in to the server as an administrator.
-
Click Schema Extension Tools > Active Directory Extension.
or
If you are installing from the SecureLogin installer package, locate the Tools folder and double-click adsschema.exe.
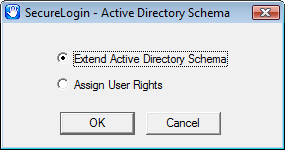
The SecureLogin Active Directory Schema dialog box is displayed.

-
Select Extend Active Directory Schema.
-
Click OK.
The following SecureLogin attributes are added to the Directory schema:
-
Protocom-SSO-Auth-Data
-
Protocom-SSO-Entries
-
Protocom-SSO-Entries-Checksum
-
Protocom-SSO-Profile
-
Protocom-SSO-SecurityPrefs
-
Protocom-SSO-Security-Prefs-Checksum
A confirmation message is displayed.
IMPORTANT:If the Microsoft Active Directory instance is deployed by copying and running the adsscheme.exe file from another location, you must copy the entire folder containing the Microsoft Active Directory Schema and configuration files to the new preferred location. The Microsoft Active Directory Schema and configuration files must be located in the same folder in order for the Active Directory instance to successfully deploy.
-
-
Click OK to return to the Active Directory Schema dialog box.
Now that directory schema is extended, you must assign access rights to the relevant containers and organizational units.
If you have previosuly extended the schema, a message listing the existing schema appears. Ignore this message.
-
Click OK in the Active Directory Schema dialog box.
-
Continue with Assigning User Rights to assign user access rights to the relevant containers and organizational units.
Assigning User Rights
You must assign permission to objects in the directory to store data against the new SecureLogin schema attributes. You assign rights to all objects that access SecureLogin, including user objects, containers, group policies, and organizational units.
When you assign rights to containers and organizational units, the rights filter down to all associated user objects, so unless you are required to do so, it is not necessary to assign rights at the individual user object level.
-
Run adsschema.exe, which is found in the Securelogin\Tools\Schema\ADS directory.

-
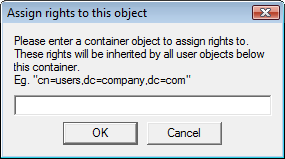
Select Assign User Rights, then click OK. The Assign Rights to This Object dialog box is displayed.

For example, if you assign rights to Users container, the User container definition is:
cn=users, dc=www, dc=training, dc=com To assign rights to an organizational unit, such as Marketing, in the domain www.company.com, the definition is: ou=marketing, dc=www, dc=company, dc=com
-
Specify your container or organizational unit definition in the Assign rights to this object field. The confirmation dialog box appears.
-
Click OK to return to the Active Directory Schema dialog box.
-
Repeat Step 2 to Step 4 to assign rights to all required user objects, containers and organizational units.
If you see an error message indicating Error opening specified object: - 2147016661, it means that rights have already been assigned to the object.
If you see an error message indicating Error opening specified object: -214716656, it means that you have attempted to assign rights to an object that does not exist in the directory. Check your punctuation, syntax, and spelling, and repeat the procedure.
-
After all required rights are successfully assigned, click OK to return to the Active Directory Schema dialog box.
-
Click Cancel.
NOTE: You can extend rights to objects at any time after the schema is extended. If you add organizational units, you need to rerun the adschema.exe tool and assign rights to the new object to permit SecureLogin data to write to the directory.
Refreshing the Directory Schema
-
Run the Microsoft Management Console (MMC) and display the Active Directory Schema plug-in.
-
Right-click Active Directory Schema, then select Reload the Schema.
-
On the Console menu, click Exit to close the MMC.
In a multiple-server environment, schema updates occur on server replication.
3.2.2 Configuring a User’s Environment
SecureLogin provides centralized management and deployment of user configuration by usingthe directory structure and administration tools. In Active Directory environment, SecureLogin installs an additional tab to the Active Directory Users and Computers User Properties dialog box. This dialog box provides SecureLogin administrative functionality in the same utility you currently use to manage your Active Directory users.
Configuring a user's SecureLogin environment includes:
-
Setting preferences.
-
Creating password policies (optional).
-
Enabling single sign-on to applications.
-
Creating passphrase questions for selection (optional).
Configure SecureLogin on a test user account before installing SecureLogin on user workstations.
The following table shows the options available for deploying and distributing the user configuration. For information on deploying and distributing configuration, see Distributing Configurations
in the NetIQ SecureLogin Administration Guide.
Table 3-1 Deployment and Distribution Options
|
User Configuration Options |
Description |
|---|---|
|
Copy Settings |
Copies the SecureLogin configuration from one object in the same directory to another object |
|
Export and import |
Distributes the configuration by using an XML file. |
|
Directory object inheritance |
Inherits the configuration from a higher level directory object, such as a Group policy. |
|
Corporate Configuration redirection |
Specifies a directory object from which the configuration is inherited. |
3.2.3 Configuring Roaming Profiles
Enterprises often create roaming profiles for specific groups of users, defined by their organizational role or function, such as field engineers connecting from remote locations or accounting staff working at different locations. For these users, you can create a roaming profile and set the path to the target user’s profile.
For more information on creating roaming profiles in an Active Directory environment, see the Microsoft Support Web site.
NOTE:During loading, SecureLogin loads the users profile, effectively locking that profile and preventing the users credential data from being copied to the roaming profile.
To prevent SecureLogin from causing problems with existing user roaming profiles, select the enable Roaming Profile feature.
This feature gets installed by default, if the workstation is a Citrix or Terminal Server. You can also set the registry setting ForceHKLMandNoDPAPI to 1 for Roaming Profile activation, if it was not initially installed.