5.0 Troubleshooting Provisioning Actions
The following sections provide solution to the problems you might encounter while performing provisioning actions:
After installing the Orchestrate Agent on VM, the VM is not displayed as a resource in the Orchestrate Development Client
-
Ensure that the Orchestrate Agent is running on the VM.
-
Ensure that no errors have been logged into the agent.log file.
The log file is located in the Orchestrate_Agent_installation_directory\novell\zos\agent\node.default directory on Windows and in the /opt/novell/zos/agent/node.default directory on Linux.
-
Ensure that the Orchestrate Server is registered to the DNS server.
The VM is suspended when you try to revert the snapshot of a powered-on VM running on a Hyper-V host
-
In the Orchestrate Development Client, right-click the suspended VM, then click .
The Provision VM dialog box is displayed.
-
In the drop-down list, select the appropriate Hyper-V host.
-
Click .
Unable to perform any provisioning adapter action after the Save Config action on the vSphere managed VM
-
In the Orchestrate Development Client, click > the vSphere managed VM.
The tab is displayed by default.
-
In the Virtual Machine Configuration panel, set the value of to a 128-bit hexadecimal value.
-
Right-click the vSphere managed VM, then click .
Provisioning of a Xen VM doesn’t work on the host server
[c121] RuntimeError: vmprep: Autoprep of /var/lib/xen/images/min-tmpl-1-2/disk0
failed with return code 1: vmprep: autoprep:
/var/adm/mount/vmprep.3f96f60206a2439386d1d80436262d5e: Failed to mount vm
image "/var/lib/xen/images/min-tmpl-1-2/disk0": vmmount: No root device found
Job 'zosSystem.vmprep.76' terminated because of failure. Reason: Job failed
A VM host cannot provision a VM that has a different file system than the VM host. The currently supported file systems are ext2, ext3, reiserfs, jfs, xfs, vfat, and ntfs.
Typically, Linux kernels autoload the appropriate module to do the work.
You must manually load the proper kernel module on the VM host to support the VM’s file system.
For example, if the VM host uses ext3 and the VM image uses reiserfs, load the proper kernel module onto the VM host to support the VM image’s reiserfs file system. Then, on the VM host, run:
modprobe reiserfs
Next, provision the VM.
NOTE:Cloning with prep is limited to what the Virtual Center of VMware Server supports.
Multiple instances of the same Xen VM running when located on shared storage
Uncomment these facts in xendConfig.policy:
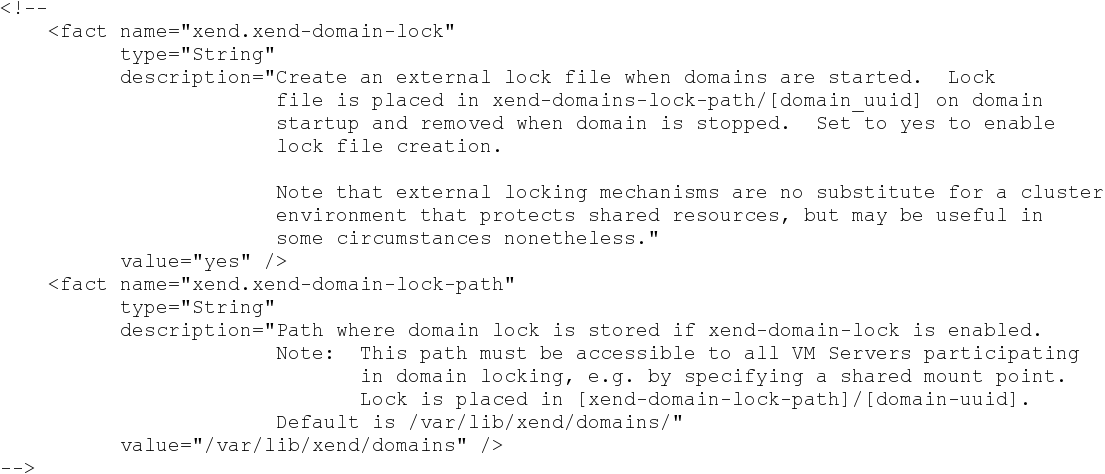
To uncomment a section of code, remove the “<!--” (comment open) tag and the “-->” (comment close) tag. Edit the xend-domain-lock-path fact to set an alternate location on shared storage that is available to all VM hosts.
When you make the changes and save the file, the facts become active and the VM locking parameters of each newly joining VM host are adjusted accordingly.
You can also schedule an immediate run of the xendConfig job to adjust all configuration files of the Xen VM hosts that are already connected to the PlateSpin Orchestrate Server.
NOTE:Setting the lock path by using PlateSpin Orchestrate only supports the scenario where all VM hosts have the domain lock path connected to the same shared repository. For more complex setups, you need to use alternative methods to adjust the VM host lock configurations.