8.1 Understanding the Virtual NIC Object
A virtual network interface card (vNIC) represents the configuration of a VM connected to a network. A VM can be configured to have multiple vNICs. When a VM is provisioned, each of its associated vNICs can be attached to a Virtual Bridge in order to gain connectivity to a specified network. The vNIC objects are discovered, along with their associated VM, when a “Discover VM Images” job has been run on a repository.
The vNIC is modeled as a Grid object, located as a subordinate to the VM Grid object in the Explorer Tree (of the Development Client). A vNIC is given the form of vmname_vnic<n> where <n> is appended to indicate the order of discovery or creation of the vNIC. For example, redhat_vnic1 would be the name of the first NIC discovered for a VM with the Grid ID redhat. Each additional vNIC would be incremented by one, so the second vNIC in this example would be named redhat_vnic2.
This section includes the following information:
8.1.1 The Purpose of the Virtual NIC
A vNIC represents the network interface configuration for a virtual machine. A vNIC is linked to a network by connecting to a virtual network bridge (vBridge). A group of vBridge objects is represented as a Network group in the Explorer Tree. By convention, during VM host discovery, any vBridges that are configured with the same name are assumed to be part of the same network.
For more information, see Section 9.0, The Network Group and its Virtual Bridge Objects.
8.1.2 Creating Or Deleting a vNIC in the Development Client
Although a vNIC is generally discovered on a VM, you can also manually create or delete a vNIC. This section includes the following information:
Creating a Virtual NIC
You might want to manually create a vNIC anytime you want to give a VM access to a network configured on the VM host.
To create a vNIC, you can select the VM Grid object in the Explorer tree, then right-click and select . You can also use the following alternate method:
-
From the PlateSpin Development Client, select > to display the Create a New Virtual NIC dialog box.

-
In the drop-down list, select the name of the VM to which you want to add a vNIC, then click .
-
When you have created all of the vNICs you need, click .
-
Select the newly created vNIC object in the Explorer Tree to view the Info/Groups page of the admin view.
-
On the Info/Groups page, configure the following settings:
-
MAC Address: The MAC Address assigned to this vNIC. If left empty, or set to asterisk (*), a MAC address is autogenerated for this vNIC.
-
Network: The network (vBridge group) that should be used when provisioning the VM. When a VM is provisioned, any vBridge contained within the specified network group can be used for attaching the VNIC to the network.
Although the vNIC can be formally created at this point, you can also configure Autoprep or Sysprep facts used to prepare a personalized version of the VM that can be provisioned later.
-
-
Click the save icon
 to save the fact changes you have made.
-
In the Explorer tree, right-click the VM object to which you added the vNIC, then select to apply the changes to the VM's configuration.
IMPORTANT:If you do not run the action after configuring the vNIC, any vNICs that were added to the grid or vNIC settings that were modified could be lost.
Creating a Virtual NIC for a Hyper-V VM
Use the following steps to create a vNIC for a Hyper-V VM:
-
Right-click the VM for which you want to create a vNIC, select .
-
In the Explorer tree, select the vNIC object you created in the previous step, then from the Admin view, select the tab to open the Constraints/Facts page.
-
In the Constraints/Facts page, click the add a fact
 button to open the Add Fact dialog box.
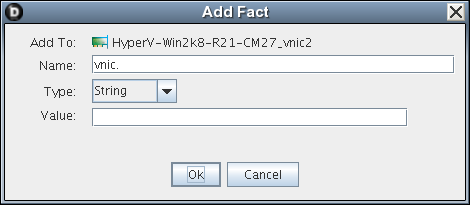
-
In the dialog box, add a custom fact for each of the items in the table below.
-
In the Explorer tree, right-click the VM object to which you added the vNIC, then select to apply the changes to the VM's configuration.
IMPORTANT:If you do not run the action after configuring the vNIC, any vNICs that were added to the grid or vNIC settings that were modified could be lost.
Deleting a Virtual NIC
Although uncommon, you might want to manually delete a vNIC when you no longer want the VM to have access to a specified network on the VM host. For example, if the initial need for connecting the VM to a network no longer exists or the network is going to become private and the VM should not have access you would delete the virtual NIC that allows connectivity.
To delete a virtual NIC, you can select the vNIC object in the Explorer tree, then right-click and select , or you can use the following procedure:
-
From the PlateSpin Development Client, select > to display the Create a New Virtual NIC dialog box.
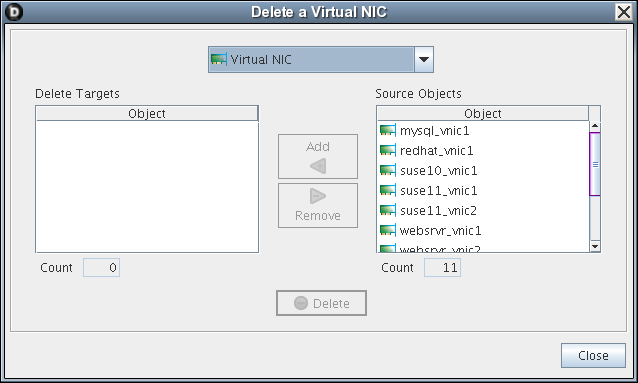
-
In the list, select the name of the vNIC (hold down the Ctrl key to select multiple), then click to move these objects to the list.
-
When you have selected all of the vNICs you want to delete, click to display the Delete query dialog box.

-
In the dialog box, select to all to delete all of the vNIC objects in the list, click , then click .
-
In the Explorer tree, right-click the VM object where you deleted the vNIC, then select to apply the changes to the VM's configuration.
NOTE:You must run the action to confirm the deletion of the vNIC. If you do not run this action, the vNIC is not deleted from the VM’s configuration.