5.16 LDAP Group Lookup
The LDAP Group lookup feature can be used to retrieve LDAP group membership information for a user stored in external LDAP directories, such as Novell eDirectory or Microsoft Active Directory. The information fetched can be used to perform external group matching in rules.
5.16.1 Creating the LDAP Account in the Credential Vault
-
Click on the home page of the console.
-
In the navigation pane, select .
-
In the task pane, click .
-
Specify the following information:
Name: Specify a name for the domain.
Type: Select as the account type for the user.
Profile: Select on the Novell directory as the profile for the user.
LDAP URL: Specify the DNS name. For example, netiq.com.
Base DN: Click to display the domain name.
Account: Specify the account name of the domain user.
User DN: Specify the complete name for the domain user.
Password: Specify the password for the domain user account.
-
Click to save the account domain details.
5.16.2 Defining the User Group
After you create an Account Domain, define a group to refer to the external LDAP group. For information on creating a user group, see Adding a User Group.
To configure an existing user group:
-
Click on the home page of the console.
-
Click , then click in the navigation pane.
-
Select the user group you want to modify.
-
Click in the task pane, then configure the following fields:
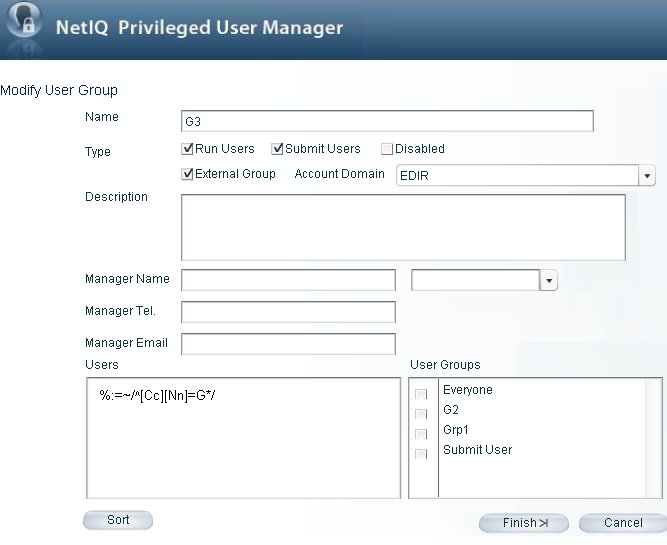
Name: Specify a name for the group.
Type: You must select the check box.
Account Domain: Link the account domain to the LDAP credential created in the Credential Vault.
Description: Describe the purpose of this user group.
Manager Name, Manager Tel., Manager Email: Specify the name, telephone number, and e-mail address of the manager of this user group.
Users: Add or change the users you want to include in this group. You can type the user names,one on each line, or paste them from elsewhere.
For example, the external group can be matched by using the %:=~/^[Cc][Nn]=G*/ regular expression,. This expression matches all external groups starting with Cn=G and followed by anything where user is part of the group.
User Groups: From the list of groups you have already defined, select the user groups you want to include as subgroups of this user group. You can also add subgroups to a user group by dragging the groups to the target user group in the navigation pane.
-
Click .
You can now use this user group in rule conditions or as a script entity.
5.16.3 Creating a Rule for the LDAP Group
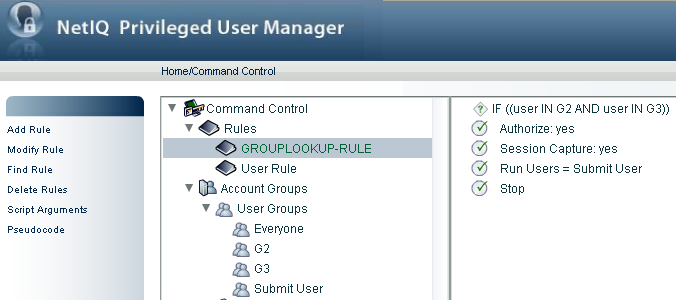
After creating a user group, you need to set up rules to use the created External User Group in Commands. For detailed information on adding a rule, see Section 5.6.1, Adding a Rule.
Figure 5-1 Creating a Rule for the LDAP Group
5.16.4 Modifying a Rule for the LDAP Group
-
Click on the home page of the console.
-
Click in the navigation pane.
-
Select the rule you want to modify.
-
Click in the task pane.
-
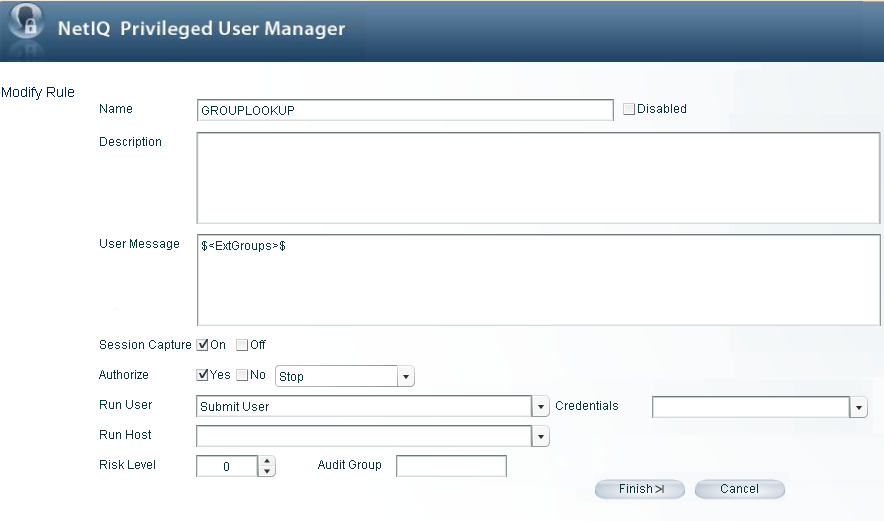
Make the following changes:
Name: Change the name of the rule.
Description: Specify a description of the rule.
User Message: Specify the user message as $<ExtGroups>$.
Session Capture: Select either or .
Authorize: Select either or , depending on whether you want the command protected by the rule to be authorized or not authorized if the rule conditions are met.
Run User: Select from the drop-down list.
Credentials: From the drop-down list, select the required account domain. The Run User is automatically populated with the domain user provided in the account domain.
Run Host: Define a run host by selecting the name of the host on which you want to run this command (this overrides any hostname defined through a set command).
Risk Level: Set a of 0 to 99.
Audit Group: Define an . This setting is for use in Compliance Auditor reports.
-
Click . The settings you have defined for the rule are displayed in the console.
A typical result of the LDAP group lookup rule when a rule is created for a user to run the ID command as a root user is displayed below:
user1@pum-sles10sp3:/root> usrun id
<ExtGroups>
<groupname="CN=GROUP3,CN=Users,DC=pum,DC=com"/>
<groupname="CN=GROUP2,CN=Users,DC=pum,DC=com"/>
<groupname="CN=GROUP1,CN=Users,DC=pum,DC=com"/>
<groupname="cn=G1,o=netiq"/>
<groupname="cn=G2,o=netiq"/>
</extroups>
uid=1001(user1) gid=100(users) groups=0(root), 16(dialout), 33(video), 100(users)
user1@pum-sles10sp3:/root>