5.8 Commands
Command definitions contain the commands you want to control. A command definition can contain a single command, or several commands that you want to control in the same way. You can also specify a command that you want to run in place of a submitted command.
5.8.1 Adding a Command
You can add command definitions to your rule conditions to control whether the rule is processed, depending on the command that is submitted by the user. You can also use commands as script entities.
To add a new command:
-
Click on the home page of the console.
-
Click in the navigation pane.
-
To add a command at the top level, click in the task pane. To add a command to a category, select the category and click in the task pane.
-
Specify a name for the command. This can be different from the name of the actual command you want to control.
-
Click .
-
To configure the command, continue with Section 5.8.2, Modifying a Command.
5.8.2 Modifying a Command
-
Click on the home page of the console.
-
Click in the navigation pane.
-
Select the command you want to modify.
-
Click in the task pane.
-
Configure the following fields:
Name: Specify a different name for the command.
Disabled: Select this check box to disable the command. A disabled command is dimmed.
Description: Describe the purpose of this command.
Rewrite: In the field, define a command to be used in place of the commands listed in the field. You can also enter command arguments. Positional parameters can be used, as described in Using the Command Rewrite Functionality for Command Arguments. To use the field to enable auditing of the command, see Configuring Auditing with the Rewrite Functionality
Commands: Define one or more commands, one on each line. You can also enter command arguments. For example:
vi *
/usr/bin/vi *
To add a regular expression term to the list, prefix the regular expression with =~. For example,
=~/^vi .*$/
=~#/usr/bin/vi .*#
You can copy and paste a list of commands from elsewhere. You can use the button to sort the commands into alphabetical order.
Sub Commands: From the list of command definitions you have already created, select the subcommands you want to include in this command definition. You can also add subcommands to a command definition by dragging them to the command definition in the navigation pane.
-
Click .
Using the Command Rewrite Functionality for Command Arguments
The following table provides examples showing how the command rewrite functionality provided on the Modify Command page can be used with positional parameters to replace the submitted command and parameters. The examples use the echo command as the rewritten command to display the selected parameters on the screen.
Table 5-5 Command Rewrite Examples
|
Function |
Rewrite |
Submitted Command |
Executed Command |
|---|---|---|---|
|
Insert all arguments ($0 is not displayed) |
echo $* |
ls passwd shadow fstab |
echo passwd shadow fstab |
|
Insert argument ’r;n’ |
echo $3 |
ls passwd shadow fstab |
echo fstab |
|
Insert all but argument 'n' ($0 is not displayed) |
echo ${^2} |
ls passwd shadow fstab |
echo passwd fstab |
|
Insert arguments from 'n' to end |
echo ${2-} |
ls passwd shadow fstab |
echo shadow fstab |
|
Insert arguments from 0 to 'n' |
echo ${-2} |
ls passwd shadow fstab |
echo ls passwd shadow |
|
Insert arguments from 'm' to 'n' |
echo ${1-2} |
ls passwd shadow fstab |
echo passwd shadow |
|
Insert the total number of arguments |
echo $# |
ls passwd shadow fstab |
echo 3 |
|
Insert contents of argument $# |
echo ${$#} |
ls passwd shadow fstab |
echo fstab |
Rewrite Example Using ufsdump
In this example, the administrator usually does a backup of the system by using the following command:
ufsdump -0f /dev/rmt/0 /usr
Assume that new tape drive is installed on the host, and it must be used for the backup. In addition, the administrator must make sure that it is working correctly by using the -v flag to verify the tape.
You can ensure that the administrator doesn’t need to remember the changes by using the field to create a command definition for the original command:
$0 -v $1 /dev/rmt/1 ${$#}
When the administrator enters the original command, the following command runs instead:
ufsdump -v -0f /dev/rmt/1 /usr
Configuring Auditing with the Rewrite Functionality
To enable auditing of the command, add the following to the field:
-o audit <n>
Replace <n> with one of the following values:
-
0: Disables auditing. It has the same effect as removing the audit setting from the field.
-
1: Enables auditing of all commands that are not built into the user's shell.
-
2: Enables auditing of all commands, including commands that are built into the user's shell. This level of auditing can affect login times.
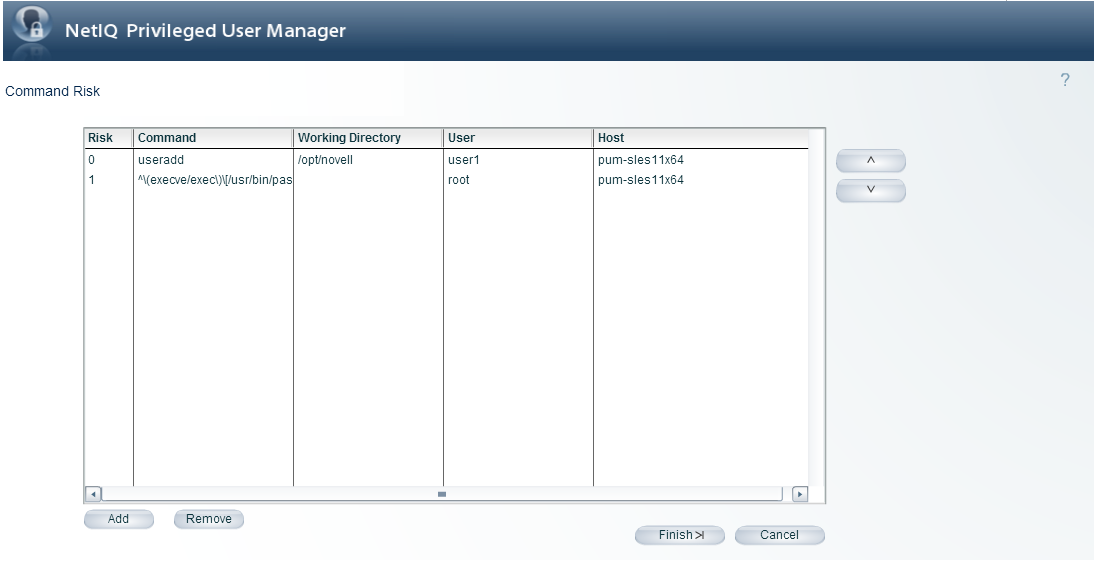
5.8.3 Setting the Command Risk
This option allows you to set a value representing the relative risk of a command when using the pcksh or cpcksh clients with the session auditing option (see Section 5.2, Integrating Command Control into User Environments). When you view a Command Control Keystroke Report, the commands with different risk values are represented in different colors.
-
Click on the home page of the console.
-
Click in the navigation pane.
-
Click in the task pane.
-
Click .
-
Set a value for the command risk.
-
Specify the command you want to set a risk value for, or the regular expression. You can use wildcard symbols.
-
If you want to base the risk level on the directory in which the command is running, define a working directory.
-
If you want to base the risk level on who is running the command, define a user.
-
If you want to base the risk level on the host where the command is running, define a host.
-
If you want to change the order in which the commands are listed, use the arrow buttons.
-
Click .
5.8.4 Removing a Command Risk
-
Click on the home page of the console.
-
Click in the navigation pane.
-
Click in the task pane.
-
Select the entry, then click .
5.8.5 Copying a Command
-
Click on the home page of the console.
-
Click in the navigation pane.
-
Select the command you want to copy.
To select multiple commands in the same category, press the Ctrl key and select the required commands one at a time, or press the Shift key to select a consecutive list of commands.
-
To create the copy, press the Ctrl key and drag the selected command to the desired location
-
If necessary, use the option to rename or modify the copy.
5.8.6 Moving a Command
-
Click on the home page of the console.
-
Click in the navigation pane.
-
Select the command you want to move.
To select multiple commands in the same category, press the Ctrl key and select the required commands one at a time, or press the Shift key to select a consecutive list of commands.
-
Drag the selected command to the desired location.
5.8.7 Deleting a Command
-
Click on the home page of the console.
-
Click in the navigation pane.
-
Select the command you want to delete.
To select multiple commands in the same category, press the Ctrl key and select the required commands one at a time, or press the Shift key to select a consecutive list of commands.
-
Click in the task pane. The selected commands are listed.
-
Click .
The commands are deleted, and are also removed from any rule conditions and script entities in which they have been defined.
5.8.8 Importing Sample Commands
Privileged User Manager ships with the following types of sample commands that you can import and use as is or import and modify to fit your needs:
-
Shell commands (ksh, sh, csh, bash)
-
vi commands
-
System commands (kill, mount, passwd, date, mkdir, useradd, chgrp, chown)
-
User commands (env, ls, id, cat uname)
To import these sample commands, click Command Control > Import Samples > Sample commands.