7.4 Privileged Access to Databases
When users access a database with privileged credentials, the chances for data loss or sensitive information misuse go up. The administrators need to ensure that the connection to the database is secure and the database credentials are not misused. Privileged Account Manager provides the database monitoring feature where administrators can protect the database by controlling and monitoring the activities of the users who connect to the database.
In addition, Privileged Account Manager allows you to assign the risk to a specific query or a table in the database. Based on the risk configuration, you can identify any suspicious activities in the database and disconnect the session or block the respective user from accessing the database.
Privileged Account Manager enables you to control and monitor database accesses by granting access to the database as follows:
-
Database Access Through Credential Checkout:
This method enables you to provide privileged access to the database using the credentials checked out from Privileged Account Manager. In this method, the privileged account credentials are reset after every check-in to avoid misuse of credentials.
NOTE:Credential check out is not supported when Privileged Account Manager is installed on a Windows server as a manager.
-
Database Access Through Privileged Account Manager Proxy:
Using this method, you can allow users to access the database through Privileged Account Manager proxy where Privileged Account Manager monitors the activities performed on the database.
-
SSO to the Database:
Using this method, you can allow users to SSO to a database session and monitor the activities performed on the database. For more information about configuring privileged SSO to database, see Configuring RemoteApp Mode Using Command Control.
Based on the information in the following table, you can choose the appropriate database access method:
|
Method |
Keystroke Audit |
Command Audit |
Video Capture |
Command Risk & Automatic Session Disconnect |
Manual Disconnect |
|---|---|---|---|---|---|
|
Database Access Through Privileged Account Manager Proxy |
✗ |
✓ |
✗ |
✓ |
✓ |
|
Database Credential Checkout |
✗ |
✗ |
✗ |
✗ |
✗ |
|
Privileged SSO to Database |
✓ |
✗ |
✓ |
✗ |
✓ |
7.4.6 Database Access Through Privileged Account Manager Proxy
You can use this feature to protect a database by controlling and monitoring the activities of the users who connect to the database through database connector. A database connector acts as a proxy between the user’s database client and the database server. This Privileged Account Manager proxy IP address and port number must be communicated to the user to whom you are providing access.
Figure 7-2 Database Connector
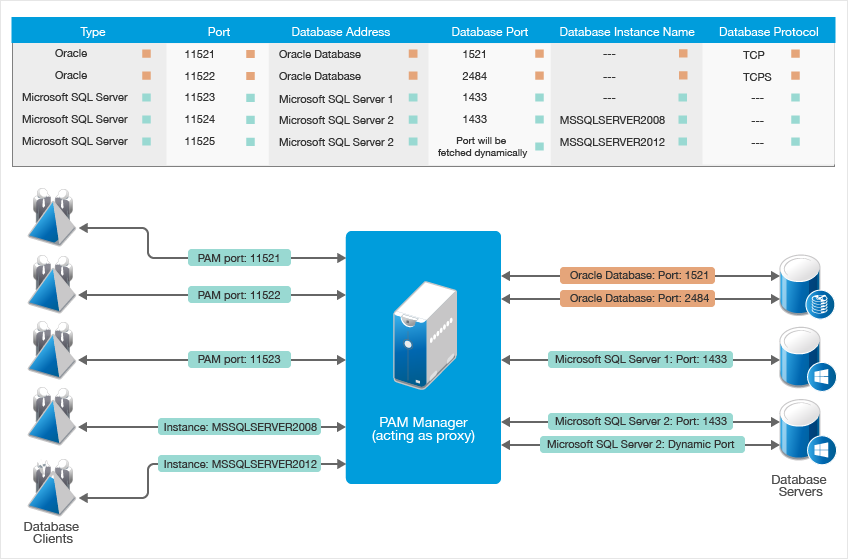
After you provide database access through Privileged Account Manager proxy, you can allow the user to log into the database using:
-
Their own database credentials.
-
Credentials checked out from Privileged Account Manager.
In this method, you are enhancing the database security by allowing Privileged Account Manager to manage database credentials.
For configuring the database access through Privileged Account Manager proxy to monitor the database activities, perform the following:
Prerequisite
-
Direct access from database client to the database server should be blocked.
The database server should only accept the data transfer through the Privileged Account Manager server.
-
If the database is connected over SSL to the Oracle database, import Privileged Account Manager certificate to the database client’s wallet.
-
If the database is connected over SSL to the Microsoft SQL server, import Privileged Account Manager certificate to the database client.
-
If the database is connected over SSL to Microsoft SQL server, ensure that the Microsoft SQL server supports TLS 1.2.
Adding Database Connectors Using Access Control
You can add the database connections which creating resource.
-
Click > > .
-
Click next to .
-
Specify the following information:
General Setting
Name: Specify the name of the database. This name is used along with the Credential to authenticate. If you do not provide the correct domain name, user authentication fails.
Connection Details
Connect String: You can specify the string that will reset the password in the database and check in the password.
Connect As: Select . If you want Privileged Account Manager to perform the password check in process then, to check the connection to the database server, click or select .
Password Change on Check In:
Based on the following selection the password of the application will be changed automatically every time a credential is checked in.
-
Never: You can use this option if you do not want to change the password after every credential check-in.
-
Delegate to Identity Manager: If you want to delegate the password check-in process to Identity Manager, select . On selecting this option, the IDM (Identity Manager) driver for Privileged Account Manager takes care of generating random password and synchronizing the password to IDM. The PAM IDM driver checks in the new password to PAM. IDM takes care of synchronizing password on the database through the respective database driver. For more information, refer the Driver Implementation guide on the PAM documentation page. Although the latest IDM driver version is 4.8.x, ensure that you use 4.5.x version of the IDM driver package, as 4.5.x version is currently supported with Privileged Account Manager.
NOTE:Before you delegate password check-in to Identity Manager ensure that both the Privileged Account Manager IDM driver and database driver are operational.
-
Internal: Use this option, if you want Privileged Account Manager to manage password change.
Select the appropriate that must be used when Privileged Account Manager generates a new password. By default is selected. You can either modify the default password policy or create a new password policy.
-
Proxy Connector Setting
-
Database IP Address: Specify the IP address or the Host Name of the Database.
-
Database Port: Specify the Database port number.
-
Connection Protocol: Select TCP or TCPS.
-
Database SSL Version: In case you have selected , specify if it is Database SSL version, or the specific one from the dropdown list.
-
DBAudit Servers: You can either select or server. Specify the proxy port.
-
Adding Database Connectors Using Command Control
You can add the database connectors for any required agent which has the dbaudit module to connect to the supported database. You can add any number of database connectors to an agent listed on the Database Connectors page.
Adding Database Connector for Oracle
-
On the home page of the console, click .
-
In the left pane, click .
The Database Connectors page displays all the agents that have dbaudit package installed with the list of connectors.
-
Click on the bar for the required agent.
If you have already added a connector, you can modify it as required by clicking the required connector field.
-
Specify the following:
-
Type: from the drop-down menu.
-
DB Proxy Port: Specify the port on which the Privileged Account Manager accepts the connection from database clients to connect to a specific database server. Privileged Account Manager maps this port number to a specific database that has a specific and .
-
DB Server Address: Specify the IP address or host name of the Oracle database.
-
DB Server Port: Specify the port number of the Oracle database.
-
Connection Protocol: Select for non-SSL connection or for an SSL connection.
-
DB SSL Version: Specify the SSL version used on the Oracle database server.
NOTE:
-
To use SSL, import the Privileged Account Manager certificate to the database client’s wallet.
-
If you are using Oracle 11.x or earlier versions of Oracle for an SSL connection, Privileged Account Manager supports only the TLS1V0 SSL version.
-
If you are using Oracle 12.x, Privileged Account Manager supports the TLS1V0, TLS1V1 and TLS1V2 versions.
-
-
Click .
When you save the configuration, the agents containing the dbaudit package restarts.
Adding Database Connector for Microsoft SQL Server
For Microsoft SQL Server database you can add a Microsoft SQL Server database connector using the port number or using the Microsoft SQL Server instance.
Adding Database Connector Using Port Number
-
On the home page of the console, click .
-
In the left pane, click .
The Database Connectors page displays all the agents that have dbaudit package installed with the list of connectors.
-
Click on the bar for the required agent.
If you have already added a connector, you can modify it as per requirement by clicking the required connector field.
-
Specify the following:
-
Type: Select from the dropdown menu.
-
Use with Instance: The checkbox is selected by default. Uncheck this to configure the connector with the database port number.
-
DB Proxy Port: Specify the port number on which the Privileged Account Manager accepts the connection from database clients to connect to a specific database server. Privileged Account Manager maps this port number to a specific database that has a specific and .
-
DB Server Address: Specify the IP address or host name of the Microsoft SQL server.
-
DB Server Port: Specify the port number of the Microsoft SQL server.
-
Network Packet Size: The default value is 4096. You can enter any value within the range 512 to 16000.
NOTE:You need to enter the same value as specified here in the client, while connecting through this connector.
-
Adding Microsoft SQL Server Connector Using Named Instance
-
(Optional) If you know the Microsoft SQL Server instance name, perform the following:
-
On the home page of the console, click .
-
In the left pane, click .
The Database Connectors page displays all the agents that have dbaudit package installed with the list of connectors.
-
Click for the required agent.
-
Specify the following:
-
Type: Select from the dropdown menu.
-
Use with Instance: The checkbox is selected by default.
-
DB Proxy Port: Specify the port number on which the Privileged Account Manager accepts the connection from database clients to connect to a specific database server. Privileged Account Manager maps this port number to a specific database that has a specific and .
-
DB Server Address: Specify the IP address or host name of the Microsoft SQL server.
-
Instance Name: Enter the Database Instance name and click .
NOTE:The SQL Server Browser service should be enabled in the SQL Server for which the instances are being fetched.
-
DB Server Port: Specify the port number of the Microsoft SQL server.
-
Dynamic Port: Click the checkbox if a dynamic port is set for the configured server.
-
Network Packet Size: The default value is 4096. You can enter any value within the range 512 to 16000.
NOTE:You need to enter the same value as specified here in the client, while connecting through this connector.
-
-
-
(Optional) If you do not know the Microsoft SQL Server instance name, you can search and fetch the instance as follows:
-
On the home page of the console, click .
-
In the left pane, click .
The Database Connectors page displays all the agents that have dbaudit package installed with the list of connectors.
-
Click .The Microsoft SQL Server Instances window is displayed.
-
Enter the host name or the IP for which you want to fetch the instances and click .
NOTE:The SQL Server Browser service should be enabled in the SQL Server for which the instances are being fetched.
-
Select the desired instance and click .
NOTE:Click the checkbox if a dynamic port is set for the configured server.
-
Click .
-
Adding Database Connector for Other Databases
Perform the following for adding the connectors for the databases MySQL, PostgreSQL, MariaDB, Sybase, and IBM Db2:
-
On the home page of the console, click .
-
In the left pane, click .
The Database Connectors page displays all the agents that have dbaudit package installed with the list of connectors.
-
Click on the bar for the required agent.
If you have already added a connector, you can modify it as required by clicking the required connector field.
-
Specify the following:
-
Type: Select the desired database from the drop-down menu.
-
DB Proxy Port: Specify the port number on which the Privileged Account Manager accepts the connection from database clients to connect to a specific database server. Privileged Account Manager maps this port number to a specific database that has a specific and .
-
DB Server Address: Specify the IP address or host name of the database.
-
DB Server Port: Specify the port number of the database.
-
Connection Protocol: Select for non-SSL connection and for an SSL connection.
This option is visible only for the databases for which you can choose the connection methods.
Databases
Connection Protocols
Sybase
You can choose or (SSL Connection) connection protocol.
MySQL and MariaDB
Privileged Account Manager dynamically selects the protocol based on the database client and database server configuration.
PostgreSQL
Privileged Account Manager supports only TCP protocol in this release.
IBM Db2
Privileged Account Manager supports only TCP protocol in this release.
-
Enable SHA Cipher Suites: This option allows Privileged Account Manager to use SHA cipher suites lower than SHA256 for communicating with database client and server.
By default, this option is enabled because most of the third party database clients use SHA cipher suites for SSL communication.
-
-
Click .
When you save the configuration, the agents containing the dbaudit package restarts for the connector configurations to take effect.
Managing Database Connectors
You can remove or edit the database connectors for any required agent which has the dbaudit module to connect to the supported database.
Viewing Database Connectors
To view a database connector, perform the following:
-
On the home page of the Administration console, click .
-
In the middle pane, select the root domain,
-
In the left pane click .
The Database Connectors page lists all the agents and its connectors on which dbaudit module is installed.
-
(Conditional) If you can view only the agents, but not the connectors then you can click on the bar. The page expands the view and displays all the database connectors for the specific agent.
It expands the view and all database connectors for the specific agent gets displayed.
-
(Conditional) If you want to expand the view to display all the connectors for all the agents, click .
-
(Conditional) If you want to collapse the view to display only the agents that contain the dbaudit package, click .
If any agent that contains the dbaudit package is offline, Privileged Account Manager displays the agent with offline message on the database connectors page.
Removing Database Connectors
To remove a database connector, perform the following:
-
On the home page of the Administration console, click .
-
In the left pane, click .
The Database Connectors page displays all the agents that have dbaudit package installed with the list of connectors.
-
To delete a connector, click on the required connector for the required agent, then click > .
Modifying Database Connectors for an Agent
You can add, remove, or modify the database connectors for any specific agent that has the dbaudit module.
To view, add, remove, or modify the database connector for a specific agent, perform the following:
-
On the home page of the administration console, click .
-
In the left pane, click .The Database Connectors page displays all the agents that have dbaudit package installed with the list of connectors.
-
Click package to display the and options.
-
Click to display the Modify Database Connector window.
NOTE:For Microsoft SQL Server database connector, and fields cannot be modified. The Instance Details will be displayed.
-
Click to delete an added connector.
If you have already added a connector, you can modify it by clicking the required field.
Database Monitoring Using Access Control
Create a database monitoring permissions using Access Control:
-
On the home page of the console, click .
-
In the pane, create resource pool for database users by clicking .
-
In the page enter the name, description and select the Database type for which you want to create the resource pool. Example: Microsoft SQL.
-
Click
-
Click to select Microsoft SQL database. The resources are populated from the resources configured in the Credential Vault. If you have not done configure it at this point to view and select the appropriate resources.
-
Click . You can view the newly created resource pool using > .
-
-
Create user role of database users for database monitoring.
-
To create this role, go to > > > – specify the fields name and description. Click .
-
In the page, click and select Database users. Click to select the users you want to add.
-
-
Create an assignment.
-
To configure the assignment, select the > , click .
-
From the page, select the database you want to create the assignment for. Example: My SQL.
-
Click .
-
Select the . Example: DB Users.
-
Add a .
-
Add . Example: My SQL Database Access and set the following fields
-
: All Days (24 hours), Specify time range starting and ending. If you want custom setting use custom days.
-
page: Move the slider to the right if you want to disable Session Capture, by default this option is set to enable.
-
page: add the customized scripts.
-
-
Click .
-
-
You are redirected to the page, Click . Assignment created successfully message is displayed.
For more information about creating Resource Pools, User Roles, and Assignments, see Access Control.
Adding Rules for Database using Command Control
After adding the appropriate database connector, you must add rules to provide access to the database. You can add the database rule manually or by using the policy template.
-
On the home page of the administration console, click .
-
To add a rule and provide the access to supported databases, perform the following:
-
(Conditional) To add the rules automatically using policy template, perform the following:
-
In the Command control pane, click .
-
In the details pane, click and then select the required policy from the drop-down list. For example, select to add rules for Oracle database.
-
Click .
When you click import a new rule is added and based on the type of policy selected, the appropriate command is also added to the rule. You can further edit the rule as required.
-
-
(Conditional) To add the rules manually, perform the following:
-
In the Command control pane, click .
-
In the details pane, click .
-
Specify a name for the database rule, then click .
-
To configure the rule, select the rule, click edit icon in the details pane.
Configure only the following:
Session Capture: Select to capture the activities done by the user.
Authorize: Select , then select from the drop-down list.
-
Click .
The settings that are defined for the rule are displayed in the console.
-
In the middle pane, click the icon.
-
From the list of commands, drag the required database command and drop it to the database rule.
NOTE:In case the user needs to have restricted access for specific instances of Microsoft SQL Server, you can create custom commands and drag it to the database rule. For example, if you want to provide restricted access to user for one of the two instances, then you need to add under field when creating the custom command.
-
-