7.5 Video Capture

Video Capture monitors the user activity by capturing videos of every task performed by the user.

  • You can schedule compression and archiving of video files to external storage.

  • You can turn the Video Capture feature ON or OFF for a particular user based on your requirement. This way you can manage your system’s storage capacity.

  • You can off-load the session screen to video conversion operation to a dedicated video off-load agent. This way you can improve the agent performance.

  • For Windows session, you can browse the text log of a user and select a particular task and watch the video. This way you do not have to go through the entire video but watch the video of the specific user activity that you require.

  • For Windows session, you can search for a particular event in a video based on the keyword search option. For example, if an important file is deleted, then you can search for all the user activities where a deletion task is performed just by the keyword search, and then select the video of your interest.

7.5.1 Configuring Video Capture

Configuring the Video Path (Optional)

The video path is where all the recorded videos are stored. This feature creates the path by default.

NOTE:This video path configuration and audit settings are specific to respective hosts. To maintain consistency ensure that all the hosts with the Audit Manager package contains appropriate video configuration.

For example, if the Framework Manager has 2 hosts with Audit Manager package and one has the Video Subfolder Configuration enabled and other has the option disabled results in the videos being stored in different folder structure. To avoid this ensure that the video configuration is consistent across all the hosts.

To modify the video storage path:

  1. Click Hosts in the home page of the console.

  2. Select the host for which you want to configure the video path.

  3. Click Packages > Audit > Audit Settings.

  4. Specify the following:

    Video Path: Specify the path where the videos must be stored. Ensure that you have created the new folders before you change the path. If you want to store the video in a shared folder, you must specify the video path in the format:

    \\<ip address>\<sharedfolder>

    Video Subfolder Configuration: Select Enable to store the videos in the sub folders created under the Video Path, that is, <Video Path>/<Host Name>/<Year>/<Month>/<Session ID>.

    Select Disable to store the videos directly in the path specified in Video Path.

    Shared Folder Access Domain: If you want to store the video in a shared folder, select the domain on which the shared folder is located.

    Shared Folder Access Credentials: If you want to store the video in a shared folder, select the credentials to access the shared folder.

    If Audit Manager is in a non Windows environment, change the path accordingly.

    NOTE:

    • Access credential drop down will contain only those credentials which are created in the Command Control under Privileged Accounts.

    • The access credential for the Windows shared folder must have write permission.

  5. Click Finish.

Configuring the Video Report Filter Settings (Optional)

To simplify the search of a particular video, Video Capture for Windows has a set of preconfigured filters for any task performed by you, like type, click and so forth.

NOTE:The Video Report filter is supported only for Windows sessions.

To edit the filter settings:

  1. Click Reporting in the home page of the console.

  2. Click Video Report Setting.

  3. Edit the Video Report Filter Settings.

    By default, Video Report Filter Settings has the following filters:

    Type|click|Checked|Close window|Terminate|msc|user|group|start|stop|Log Off
  4. Click Finish.

NOTE:After editing the filter configuration if you want the initial filter configuration then click Reset > Finish.

Configuring Video Archival (Optional)

To archive the videos:

  1. Click Reporting in the home page of the console.

  2. Click Audit Settings.

  3. Add the following sample script under Rollover Script:

    \nuse warnings;\nuse File::Copy; \n  $ctx->log_info(\"===================================================================================\");\nif ($DBGRP eq \'cmdctrl\') {\n    my $srcdir = ($^O eq \'MSWin32\') ? \"C:/Program Files/Netiq/npum/service/local/audit/video/capture/\" :  \"/opt/netiq/npum/service/local/audit/video/capture/\"; \n\n    my $dest = ($^O eq \'MSWin32\') ? \"C:/Program Files/Netiq/npum/service/local/audit/videobck/\" : \"/opt/netiq/npum/service/local/audit/videobck/\";\n\n    my $fileage = 1;     #Age in days \n\n    opendir(DIR, $srcdir) or die $ctx->log_error(\"Can\'t open $srcdir: $!\");\n    my @files = grep {!/^\\. $/ } readdir(DIR);\n    foreach my $file (@files) {\n        my $old = \"$srcdir/$file\";\n        if( (-f $ol
     d) && ($fileage< -M $old) ) {\n            move($old, $dest) or die $ctx->log_error(\"Move $old -> $dest failed: $!\");\n                                                \n        }\n    }  \n    close(DIR);\n    $ctx->log_info(\"Backup Complete\");\n}
  4. Click Finish.

Configuring the Video Conversion Settings

Using this video conversion settings, you can optimize the videos conversion process based on quality, size and CPU utilization.

The video conversion settings is a global settings that will be applied to all the policies which have the Video Capture option enabled. Based on this configuration, the images are captured for the sessions and converted to videos.

To edit the Video Conversion Settings:

  1. On the home page of the console, click Command Control.

  2. In the left pane, click Command Control.

  3. In the right pane, click Video Settings.

  4. In the right pane, edit the following fields for Windows and SSH:

    Settings: Select Default or Low Priority to use the predefined settings, you cannot modify the predefined settings.

    Select Customize to customize the video settings.

    Video fps: This option determines the quality of the video. The Video fps value that is set is the maximum video fps that can be achieved. Based on the factors such as type of Processor, RAM capacity, CPU availability, and so on, the video fps may vary.

    If video fps value is high, the video quality is good and consumes more storage.

    Video Duration: Select the Video duration as 1 min or 2 min based on the requirement.

    If video duration is more, number of video files are less.

    Video Conversion Priority: This option determines the video conversion process priority in CPU. By setting the priority, you can ensure that other operations of the CPU are uninterrupted.

    Set this option to Low when video conversion is not of high priority.

    Set this option to Normal when video conversion process is of moderate or high priority.

  5. Click Save.

Enabling Video Capture

To enable video capture:

  1. Add an resource. For more information, see Contextual Help.

  2. Click Command Control on the home page of the console, then click Create a rule.

  3. Select the account that you created from the Credentials drop-down list.

  4. Select the following options:

    For Windows:

    Session Capture: Set this option to ON to enable session capture

    Video Capture: Set this option to ON to enable video capture

    For SSH:

    Session Capture: Set this option to ON to enable session capture.

    X11 Enable: Set this option to Yes to enable X11 application access.

    Video Capture: Set this option to ON to enable video capture.

  5. Click Finish.

Converting the FLV Videos to WebM

Privileged Account Manager supports videos only in WebM format. If you have videos in FLV format, you need to convert the videos to WebM format to enable playback of the recorded videos.

Convert the FLV Videos to WebM in Windows

To convert the videos to WebM format, download the FFmpeg executable from the download site and execute the following command:

ffmpeg.exe -i <input_file_name>.flv -c:v libvpx-vp9 -speed 8 -deadline realtime <output_file_name>.webm

Convert the FLV Videos to WebM in Linux/Unix

To convert the videos to WebM format, download the FFmpeg executable from the download site and execute the following command:

./ffmpeg -i <input_file_name>.flv -c:v libvpx-vp9 -speed 8 -deadline realtime <output_file_name>.webm

7.5.2 Viewing the Videos

To view the videos:

  1. Click Reporting on the home page of the console.

  2. Click Command Control > Sample Report.

  3. Select the session report you want to view, then click Keystroke Replay.

  4. In the Command Control Keystroke Report page, click Playback.

    The Playback button is displayed only if video capture is enabled for that session.

    NOTE:

    • If the recorded videos with .flv extension are not displayed, ensure that you have converted those videos to .webm format. For more information, refer to Converting the FLV Videos to WebM.

    • Video playback is not supported in Edge Browser as Edge browser does not support WebM format. Instead use Google Chrome or Mozilla Firefox to play the videos.

  5. In the Video playback screen, click the button to play the video.

    Time: The time when the event occurred.

    Standard Input: Action performed by the user.

    All events: Displays all the events.

    Filtered events: You can filter the events based on the predefined filter option. For more information, see Configuring the Video Report Filter Settings (Optional).

    Find: Searches the events based on the options provided by you.

7.5.3 Video Off-Load

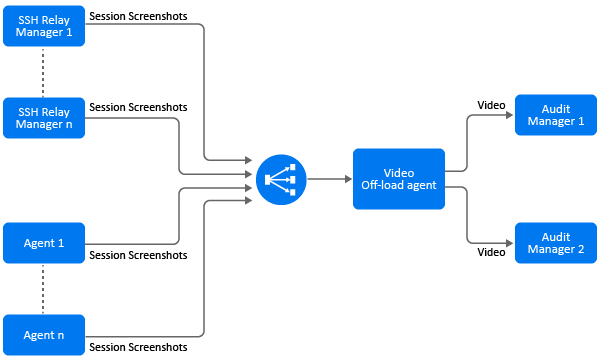
Privileged Account Manager audits all the privileged session operations in the form of keystrokes and videos based on the command control rule configuration. If you have enabled video capture in the rule, the video is generated in the agent where the session is running. In an agentless environment, such as SSH relay with X11 enabled, the video is generated in the SSH relay manager. After the video is generated, it is sent to audit manager in the audit zone.

The video generation operation consumes more CPU if there are multiple concurrent sessions to the agent or SSH relay manager. Hence, PAM provides an option to configure a server (video off-load agent) exclusively for video generation operation. You can use a video off-load agent, when you are using SSH Relay, Application SSO or when the agent has limited resource. When the video off-load agent is down, the conversion operation is performed on the PAM agent where the session is running.

Figure 7-1 The following illustrations explains the flow of the video generation process in a multi-agent environment:

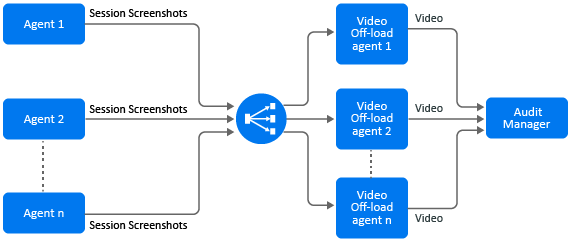
Figure 7-2 The following illustrations explains the flow of the video generation process with multiple audit manager:

Setting Up Video Off-Load Agent

The video off-load server is a PAM agent, where the session images are converted to videos. For the system requirements of the video off-load server, see the System Requirements in PAM Documentation website.

To setup and configure a video off-load agent:

  1. Install and register the PAM agent on every video off-load server.

    NOTE:You can use only Linux server as a video off-load server.

    For more information about installing and registering a PAM agent, see Installing and Registering a Framework Agent in the Privileged Account Manager Installation Guide.

  2. Install the videoprocessor package on every video off-load server:

    1. Click Hosts.

    2. Select the host which is a video off-load server, then click Packages.

    3. Click Install Packages.

    4. Select the videoprocessor package.

    5. Click Next to start installing the selected package.

    6. Click Finish.

    For more information about installing a package on the agent, see Installing Packages on a Host.

  3. Configure a location on every video off-load server to store session images and videos:

    1. Click Hosts.

    2. Select the host which is a video off-load server, then click Packages.

    3. Select the videoprocessor package.

    4. Click Video Settings.

    5. Specify the Video Processor Path, then click Next.

      Video Processor Path is the location in the video off-load server where:

      • The temporary video capture data that is used for video generation is stored.

      • The generated videos are stored before sending them to the audit manager.

Video Off-Load Settings

Video off-load settings help in tuning the performance of the video off-load agent to optimize the video generation operation based on the resources available on the video-offload agent.

The video off-load setting is a global setting that is applied to all the video off-load agents.

To edit video off-load settings:

  1. Click Command Control > Video Settings.

  2. Click Video Processor and specify the following:

    Apply Settings: Select Default to use the predefined settings, you cannot modify the predefined settings. When you select Default, Conversion Priority is set to Normal and Auto Manage Resources is set to Yes.

    Select Customize to customize the following settings:

    Auto Manage Resources: If you set this option to Yes, then based on the CPU and memory usage at any given time, PAM determines the number of video conversion instances that can be executed simultaneously. For better throughput and optimized CPU and RAM usage, you must set this option to Yes.

    If you set this option to NO, you must define Number of Simultaneous Instances.

    Number of Simultaneous Instances: Specify the maximum number of video conversion instances that can run simultaneously at a time in the video off-load agent.

    Conversion Priority: This option determines the video conversion process priority in CPU. By setting the priority, you can ensure that other operations of the CPU are uninterrupted.

    Set this option to Low when video conversion is not of high priority. If you set the priority to Low the video generation operation would be slow and would consume more temporary storage to accumulated the video generation data.

    Set this option to Normal when video conversion process is of moderate or high priority.

  3. Click Finish.

Enabling Video Off-Load

You must enable Video Off-load in the appropriate PAM rule to transfer the session image to video conversion activity to the video off-load agent.

Before enabling video off-load, ensure that you have setup the video-offload agent. For more information about setting up the video-offload agent, see Setting Up Video Off-Load Agent.

To enable video off-load:

  1. Click Command Control on the home page of the console, then click Create a rule.

  2. (Conditional) If you are creating a new rule, then click Create a rule.

  3. (Conditional) If you are updating an existing rule to support video off-load, then click the appropriate rule.

  4. Select the following options:

    For Windows:

    • Session Capture: Set this option to ON to enable session capture.

    • Video Capture: Set this option to ON to enable video capture.

    • Video Offload: Set this option to ON to enable video offload.

    For SSH:

    • Session Capture: Set this option to ON to enable session capture.

    • X11 Enable: Set this option to Yes to enable X11 application access.

    • Video Capture: Set this option to ON to enable video capture.

    • Video Offload: Set this option to ON to enable video offload.

    For more information about the rule configuration fields, see the Modifying a Rule.

  5. Click Finish.

For emergency access requests, you can off-load the video generation operation by selecting Video Capture and Video Offload when approving the request.