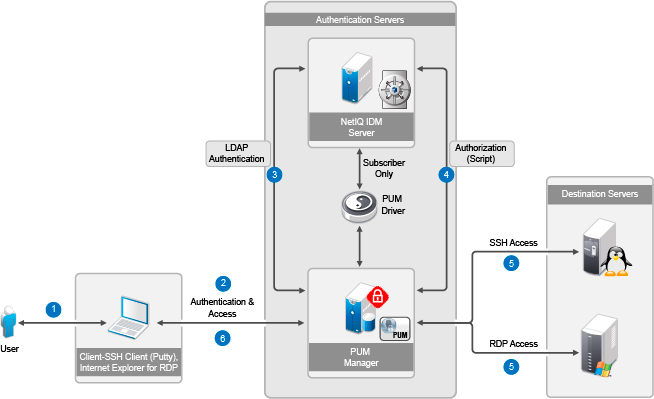
C.2 Access Control Using SSH Relay and RDP Relay Features of PAM

This solution is based on the Credential Vault feature of PAM. With the Credential Vault, a PAM administrator can create Account Domains (servers) for UNIX SSH servers and corresponding accounts called credentials for those servers under the respective domains. Similarly for Windows servers, account domain and the corresponding accounts can be created as credentials objects.

These credentials are consumed in the Rule Objects in PAM to provide the elevated access to users.

To integrate PAM with IDM, the corresponding Credential Vaults eDirectory objects can be created and managed from IDM and these would be synced to PAM by the PAM driver. Since PAM supports user authentication from an LDAP directory, an IDM user can become a PAM user by configuring PAM users to be authenticated to the eDirectory server and the access authorization to the servers would be made by PAM. eDirectory groups are created which defines the users' group membership and the group class's schema is extended with another attribute to add accounts of the hosts as members to it. By doing this, the user's group membership defines the users' privileged access to various hosts i.e. UNIX and Windows servers. So basically, for authorizing a user with privileged access to the servers, a PAM Script object which is associated with a PAM Rule object, queries the eDirectory group objects for the user's and host-account membership.

Figure C-4 Access Control Using PAM in Relay/Proxy Mode

The details of the steps are as described in the following example.

C.2.1 Setting up IDM

To set up IDM:

  1. Install IDM 4.5, iManager, and Designer. For more information, see the NetIQ Identity Manager Documentation Web site.

  2. Extend eDirectory schema (customSchema.sch) using iManager.

  3. Ensure that a password policy is associated with the user and the servers containers for synchronization of passwords to PAM. In this use case, the users container is ou=users,o=data and the servers container is ou=PUM,ou=users,o=data. Note that, with IDM 4.5 installation, the container ou=users,o=data is associated with the Default Password policy, which is utilized in this use case.

C.2.2 Setting up PAM

To set up PAM:

  1. Install PAM v2.4, or later Framework Manager on a Linux machine.

    For example, https://<pumManagerDNSorIP>.

    For more information, see the NetIQ Privileged User Manager 2.4.1 Documentation Web site.

  2. Have a Windows server (example: windows-server-01) and a Linux server (example: linux-server-01), which are the destination servers to which privileged access would be provided to IDM/eDirectory users.

C.2.3 Creating the PAM Driver Using Designer

To create the PAM driver using Designer, see Section 4.0, Creating a New Driver.

C.2.4 Adding eDirectory Objects Using the Sample LDIF File

After the objects are added to eDirectory, corresponding PAM Credential Vault objects will be created on the PAM Server, which can be verified from the PAM UI.

To add eDirectory objects using the provided sample LDIF file:

  1. Extend eDirectory schema (customSchema.sch) using iManager.

  2. Modify the attributes of the sample objects in the sample-npumRelay.ldif file.

    You can modify the IP addresses of the ldap account domains, user passwords, and so on. Note that the server names should be resolvable if DNS names are used.

  3. Upload the user objects using the sample-users.ldif file.

  4. Upload the eDirectory objects using the sample-npumRelay.ldif file.

  5. After the objects are uploaded successfully, they will be synced to PAM via the PAM driver. You can see this, by logging in to the PAM Framework Manager (https://<PUMManagerDNSorIP>) as admin, in the Home > Command Control screen.

The following objects are created:

  • eDirectory User objects: john, bob

  • eDirectory Group objects: unixAdminGrp, winAdminGrp

  • PAM Credential Vault objects: PAM-IDM with credential admin, linux-server-01 with root account, windows-server-01 with Administrator account

C.2.5 Configuring PAM and the PAM Sample Export File

  1. Configure PAM Framework Manager to authenticate users from LDAP server (eDirectory) on which IDM is running:

    1. Log in to PAM (https://<pumManagerDNSorIP>) as admin.

    2. Configure PAM to authenticate users from LDAP server(eDirectory).

      1. Go to Home > Command Control > Privileged Accounts and click Add Account Domain and provide the following information:

        • Name: LDAP-Auth-Domain

        • Type: LDAP

        • Profile: NetIQ eDirectory

        • LDAP URL: <IP of the eDirectory server where IDM is running>

        • Base DN: ou=users,o=data

        • Account: admin

        • User DN: cn=admin,ou=sa,o=system

        • Password: <eDirectory admin password>

      2. Go to Home > Framework User Manager. Click Users > Account Settings. In Authentication Domain drop-down list, select PAM-IDM and click Finish.

  2. Import the custom scripts and modify them:

    1. Open the npumExportSettings-Relay.xml file in a text editor and copy it to the clipboard.

    2. Go to Home > Command Control > Import Settings, and paste it in the Import text field. Click Finish.

    3. After the import, two PAM script objects, SSH-Relay-Script and RDP-Relay-Script, appear under Home > Command Control > Scripts and two PAM Rule objects, SSH-Relay-Script and RDP-Relay-Script, appear under Home > Command Control > Rules.

    4. Double-click each script to modify the LDAP (eDirectory) information, such as server IP, adminDN, admin credentials, and baseDN. LDAP information is located in the section of the scripts called ### CUSTOMIZE SECTION ####. Following is the snippet from the script:

      ### CUSTOMIZE SECTION ####
      my $ldap_url = "ldaps://<idm_server_ip>";
      my $ldap_user = "<admin_dn>";
      my $ldap_pwd = "<admin_password>";
      my $ldap_user_base = "<user_container_dn>";
      my $ldap_host_base = "<unix/windows_servers_container_dn>";
      my $ldap_acc_grp_base = "<groups_container_dn>";
      my $driver_name = "<pum_driver_dn>";
      

      NOTE:The custom script expects the Windows and UNIX servers containers to be different, that is, the value of the variable $ldap_host_base.

C.2.6 Getting Privileged Access

NOTE:

  • The values are based on the sample file.

  • RDP-Relay-Rule gets executed for RDP Relay. In this rule, Run User is set as Everyone and Run Host is set as All Hosts. With these settings, in the RDP relay page, after the user successfully logs in, the user is prompted for account and the IP/DNS address of the server to which user wants the privileged access. This behavior is different from the usual RDP relay, where the Windows server access are listed based on the privileges defined by the rules.

Verify that users john and bob are provisioned with privileged access to the servers:

  1. SSH Relay: bob is a member of the unixAdminGrp group, and gets privileged access to all the UNIX servers that are part of this group. In this case, root account on linux-server-01 is a member this group, so bob can get root access to this server via PAM by running the below command:

    # ssh -t -p 2222 bob@<pumServerIP> root@linux-server-01

    Enter the eDirectory password of bob, which is bob123 in our example.

    After successful login, bob gets a root access shell to linux-server-01. Note that bob did not need to provide the root password of the Linux server.

    bob enters his eDirectory credentials and gets authenticated to the PAM server, which in turn authorizes bob with root access to the UNIX server, linux-server-01, without asking for root password.

  2. RDP Relay: john is a member of the winAdminGrp group and gets privileged access to all the Windows servers that are part of this group. In this case, Administrator account on windows-server-01 is member of this group, so john can get Administrator privileges to this server via PAM by performing the following steps:

    1. Open the following URL in Internet Explorer 9 or above:

      https://<pumServerIP>/rdprelay

    2. Log in as john with password john123. john is authenticated to PAM using eDirectory credentials.

    3. After successful login, john will be prompted to specify values in two fields, User Name and Hostname/IP. Enter the account name and the IP address of the Windows server to which you have privileged access. In this example, user name is Administrator and host name is be windows-server-01.

    After successful login, john gets Remote Desktop access to windows-server-01. Note that john did not need to provide the Administrator password of the Windows server.