Securing and Monitoring Web Based RDP Sessions without Installing Privileged Access Manager Agent
Let us assume, an organization Intech Data, Inc. wants to secure and monitor employees’ action during the privileged access to Windows Server that is located in the network lab. This Windows Server contains confidential data.
Employees can access this server without using the remote desktop client. A few employees can access it remotely only during the business hours (9 AM to 6 PM) on business days (Monday to Friday).
This example refers to the following user profiles:
-
Markus: An administrator of Intech Data, Inc.
-
Albert Jones: An employee of Intech Data, Inc.
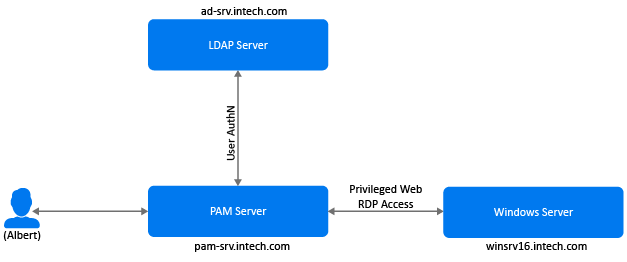
Markus wants to enforce Windows Agentless Web RDP to secure the Windows server. With this implementation, designated employees can access the Windows server through PAM User console for privileged access, and each action is recorded and monitored for auditing purposes. If employees perform any action that poses potential risk, such as deleting, copying data, and so on, the actions are recorded. Markus can suspend the just-in-time session if he is monitoring the active session.
The following diagram depicts the requirement of this use case:
This section explains the prerequisites, flow of actions, and step-by-step configuration details to achieve this requirement.
Flow Diagram
The following diagram illustrates the sequential flow of configuration required for implementing the Windows Agentless Web RDP:
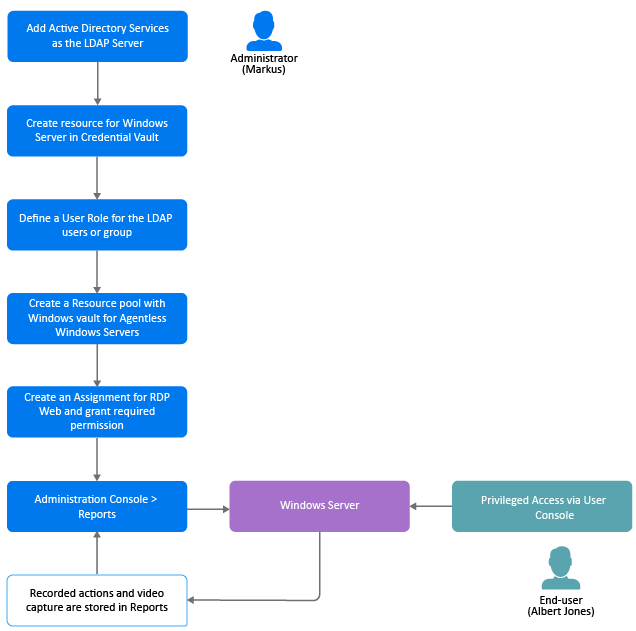
To achieve this requirement, Markus performs the following tasks:
Prerequisites
-
Privileged Access Manager is installed with the required Agentless module.
NOTE:The agentless component of Privileged Access Manager (agentless) is supported on SLES 12 (64-bit), SLES 15 (64-bit), Oracle Linux 8 (64-bit), and RHEL 8(64-bit).
-
Enable the option in > .
-
Import the CA certificate on the system where Privileged Access Manager is installed to enable communication over Secure Sockets Layer (SSL).
For more information, see Exporting the Certificate From the Active Directory Server.
Configure the LDAP Repository
-
Click on the Administration Console.
-
Click on the left pane and click .
-
Perform the following actions:
-
Specify of the LDAP Server.
-
is set to , by default.
-
Specify of the LDAP Server.
NOTE: is set to 636, by default.
-
Select and to secure the connection via SSL by using the CA certificate.
-
Click to fetch the appropriate details.
-
Set to .
-
Specify , , and that are required for retrieving the user details and domain details for authentication.
-
-
Click .
Add a Resource
A resource is a network device, application, repository, or data storage device to which users can get privileged access.
-
Click on the Administration Console.
-
Click > > .
-
In , specify a name for Windows Server.
For this example, the resource name is set to winsrv16.intech.com.
-
Click .
-
Perform the following actions to configure the details:
-
In , specify the host name or IP address of Windows Server.
NOTE: is set to 3389, by default.
-
displays the list of domains if the specified host name is associated to a domain.
In this example, Windows Server is a standalone device and does not need to be associated to any Active Directory Domain.
-
-
Click .
-
Click .
-
Click the resource that you have added and click tab.
-
Click .
-
Specify the , , and required to access Windows Server.
Defining a User Role
-
Click > > .
-
Specify the role name in and additional information about the role in .
-
Click .
-
Click > .
-
Select the domain and select the preferred user or group.
In this example, the user AlbertJ is selected.
-
Click > .
Create a Resource Pool
-
Click > > .
-
Specify and for this resource pool.
For this example, the resource pool name is set to Windows Server with AD Users.
-
Select as under Agentless.
-
Click .
-
Click and select the resource that you added in Add a Resource.
-
Click .
-
Select that is required to allow users to access the resource.
-
Click .
Create an Assignment and Grant Permission
-
Click > > .
-
Select the Resource Pool that you created in Create a Resource Pool.
-
Select the User Role that you defined in Defining a User Role.
The gets generated with the name that you have provided for Resource Pool and User Role.
-
Click and select permission in the Privilege Elevation window.
NOTE:By default, is set to to allow users to access Windows Server with the default credentials that is configure for the resource.
-
Click .
-
Select and set the days and time frame as follows:
-
Select to as the days.
-
Specify 9 to 6 as time frame for the selected days.
-
-
Click .
-
Disable .
-
Enable to allow file transfer from the Web RDP session.
NOTE:When the is enabled the toggle enables automatically.
-
In , specify a message that is displayed to users on connecting to the resource.
-
Click > > .
After Markus implements Windows Agentless Web RDP, the following are possible scenarios:
|
Scenario |
Result |
|---|---|
|
Albert logs in to the User Console and accesses the Windows Server. Later, he installs software and configures it. |
Each action is recorded, the live session video is captured, and stored in . No malicious activity is detected. |
|
Albert wants to access Windows Server on Thursday at 8 PM. |
The Windows Server resource is not available on the User Console for Albert. As Windows Server is accessible from 9 AM to 6 PM. |
|
Albert installs a malware on Windows Server unintentionally. |
The install procedure is recorded. When Markus checks the report and notices malware installation, he notifies Albert to uninstall the identified malware. |
|
Markus is monitoring the live session and Albert attempts to delete the server configuration. |
Markus terminates the session. Later, he drafts a mail with the reason and sends it to Albert. |