5.9 Configuring Target Virtual Machines

For jobs that involve workload virtualization, Portability Suite provides a mechanism for specifying target VM configuration options, such as providing a target VM name and a configuration file path, selecting a datastore to use, and allocating virtual memory, in accordance with the features and capabilities of the selected virtualization platform.

If you have resource pools configured on your target virtualization platform, you can select it for your VM to be assigned to.

NOTE:If your target VMware ESX server is part of a fully-automated Distributed Resource Scheduler (DRS) cluster (a cluster with its VM migration automation level set to Fully Automated), the newly-created target VM’s automation level is changed to Partially Automated for the duration of the conversion. This means that your target VM might power up on a different ESX server from the one initially selected, but migration is prevented from automatic execution.

To specify target VM configuration options:

In Wizard mode, Portability Suite prompts only for basic virtual machine configuration options. For configuring advanced virtual machine options, such as those related to resource pools and CPU scheduling, switch to the Advanced mode.

VM Name: Specify a display name for the new virtual machine.

Configuration File Path: Specify the path to the target virtual machine’s configuration file.

Datastore: Select the required virtual machine’s datastore.

Resources: Specify the amount of virtual RAM and the number of CPUs to be assigned to the virtual machine.

5.9.1 Virtualization Platform-Specific and Advanced VM Configuration Options

In advanced mode, Portability Suite displays target virtual machine configuration options specific to the selected target and provides access to more advanced configuration options.

Virtual Machine Configuration: MSVS

The following are configuration options specific to Microsoft Virtual Server.

Virtual Machine Name: Specify the display name for the new virtual machine.

Configuration Folder: Select the directory where the configuration files will be stored for the virtual machine.

Virtual Machine Memory Allocation: Specify a value for the amount of virtual RAM to be assigned to the virtual machine.

Install Virtual Machine Additions: Enable this option to install VM Additions during the conversion process.

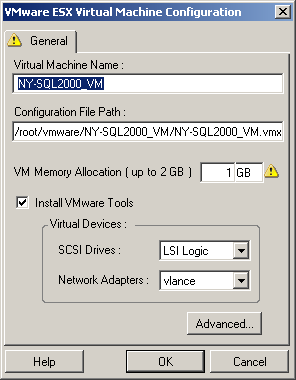
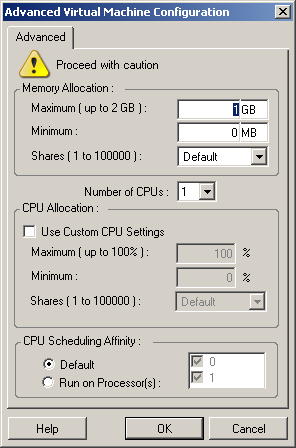
Virtual Machine Configuration: VMware ESX 2.x

The following are configuration options specific to VMware ESX 2. To access settings for the ESX 2 memory allocation, the number of CPUs, and CPU scheduling affinity, click Advanced.

Virtual Machine Name: Specify the display name for the new virtual machine.

Configuration File Path: Select the path to the directory where the VM’s configuration files will be stored.

Virtual Machine Memory Allocation: Specify the amount of virtual RAM to assign to the VM.

Install VMware Tools: Enable this option to install VMware Tools during the conversion process (recommended).

Network Adaptors: Select either vlance or vmxnet. Vmxnet is the recommended selection for optimum performance.

SCSI Drives: Select either BusLogic (most conversions) or LSIlogic (recommended for Windows 2003 workloads).

Advanced: Click this button to view or modify advanced VM configuration settings.

Memory Allocation: Minimum and Maximum memory allocation controls how memory is distributed among different VMs on the VM host. Shares define the memory allocation priority of a given VM relative to other VMs. In most cases you shouldn’t need to change these settings.

Number of CPUs: Select the number of CPUs to assign to the target VM. For example, you can convert a single-processor workload to a multi-processor VM, or a multi-processor workload to a single-processor VM.

CPU Allocation: The minimum percentage represents an absolute, fixed lower limit. The maximum percentage represents an absolute, fixed upper limit. A VM uses at least as much CPU time as specified by the minimum percentage and never uses more CPU time than the specified maximum percentage.

CPU Scheduling Affinity: Represents which ESX Server processors the virtual machine can run on (if your ESX Server is a multiprocessor system). Specify the required processor or select Default (recommended).

For details, see your VMware documentation.

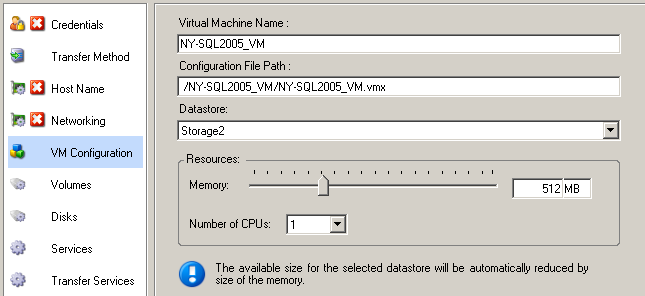
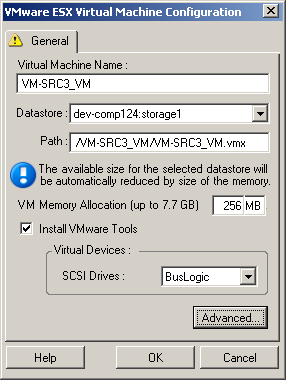
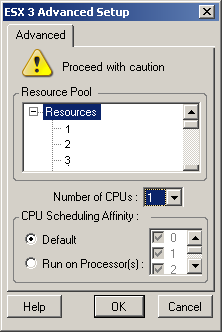
Virtual Machine Configuration: VMware ESX 3/3.5

The following are configuration options specific to VMware ESX 3 and 3.5. To access settings that control resource pools, the number of CPUs, and CPU scheduling affinity, click Advanced.

Virtual Machine Name: Specify the display name for the new virtual machine.

Datastore: Select the datastore where you want to create the *.vmx file.

Configuration File Path: Specify a name and the directory path for the virtual machine’s *.vmx configuration file.

Virtual Machine Memory Allocation: Specify a value for the amount of virtual RAM to be assigned to the virtual machine.

Install VMware Tools: Enable this option to install VMware tools during the conversion process (recommended).

SCSI Drives: Select either BusLogic (most conversions) or LSIlogic (recommended for Windows 2003 workloads).

Advanced: Click this button to view or modify advanced VM configuration settings.

Resource Pool: If required, assign your target VM to a resource pool. When no resource pool is specified, the VM is assigned to the root resource pool.

Number of CPUs: Select the required number of CPUs to assign to the target VM. For example, you can convert a single-processor workload to a multi-processor VM, or a multi-processor workload to a single-processor VM.

CPU Scheduling Affinity: Represents which ESX Server processors the virtual machine can run on (if your ESX Server is a multiprocessor system). Specify the required processor or select Default (recommended).

For details, see your VMware documentation.

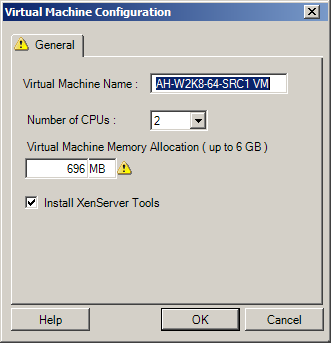
Virtual Machine Configuration: Citrix XenServer

The following are configuration options specific to Citrix XenServer.

Virtual Machine Name: Specify the display name for the new virtual machine.

Number of CPUs: Select the number of CPUs to assign to the target VM. For example, you can convert a single-processor workload to a multi-processor VM, or a multi-processor workload to a single-processor VM.

Virtual Machine Memory Allocation: Specify a value for the amount of virtual RAM to be assigned to the virtual machine.

Install XenServer Tools: Enable this option to install XenServer Tools during the conversion process (recommended).

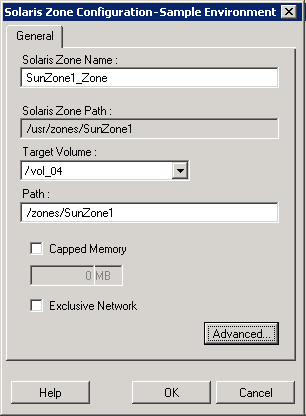
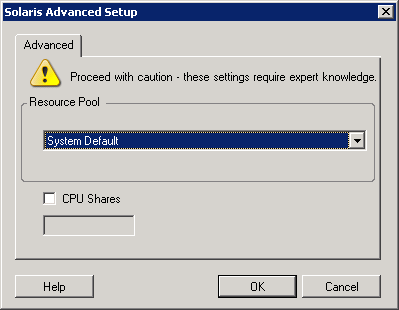
Solaris Zone Configuration

The following are configuration options specific to Solaris. To access settings that control resource pools, CPU shares, click Advanced.

Solaris Zone Name: Type a name for your target Solaris zone.

Solaris Zone Path: The path is determined based on the two subsequent values.

Target Volume: This drop-down list contains discovered volumes on the target zone host. Select the required volume for the target zone. Do not use system hierarchies, such as /usr, /sbin, /lib, /platform, and /var.

Path: Type a pathname for the target zone.

Capped Memory: Specify the number or maximum memory to be allocated to the guest zone.

Exclusive Network: If this option is selected, the network interface is used exclusively by the guest zone. If this options is deselected, the NIC is shared by the guest zone, other zones if available, and the host.

Advanced: Click to access options that control resource pool assignment and CPU shares allocated to the guest zone.

Resource Pool: This drop-down list contains discovered resource pools on the target zone server. Select the required resource pool for the guest zone.

CPU Shares: Select this option to allocate CPU shares to the guest zone, and specify the required number of CPU shares in the corresponding field.