6.12 Advanced Workload Protection Topics
6.12.1 Protecting Windows Clusters
PlateSpin Forge supports the protection of a Microsoft Windows cluster’s business services. The supported clustering technologies are:
-
Windows 2003 Server-based Windows Cluster Server (Single-Quorum Device Cluster model)
-
Windows 2008 Server-based Microsoft Failover Cluster (Node and Disk Majority and No Majority: Disk Only models)
Protection of a cluster is achieved through incremental replications of changes on the active node streamed to a virtual single-node cluster, which you can use while troubleshooting the source infrastructure.
The scope of support for cluster migrations in the current release is subject to the following conditions:
-
When you perform an operation, you must identify the active node—the node that currently owns the quorum resource of the cluster—identified by the cluster’s IP address (virtual IP address). Specifying the IP address of an individual node results in that node being inventoried as a regular, cluster-unaware Windows workload.
-
A cluster’s quorum resource must be collocated with the cluster’s resource group (service) being protected.
If a node failover occurs between incremental replications of a protected cluster, PlateSpin Forge generates a protection event. If the new active node’s profile is similar to the failed active node, the protection contract continues; otherwise, the command fails. The profiles of cluster nodes are considered similar if:
-
They have the same number of volumes
-
Each volume is exactly the same size on each node
-
They have an identical number of network connections
To protect a Windows cluster, follow the normal workload protection workflow (see Basic Workflow for Workload Protection and Recovery).
On failback, PlateSpin Forge provides validation that helps you ensure that shared volume layouts are preserved on the target. Make sure you map the volumes correctly.
6.12.2 Linux Failback to a Paravirtualized VM on Xen on SLES
You can do a failback to a paravirtualized VM on Xen on SLES (version 10 only). This is done indirectly, through a two-stage process. The paravirtualized VM needs to be transformed into a fully virtualized VM first and later transformed back. A utility (xmpsadministrator-), included in your PlateSpin boot ISO image, is used to transform the VM.
The procedure varies slightly, depending on whether the target is a new or an existing paravirtualized VM.
Linux Failback to a New Paravirtualized VM
-
Copy the Spin boot ISO image to the target Xen on SLES server.
-
Start the Virtual Machine manager and create a fully virtualized VM:
-
Select the option.
-
Choose a suitable size for the disk image (the disk size should be equal to or bigger than that of the failover VM).
-
Select the boot ISO as the installation source.
The VM boots into the PlateSpin OS environment, used in failback to physical machine settings.
-
-
Complete the failback procedure. See Semi-Automated Failback to a Physical Machine.
Upon completion, the VM should be fully functional as a fully virtualized machine.
-
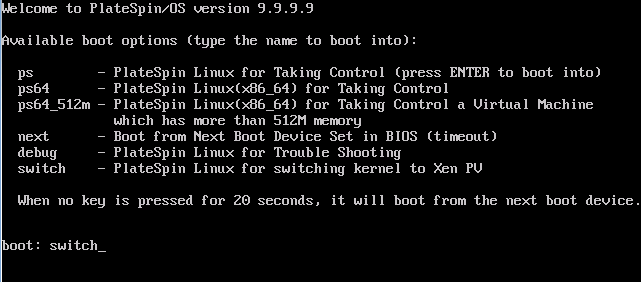
Reboot the VM, making sure that it still boots into the PlateSpin OS environment.
-
At the boot: prompt, type switch and press Enter.
This reconfigures the operating system to be bootable as a paravirtualized machine. Upon completion, the output should look similar to the one shown below:
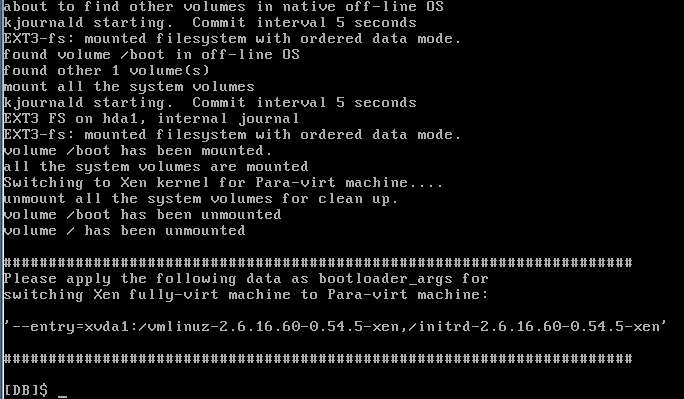
Note the bootloader arguments in the final segment of the output:
Please apply the following data as bootloader_args for switching Xen fully-virt machine to Para-virt machine:
'-entry=xvda1:/vmlinuz-2.6.16.60-0.54.5-xen, /initrd-2.6.16.60-0.54.5-xen'
These are used by the xmps utility to set up the location of the kernel and the initrd image, from which the paravirtualized machine boots from.
-
Power off the virtual machine:
[DB]$ poweroff
-
Login to the XEN on SLES server as root and mount the PlateSpin PlateSpin boot ISO image (the command example assumes that the ISO has been copied under the /root directory):
# mkdir /mnt/ps # mount -o loop /root/linuxfailback.iso /mnt/ps
-
Run the xmps utility to create a paravirtualized VM based on the configuration of the fully virtualized VM:
# /mnt/ps/tools/xmps --pv --vm_name=SLES10-FV --new_vm_name=SLES10-PV --bootloader_args="--entry=xvda1:/vmlinuz-2.6.16.60-0.54.5-xen, /initrd-2.6.16.60-0.54.5-xen"
The utility takes as input:
-
The name of the fully virtualized VM on which the configuration of the paravirtualized machine will be based (SLES10-FV)
-
The name of the virtual machine to create (SLES10-PV)
-
The paravirtualized machine's bootloader arguments "--bootloader_args" (shown at Step 5)
If a VM with the same name as the one passed as new_vm_name already exists, the xmps utility fails.
The newly created paravirtualized VM (SLES10-PV) should now be available in the Virtual Machine Manager, ready to be turned on. The corresponding fully virtualized machine is retired and will fail to boot. This VM can be deleted safely (only the VM configuration will be removed).
-
-
Unmount the PlateSpin PlateSpin boot ISO image:
# umount /mnt/ps
Linux Failback to an Existing Paravirtualized VM
-
Copy the PlateSpin boot ISO image to the target Xen on SLES server.
-
Log in to the XEN SLES server as root and mount the PlateSpin boot ISO image:
# mkdir /mnt/ps # mount -o loop /root/linuxfailback.iso /mnt/ps
-
Run the xmps utility to create a fully virtualized VM based on the configuration of the paravirtualized VM (the intended failback target):
# /mnt/ps/tools/xmps --fv --vm_name=SLES10-PV --new_vm_name=SLES10-FV --bootiso=/root/linuxfailback.iso
The utility takes as input:
-
The name of the existing paravirtualized machine (SLES10-PV), which is the intended failback target
-
The name of the temporary fully virtualized machine (SLES10-FV) to be created for the two-stage failback operation
-
The full path of the boot ISO (assuming that the ISO file is located under /root: /root/linuxfailback.iso)
If a VM with the same name as the one passed as new_vm_name already exists, the xmps utility fails.
The newly created fully virtualized machine (SLES10-FV) should now be available in the Virtual Machine Manager.
-
-
Turn on the newly created fully virtualized machine (SLES10-FV).
The VM boots into the PlateSpin OS environment, used in failback to physical machine settings.
-
Complete the failback procedure. See Semi-Automated Failback to a Physical Machine.
-
Reboot the VM, run switch, and reconfigure the workload as described in Linux Failback to a New Paravirtualized VM (from Step 4 to Step 9 only).
6.12.3 Using Workload Protection Features through the PlateSpin Forge Web Services API
You can use workload protection functionality programmatically, through the protection.webservices API from within your applications. You can use any programming or scripting language that supports Web services.
https://<hostname | IP_address>/protection.webservices
Replace <hostname | IP_address> with the hostname or the IP address of your Forge VM. If SSL is not enabled, use http in the URI.
Figure 6-3 The Front Page of the Protection Web Services API
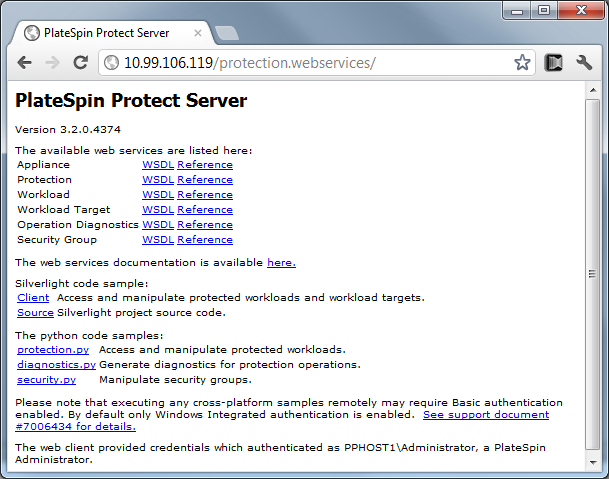
To script common workload protection operations, use the referenced samples written in Python as guidance. A Microsoft Silverlight application, along with its source code, is also provided for reference purposes.