3.3 Discovering Source Workloads and Migration Targets

3.3.1 Pre-populating the Servers View with Windows Computers in the Network

PlateSpin Migrate’s Network Discovery feature automatically populates PlateSpin Migrate Client with a list of Windows physical and virtual machines that are online. Unlike a full discovery, Network discovery creates a list of machines but does not retrieve detailed inventory information about each one, which is required for workload portability jobs.

The Network Discovery feature is necessary to discover all machines of a Windows domain in a single job. See Discovering All Machines in a Windows Domain.

PlateSpin Migrate uses the standard Windows network browser function for the auto-discovery feature. Because Linux workloads and virtual machine servers do not advertise to the Windows network browser, they are not auto-discovered.

The Network Discovery feature is enabled by default. To disable the feature or toggle between its enabled/disabled modes, double-click Network Discovery in the bottom right corner of the PlateSpin Migrate Client window.

3.3.2 Discovering the Details of Source Workloads and Targets

You can discover:

  • An individual physical machine

  • An individual virtual machine

  • An individual virtual machine server

  • Multiple virtual machine servers

  • All VMware ESX hosts affiliated with a VMware vCenter Server

  • Hyper-V hosts

  • Multiple machines

Before starting discovery operations, make sure PlateSpin Server can communicate with your source workloads and targets. See Section 2.3.1, Requirements for Discovery.

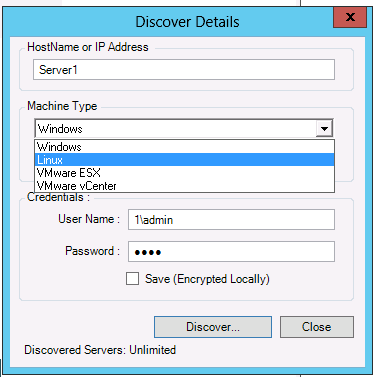
  1. On the PlateSpin Migrate toolbar, click Discover Details.

    or

    In the Servers view, right-click in a blank area, then select Discover Details.

  2. In the Discover Details dialog box, type the hostname or IP address of the source or target. To discover multiple machines, specify multiple hostnames or IP addresses separated by semicolons. If the target is behind a NAT device, specify its public (external) IP address.

    See Migrations Across Public and Private Networks through NAT.

  3. Select the machine type and provide administrator credentials for the machine you are discovering.

    See Discovery Guidelines for Machine Types and Credentials.

    Discovering hosts with Xen Hypervisor systems results in these systems being registered as PlateSpin Migrate source workloads (as opposed to VM host targets). For information about using these platforms as workload portability targets, see Semi-Automated Workload Virtualization Using the X2P Workflow.

  4. (Optional) If you want to store these credentials for use during future jobs, enable the Save (Encrypted Locally) option.

  5. Click Discover and wait for the process to complete.

  6. (Optional) If you want to monitor the progress of the job, switch to the Jobs view.

3.3.3 Discovering All Machines in a Windows Domain

  1. Enable the automatic Network Discovery feature.

    See Pre-populating the Servers View with Windows Computers in the Network.

  2. In PlateSpin Migrate Client, expand the domain listing containing the machines to be discovered.

  3. Right-click the domain name, then select Discover All Servers.

  4. Specify domain-level administrator credentials.

  5. Click Discover and wait for the process to complete.

  6. (Optional) If you want to monitor the progress of the job, switch to the Jobs view.

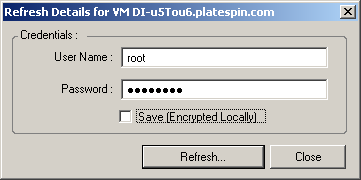
3.3.4 Refreshing Machine Details

You should routinely refresh your source workloads and targets before setting up a migration job.

To refresh a source or a target machine:

  1. In the Servers view, right-click the required item, then select Refresh Details.

  2. Specify the credentials appropriate for the system being refreshed, then click Refresh.

    PlateSpin Migrate starts a discovery job, which you can monitor in the Jobs view.

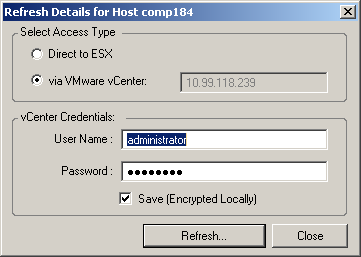
3.3.5 Resetting the Mechanism Used to Authenticate Access to ESX Hosts

If you discover ESX hosts through a vCenter Server, all subsequent communications with these VM hosts take place through the vCenter Server.

You can reset this access mechanism to Direct to ESX or back to Via vCenter:

  1. Refresh the required ESX host.

    See Refreshing Machine Details.

    The system prompts you to select an access type:

  2. Select the required option, then click Refresh.

    PlateSpin Migrate rediscovers the required ESX host by using the specified access mechanism, which it uses for all subsequent communications with that host.

3.3.6 Discovering Target Physical Machines

To discover a physical target and inventory its hardware components, you must boot the target machine with the PlateSpin boot ISO image on a CD or other media, from which your target can be booted. A similar process is used to migrate workloads to virtualization platforms that use the semi-automated virtualization process, whereby a target virtual machine on a virtual machine host is regarded as a physical target (see Semi-Automated Workload Virtualization Using the X2P Workflow).

Downloading the PlateSpin Boot ISO Images

You can download the PlateSpin boot ISO image (bootofx.x2p.iso) from the PlateSpin Migrate area of NetIQ Downloads by doing a search with the following parameters:

  • Product or Technology: PlateSpin Migrate

  • Select Version: 12.0

  • Date Range: All Dates

IMPORTANT:The .iso file is compressed in PhysicalTarget.zip at the download site.

Injecting Additional Device Drivers into the Boot ISO Images

The PlateSpin boot ISO image contains a large library of device drivers sufficient to boot most common targets. However, occasionally you might want to use your own, such as lesser-known, vendor-specific or custom-developed drivers.

To inject drivers into the PlateSpin boot ISO image:

  1. Download and extract the PlateSpin boot ISO images from NetIQ Downloads. See Downloading the PlateSpin Boot ISO Images.

  2. Obtain or compile the required *.ko driver files.

    IMPORTANT:Make sure the drivers are valid for the kernel included with the ISO file (3.0.93-0.8-default for 64-bit, 3.0.93-0.8-pae for 32-bit) and are appropriate for the target architecture.

  3. Mount the ISO image in any Linux machine (root credentials required). Use the following command syntax:

    mount –o loop <path-to-ISO> <mount_point>

  4. Copy the rebuildiso.sh script, located in the /tools subdirectory of the mounted ISO file, into a temporary working directory.

  5. Create another working directory for the required driver files and save them in that directory.

  6. In the directory where you saved the rebuildiso.sh script, run the following command as root:

    ./rebuildiso.sh –i <ISO_file> -d <driver_dir> -m32|-m64

    On completion, the ISO file is updated with the additional drivers.

    NOTE:To rebuild Migrate 12.0 LRD ISO, a minimum of genisoimage 1.1.11 is required. By default, operating systems such as RHEL 7, CentOS 7, and Ubuntu 14.04.1 have the required genisoimage version.

  7. Unmount the ISO file (execute the command unmount <mount_point>).

Registering Physical Targets Using the PlateSpin Boot ISO Image

Complete these steps to register your target with PlateSpin Server when you are using an unmodified boot ISO image. If you want to inject additional device drivers into the image (Linux workloads only), first complete the steps in Injecting Additional Device Drivers into the Boot ISO Images.

To boot the target physical machine and register it with the PlateSpin Migrate Server:

  1. Burn the PlateSpin boot ISO image on a CD or save it to the required media, from which your target can boot.

  2. Boot the target machine from the ISO image.

  3. (Conditional) For 64-bit systems, at the initial boot prompt, type the following:

    ps64

    Press Enter.

  4. When prompted, enter the PlateSpin Server URL, using the following format:

    http://<hostname | IP_address>/platespinmigrate

    Replace <hostname | IP_address> with the hostname or the IP address of your PlateSpin Server host.

  5. Enter your credentials for the PlateSpin Server.

  6. Specify a static IP address or indicate that the machine should dynamically obtain an IP address from a DHCP server.

  7. Enter a name for the target host and specify an existing PlateSpin Migrate Network to work with.

After a few moments, PlateSpin Migrate displays the physical target in the Servers view.

Performing an Unattended Registration of a Target Physical Machine

PlateSpin Migrate provides a mechanism for automating a target physical machine’s registration with the PlateSpin Server. This involves updating the boot ISO image with specific registration information before booting the target.

For details, see KB Article 7013485 .

3.3.7 Discovering, Registering and Preparing a VM for a Server Sync Job

If you want to synchronize two workloads, and if your synchronization target is a virtual machine, you must discover and register an appropriate virtual machine first. For information about the Server Sync feature, see Synchronizing Workloads with Server Sync.

  1. On your virtual machine host, create a virtual machine with the desired specifications and install the operating system that matches the intended source workload, including the exact service pack.

  2. Discover the virtual machine host or refresh its details.

  3. In the Servers view, right-click the newly created virtual machine underneath the virtual machine server, then select Prepare for synchronization.

  4. Specify administrator credentials for the virtual machine server.

  5. (Optional) If you want to store these credentials for use during future jobs, enable the Save (Encrypted Locally) option.

  6. (Optional) To configure the temporary (Take Control) network settings, such as choosing which virtual network to use from those available on the virtual machine server and configuring TCP/IP settings, click Configure, then configure the network settings as required.

  7. Click Prepare and wait for the job to complete.

    On completion, the Servers view lists a new Server Sync target underneath the VM host:

3.3.8 Discovery Guidelines for Machine Types and Credentials

The following are guidelines for machine type selection, credential format, and syntax for discovery parameters.

Table 3-2 Guidelines for Discovery Parameters

To Discover

Machine Type Selection

Credentials

Remarks

All Windows workloads

PlateSpin Image Servers

Windows

Local or domain admin credentials.

For the username, use this format:

  • For domain member machines: authority\principal

  • For workgroup member machines: hostname\principal

All Linux workloads

Linux

Root-level username and password

Non-root accounts must be properly configured to use sudo. See KB Article 7920711.

VMware ESX hosts

VMware ESX

ESX account with admin role

OR

Windows domain credentials (versions 4 and 4.1 only)


VMware ESX hosts affiliated with a VMware vCenter Server

VMware vCenter

VMware vCenter Web service credentials (username and password)

OR

Windows domain credentials (versions 4 and 4.1 only)

All subsequent communications with ESX hosts take place through the vCenter Server. To reset the access mechanism to Direct to ESX or back to Via vCenter, refresh the details of the required ESX host and select the required option. See Resetting the Mechanism Used to Authenticate Access to ESX Hosts.

Hyper-V hosts

Windows

Local or domain admin credentials.

For the username, use this format:

  • For domain member machines: authority\principal

  • For workgroup member machines: hostname\principal