2.2 Setting Up User Authorization and Authentication

2.2.1 About PlateSpin Forge User Authorization and Authentication

The user authorization and authentication mechanism of PlateSpin Forge is based on user roles, and controls application access and operations that users can perform. The mechanism is based on Integrated Windows Authentication (IWA) and its interaction with Internet Information Services (IIS).

The role-based access mechanism enables you to implement user authorization and authentication in several ways:

  • Restricting application access to specific users

  • Allowing only specific operations to specific users

  • Granting each user access to specific workloads for performing operations defined by the assigned role

Every PlateSpin Forge instance has the following set of operating system-level user groups that define related functional roles:

  • Workload Protection Administrators: Have unlimited access to all features and functions of the application. A local administrator is implicitly part of this group.

  • Workload Protection Power Users: Have access to most features and functions of the application, with some limitations such as restrictions in the capability to modify system settings related to licensing and security.

  • Workload Protection Operators: Have access to a limited subset of system features and functions, sufficient to maintain day-to-day operation.

When a user attempts to connect to PlateSpin Forge, the credentials provided through the browser are validated by IIS. If the user is not a member of one of the Workload Protection roles, connection is refused.

Table 2-1 Workload Protection Roles and Permission Details

Workload Protection Role Details

Administrators

Power Users

Operators

Add Workload

Allowed

Allowed

Denied

Remove Workload

Allowed

Allowed

Denied

Configure Protection

Allowed

Allowed

Denied

Prepare Replication

Allowed

Allowed

Denied

Run (Full) Replication

Allowed

Allowed

Allowed

Run Incremental

Allowed

Allowed

Allowed

Pause/Resume Schedule

Allowed

Allowed

Allowed

Test Failover

Allowed

Allowed

Allowed

Failover

Allowed

Allowed

Allowed

Cancel Failover

Allowed

Allowed

Allowed

Abort

Allowed

Allowed

Allowed

Dismiss (Task)

Allowed

Allowed

Allowed

Settings (All)

Allowed

Denied

Denied

Run Reports/Diagnostics

Allowed

Allowed

Allowed

Failback

Allowed

Denied

Denied

Reprotect

Allowed

Allowed

Denied

In addition, PlateSpin Forge software provides a mechanism based on security groups that define which users should have access to which workloads in the PlateSpin Forge workload inventory.

Setting up a proper role-based access to PlateSpin Forge involves two tasks:

  1. Adding users to the required user groups detailed in Table 2-1 (see your Windows documentation).

  2. Creating application-level security groups that associate these users with specified workloads (see Section 2.2.2, Managing PlateSpin Forge Security Groups and Workload Permissions).

2.2.2 Managing PlateSpin Forge Security Groups and Workload Permissions

PlateSpin Forge provides a granular application-level access mechanism that allows specific users to carry out specific workload protection tasks on specified workloads. This is accomplished by setting up security groups.

To set up a security group:

  1. Assign a PlateSpin Forge user a Workload Protection Role whose permissions best suit that role in your organization.

  2. Access PlateSpin Forge as an administrator by using the PlateSpin Forge Web Interface, then click Settings > Permissions.

    The Security Groups page opens:

  3. Click Create Security Group.

  4. In the Security Group Name field, type a name for your security group.
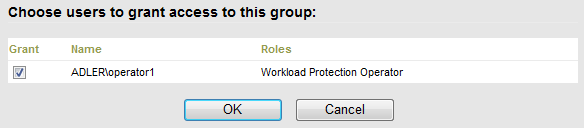
  5. Click Add Users and select the required users for this security group.

    If you want to add a PlateSpin Forge user that was recently added to the Forge VM, it might not be immediately available in the user interface. In this case, first click Refresh User Accounts.

  6. Click Add Workloads and select the required workloads:

    Only users in this security group will have access to the selected workloads.

  7. Click Create.

    The page reloads and displays the your new group in the list of security groups.

To edit a security group, click its name in the list of security groups.