1.2 Appliance Configuration Procedure
The initial setup and configuration of the PlateSpin Forge appliance is a one-time procedure consisting of the following steps:
-
Configuring the appliance host (VMware ESXi, which is the hypervisor component of the product).
-
Configuring the Forge Management VM (a Windows virtual machine with application logic running on the host).
-
Activating your product license.
Fill out the PlateSpin Forge 11.0 Configuration Worksheet before starting this procedure.
To begin the installation and configuration of the appliance, you need to connect to it directly through another computer (a.k.a. the “administrative computer”) and use the browser-based Forge Appliance Configuration Console (ACC) utility. For flexibility and mobility, consider using a notebook computer for this purpose.
Use the following steps to install and configure the appliance:
-
Perform the preparatory steps described in Before You Begin.
-
Connect your administrative computer to the appliance. You can do this in two ways:
-
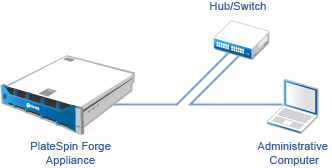
Connection through a Network Switch: Connect both units to a network switch or a hub through an Ethernet network cable:
-
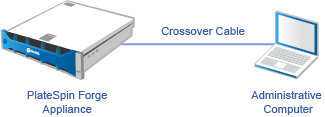
Direct Connection: Connect your PlateSpin Forge appliance and the administrative computer directly through a crossover cable:
-
-
Turn on the power of the PlateSpin Forge appliance. Wait at least 10 minutes for the system to fully start before trying to connect.
-
Assign the computer an IP address, in the 192.168.1.x range and an associated subnet mask of 255.255.255.0 (or any IP address/subnet mask combination, making sure that the computer is able to ping the appliance at its default IP address, 192.168.1.200).
NOTE:Do not use the following IP addresses:
-
192.168.1.200 - used by the hypervisor
-
192.168.1.210 - used by the Forge VM (assigned by an automatic appliance configuration utility).
-
-
Open a supported Web browser and go to the Forge Appliance Configuration Console (Forge ACC) at http://192.168.1.200:10000.
NOTE:Depending on your browser, you might have to type the entire URL, including the protocol (http://) in the browser’s address bar.
-
Log in using the root account (password: Password1). The system redirects you to the Change Password page.
-
Change the password for the root account as well as for the forgeuser account.
-
Log out of the Forge ACC.
-
Log in using the forgeuser account using the password you set in Step 7.
-
Select Configure Host.
NOTE:You must first configure the appliance host. Do not attempt to configure the Forge VM prior to this.
-
Specify the appropriate settings and click Apply.
-
Click Continue.
-
When the configuration is complete, disconnect the administrative computer and connect the appliance to the production network (where the new IP address will be valid).
-
From the computer, go to http://<appliance_IP>:10000
(If you are using the same computer, you need to change its IP address to one that is valid in your network).
-
Log in using the forgeuser account.
-
Click Configure Forge VM.
-
At the Configure Forge VM page, enter the appropriate settings and click Apply.
-
At the summary page, click Continue and wait for the VM configuration to complete.
-
Select the Forge dashboard link to connect to the Forge UI at http://<appliance_IP>/forge.
-
Use the default credentials for the Forge VM (username: Administrator, password: Password1).