3.1 Installing the Hypervisor and Forge Components
This section provides information about installing the hypervisor and Forge software components in your appliance.
3.1.1 Installing VMware ESXi 5.5.0 to the Appliance
PlateSpin Forge requires VMware ESXi 5.5 to control the Forge Management VM. You need to make sure that you have the PlateSpin Forge 11.1.0 Installation CD to proceed with the installation.
To install VMware ESXi 5.5.0 to the Forge Appliance:
-
Power on the appliance and press F11 at the boot prompt.
-
While at the boot prompt, insert the installation CD into the CD-ROM drive.
It might take some time for the Boot Manager utility to be displayed.
-
On the Boot Manager Main Menu, select BIOS Boot Menu to launch the BIOS Boot Manager.
-
In the BIOS Boot Manager utility, navigate to the option that lets you boot from an optical device (for example, a SATA optical drive), then press Enter.
NOTE:The name of the optical device might vary, depending on the device driver installed on the appliance.
-
On the Forge ESXi build installation menu, select ESX Scripted Install for the Forge Appliance, then press Enter to load the ESXi installer.
The installation progress updates on the screen and moves through several stages. When the process is completed, the following dialog box is displayed prior to the system reboot:

NOTE:If you choose not to attend the installation, the system reboots on its own. You will see the ESXi console when you return.
If you encounter problems during the installation, see Section 4.2, Errors Occurring During ESXi Installation of this guide.
-
In the dialog box, press Enter to reboot the system (or let the system reboot itself), then continue with the instructions in Section 3.1.2, Reconnecting the Forge Administrative Computer.
3.1.2 Reconnecting the Forge Administrative Computer
To continue with the installation and configuration of the appliance, you need to connect directly to it through another computer, an “administrative computer.” You should have been using a Windows notebook computer (that is, a “laptop”) for this purpose in the past.
This section includes the following information:
Connecting the Appliance and the Administrative Computer
For licensing and configuration tasks in this section, use the following procedure to connect your administrative computer to the Forge hardware appliance. This requires setting up a physical connection, configuring with a static IP address in the same subnet as Forge, then re-connecting the administrative computer to the Forge appliance. It also includes establishing a management connection, which enables the administrative computer to configure aspects of the Forge appliance software.
This section includes the following information:
Establishing a Physical Connection
To establish a physical connection between the administrative computer and the Forge Appliance:
-
Use one of these methods:
Connection through a Network Switch: Connect both units to a network switch or a hub through an Ethernet network cable:

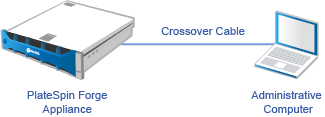
Direct Connection: Connect your PlateSpin Forge appliance and the computer directly through a crossover cable:
-
Turn on the power at the Forge appliance. Wait at least 10 minutes for the system to fully start before trying to connect.
-
Access the TCP/IP properties of the administrative computer’s wired LAN adapter and assign it an IP address (192.168.1.205) and an associated subnet mask (255.255.255.0).
NOTE:Do not use the following IP addresses:
-
192.168.1.200 - used by the hypervisor
-
192.168.1.210 - used by the Forge VM (assigned by an automatic appliance configuration utility).
-
-
Save the settings and close the LAN Properties applet.
Establishing a Management Connection through the vSphere Client
When the administrative computer has been connected physically, you need to establish the management connection between the administrative computer and the ESXi hypervisor and the Forge Management VM. The connection is enabled through the VMware vSphere Client on the administrative computer. By using the vSphere client on the administrative computer, you can access the ESXi hypervisor and the Forge Management VM.
You already installed ESXi 5.5 on the Forge Appliance. From the administrative computer’s physical connection to the Forge Appliance, you can access and download the vSphere Client.
NOTE:You will need a connection to the Internet for the download to be successful. You can either copy the link location and download the client while you are connected, or you can manually download the vSphere Client from the VMware download site (see the procedure below).
On the administrative computer, use the following steps to install the VMware Infrastructure Client program:
-
From a browser, enter the Forge Host address to open the VMware ESXi 5.5 Welcome page, then select Download vSphere Client.
-
At the download location, run the vSphere Client installation .exe.
-
Launch the vSphere Client login, then connect to the PlateSpin Forge using these parameters:
IP address: 192.168.1.200
User name: root
Password: Password1
The vSphere Client opens, connected to the hypervisor.
Deploying the OVF Template
Included in the PlateSpin Forge 11 Appliance Upgrade/Rebuild Kit is the PLATESPINFORGE01.ovf file used in the PlateSpin Forge 11.0.0.x release build.You will deploy this .ovf file during the installation process to import the Forge VM into ESXi.
Use the following steps to deploy the OVF template:
-
From the PlateSpin Forge 11 Appliance Upgrade/Rebuild Kit download site, select and download the following files and copy them to the same location on the administrative computer.:
-
PLATESPINFORGE01-disk1.vmdk
-
PLATESPINFORGE01-disk2.vmdk
-
PLATESPINFORGE01-file1.flp
-
PLATESPINFORGE01.mf
-
PLATESPINFORGE01.ovf
NOTE:The OVF template uses the other files from the kit to create the Forge Management VM.
-
-
In the vSphere Client (see Installing VMware ESXi 5.5.0 to the Appliance), click File > Deploy OVF Template.
-
In the Deploy OVF Template dialog box, browse to the location where you downloaded the .ovf file, then click Next.
-
In the Name field of the Name and Location view, enter PLATESPINFORGE01 as the name for the imported PlateSpin Forge Management VM, then click Next.
-
From the Storage view, select ForgeSystem as the destination storage location, then click Next.
-
From the Disk Format view, select Thick Provision Eager Zeroed, then click Next.
-
From the Ready to Complete view, select Power on after deployment, then click Finish.
The VM import process should complete after approximately 15 minutes.
-
In the vSphere client, locate the Forge Management VM (PLATESPINFORGE01), right-click the VM, then rename it to PlateSpin Forge Management VM.
-
In the vSphere client, click the Console tab, then click inside the remote console window.
-
At the Product Key Settings page, enter the product key.
-
On the Administrator Account Settings page, set the administrator password as Password1, click Finish, then log in (ensure that you press Ctrl+Alt+Insert to log in to the VM).