6.4 Managing the Forge VM with vSphere Web Client

Occasionally you might need to work directly with the Forge VM and perform maintenance tasks as described here or when you are advised to do so by PlateSpin Support. Use the vSphere Web Client to access the Forge VM, including its OS interface and VM settings.

6.4.1 Accessing the vSphere Web Client

The vSphere Web Client is your management interface with the VMware ESXi host. It is installed automatically on the Forge appliance. It is accessible through a web browser on your Forge administrative computer. A network connection is required between the administrative computer and the Forge Appliance.

You will use the vSphere Web Client to configure aspects of the Forge Appliance software. You will also use it to manage the ESXi host, to power on and off the Forge Management VM, and to access the Console for the Forge Management VM.

Use a supported web browser on the administrative computer to connect to the VMware vSphere Web Client.

NOTE:VMware supports the vSphere Web Client on the latest version of Google Chrome, Mozilla Firefox, and Internet Explorer 11. See the VMware Knowledgebase article vSphere Client (HTML5) and vSphere Web Client 6.5 FAQ (2147929).

  1. On the PlateSpin administrative computer, launch a supported web browser.

  2. Specify the ESXi hypervisor URL to open the VMware vSphere Web Client on the Forge Appliance:

    https://192.168.1.200

  3. If you are prompted that your connection is not secure, add the security exception for the VMware ESXi server on the Forge Appliance. Click Add Exception, review the Certificate information, then click Confirm Security Exception.

  4. Log in with the vSphere administrator credentials to the vSphere Web Client. Default credentials are:

    User name: root

    Password: Password1

  5. If you are prompted in browser pop-up dialog to save credentials, do not select to save credentials.

  6. In the Help Us Improve the VMware Host Client dialog, deselect the check box to Join the VMware Customer Experience Improvement Program, then click OK.

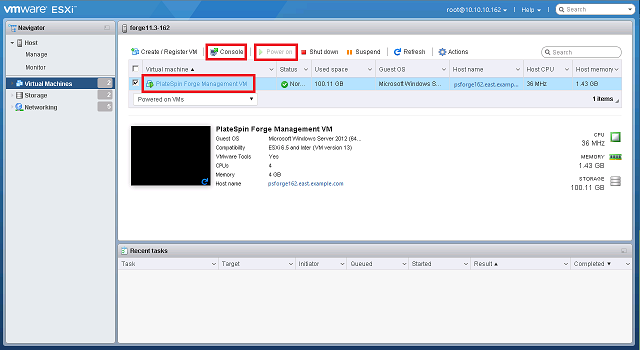
6.4.2 Accessing the Console for the Forge Management VM

  1. On the PlateSpin administrative computer, launch the vSphere Web Client, then log in with your administrator-level credentials.

  2. If the VM is not running, power on the PlateSpin Forge Management VM. In the program tree view, select the PlateSpin Forge Management VM, then click the green Play button to power it on.

  3. At the top of the right panel, click the Console tab.

    The Client’s console area displays the Forge VM’s Windows interface.

  4. Click inside the remote console window to access the Windows desktop for the VM.

Use the console to work with the Forge Management VM the same way as you would work with Windows on a physical machine.

HINT:

  • To unlock the Management VM, click inside the console and press Ctrl+Alt+Insert.

  • To release the cursor for working outside the vSphere Web Client, press Ctrl+Alt.

6.4.3 Shutting Down or Starting the Forge Management VM

Occasionally, you might need to shut down and then restart the Forge Management VM, such as when you relocate the appliance.

To shut down the Forge VM gracefully:

  1. Use the vSphere Web Client to access the Forge VM host.

  2. Open the VM console for the Forge VM.

  3. In the VM Console, use the standard Windows procedure to shut down the VM. (Select Start > Shut Down.)

    Wait for the VM to shut down gracefully.

To power on the Forge VM:

  1. Use the vSphere Client to access the Forge VM host.

  2. In the inventory panel at the left, right-click the PlateSpin Forge VM item and select Power on.

    In the program tree view, you can alternatively select the PlateSpin Forge Management VM, then click the green Play button to power it on.

6.4.4 Managing Snapshots of the Forge VM on the Appliance Host

Occasionally you might need to take a point-in-time snapshot of your management VM, such as when you upgrade Forge software or when you carry out troubleshooting tasks. You might also need to remove snapshots (recovery points) to free storage space.

To manage snapshots of the Forge VM:

  1. Launch the vSphere Client, then log in to the appliance host with administrator-level credentials.

  2. In the inventory panel at the left, right-click the PlateSpin Forge VM item and select Snapshot > Take Snapshot.

  3. Type a name and a description for the snapshot, then click OK.

To revert the Forge VM to a previous state:

  1. Launch the vSphere Client, then log in to the appliance host with administrator-level credentials.

  2. In the inventory panel at the left, right-click the PlateSpin Forge VM item and select Snapshot > Snapshot Manager.

  3. In the tree representation of the VM states, select a snapshot, then click Go to.

To remove snapshots that represent recovery points:

  1. Launch the vSphere Client, then log in to the appliance host with administrator-level credentials.

  2. In the inventory panel at the left, right-click the PlateSpin Forge VM item and select Snapshot > Snapshot Manager.

  3. In the tree representation of the VM states, select a snapshot, then click Remove.

6.4.5 Manually Importing VMs into the Appliance Host’s Datastore

You might want to manually import VMs into the Appliance host’s datastore when you want your failover workload to be created differentially. See Initial Replication Method (Full and Incremental).

  1. At the production site, create a VM from your production workload (for example, by using PlateSpin Migrate) and copy the VM files from the ESX host’s datastore to portable media, such as a portable hard drive or a USB flash drive. Use the Datastore Browser of the client software to browse and locate the files.

  2. At the disaster recovery site, attach the media to a workstation that has network access to Forge.

  3. Use the vSphere Client’s Datastore Browser to access the Forge datastore (Storage1) and upload the VM files from the temporary media. Use the uploaded VM to register it with the appliance host (right-click > Add to Inventory).

  4. Refresh the PlateSpin Forge inventory. In the PlateSpin Forge Web Interface, click Settings > Containers, then click the Refresh icon next to the appliance host.

6.4.6 Applying Windows Security Updates to the Forge VM

We recommend that you use Windows updates to apply Windows Server 2012 R2 security updates to the Forge VM during a maintenance window. Use the following procedure to ensure that the update process does not interrupt your protection processes and workflow.

To apply Windows security updates to the Forge VM:

  1. During a maintenance window, access the Forge VM console by using the VMware vSphere Web Client.

  2. From within the Forge VM’s Windows interface, check for security updates from Microsoft.

  3. Use the PlateSpin Forge Web Interface to put PlateSpin Forge into maintenance mode by pausing all replication schedules and ensuring that any incomplete replications are complete.

  4. Take a snapshot of the Forge VM. See Managing Snapshots of the Forge VM on the Appliance Host.

  5. Download and install the required security patches. After the installation finishes, reboot the Forge VM.

  6. Use the PlateSpin Forge Web Interface to resume replications paused in Step 3, then verify that replications are working properly.

  7. Remove the snapshot of the Forge Management VM that you took in Step 4. See Managing Snapshots of the Forge VM on the Appliance Host.