2.0 Reconfiguring the RAID Controller (Conditional)
Use the information in this section if you need to reconfigure the RAID controller on the PlateSpin Forge Appliance Hardware. Reconfiguring the RAID controller is not necessary unless you are adding or replacing hard disks in your Forge Appliance as part of the product rebuild.
For more information about choosing which RAID controller you should select for reconfiguring, see Table 1-1.
On first boot, you use the PERC Configuration utility to configure the RAID controller:
-
Press Ctrl+R at the RAID Controller boot prompt, approximately 24 seconds into the boot sequence.
-
Configure the PERC RAID controller to have multiple logical disks over a single RAID array (that is, a RAID 1, a RAID 5, or a RAID 6, based on your hardware):
-
Delete any existing disk groups:
IMPORTANT:Remember, deleting a disk group also deletes the data on that disk group.
-
Select a disk group and press F2.
-
Select .
-
Repeat Step 2.a.a and Step 2.a.b for all existing disk groups.
-
-
Create a new disk group for the Forge system:
-
Select the controller and press F2.
-
Select .
-
Select the value, press Enter, select the RAID controller type you need from the list, then press Enter again.
-
Select all available physical disks by selecting a disk item and pressing the Spacebar (disk sizes might vary).
-
Under , fill in the following fields:
- If the PERC Controller displays the disk size in MB, enter 307200. If the disk size is displayed in GB, enter 300.
- : Use ForgeSystem as the value.
-
Select and press Enter.
-
-
Create a new disk group for the Forge failover VMs:
-
On the page tree view, select _ (see Step 2.b.c) and press F2 to open the Operations dialog.
-
In the dialog, select to open the page.
-
On this the page, configure the new virtual disk for the failover by completing the following fields:
-
VD Size: Depending on the appliance you have, use the remaining disk space value as your default backup storage.
-
VD Name: Enter FailoverVMs.
Click when these fields are completed.
-
-
-
Configure the VD disks: to fast initialize:
-
On the page tree view, select > <> and press F2 to open the Operations dialog.
-
In the dialog, select > > .
-
Repeat Step 2.d.a and Step 2.d.b for each virtual disk.
-
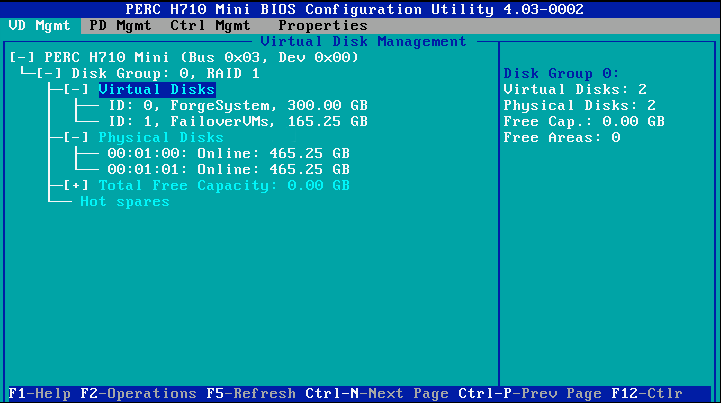
The final configuration screen for RAID 1 should look like this:
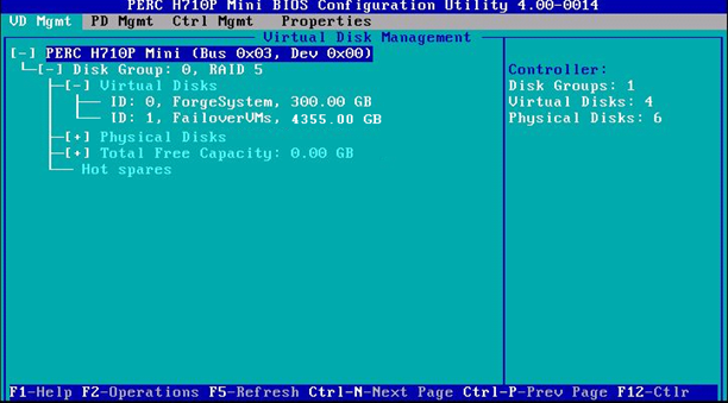
The final configuration screen for RAID 5 should look like this:
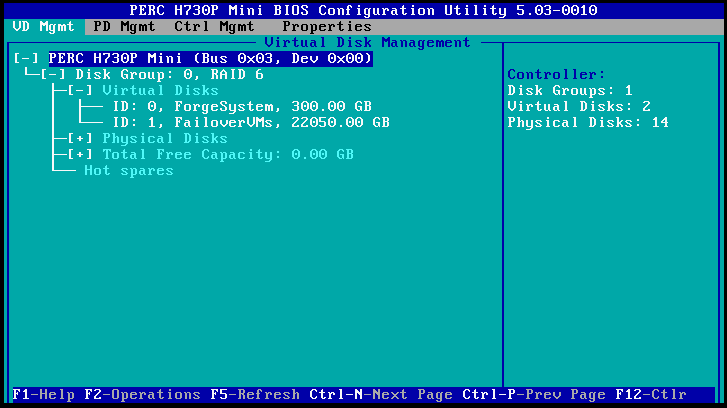
The final configuration screen for RAID 6 should look like this:
-
-
Press Esc to exit the controller configuration utility.
-
Press Ctrl+Alt+Del if you are prompted. The server reboots with the new settings.