2.5 Configuring PlateSpin Forge Default Options

2.5.1 Setting Up Automatic Email Notifications of Events and Reports

You can configure PlateSpin Forge to automatically send notifications of events and replication reports to specified email addresses. This functionality requires that you first specify a valid SMTP server for PlateSpin Forge to use.

SMTP Configuration

Use the PlateSpin Forge Web Interface to configure SMTP (Simple Mail Transfer Protocol) settings for the server used to deliver email notifications of events and replication reports.

Figure 2-1 Simple Mail Transfer Protocol Settings

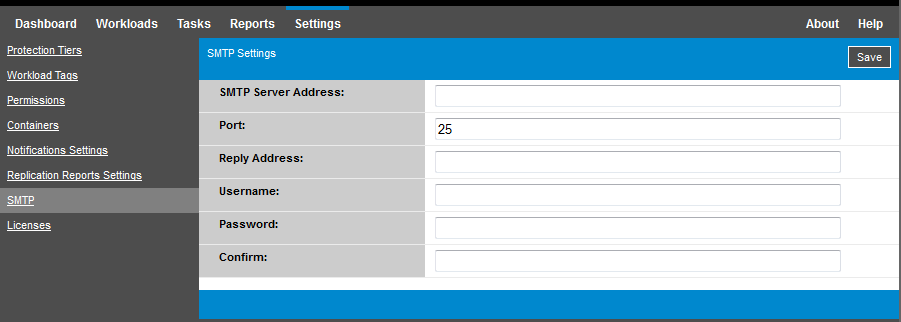
To configure SMTP settings:

  1. In your PlateSpin Forge Web Interface, click Settings > SMTP.

  2. Specify an SMTP server Address, a Port (the default is 25), and a Reply Address for receiving email event and progress notifications.

  3. Type a Username and Password, then confirm the password.

  4. Click Save.

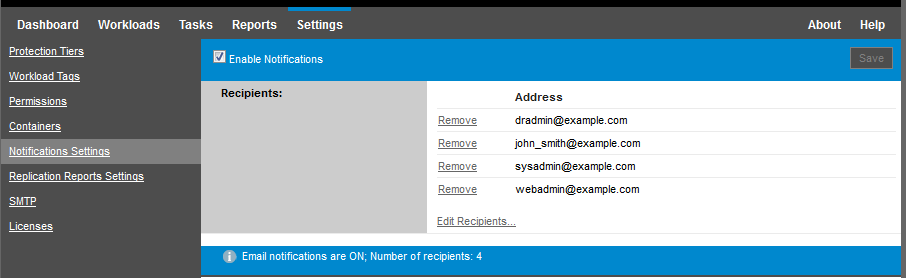
Setting Up Automatic Event Notifications by Email

To set up automatic event notifications:

  1. Set up an SMTP server for PlateSpin Forge to use. See SMTP Configuration.

  2. In your PlateSpin Forge Web Interface, click Settings > Notification Settings.

  3. Select the Enable Notifications option.

  4. Click Edit Recipients, type the required email addresses separated by commas, then click OK.

  5. Click Save.

    To delete listed email addresses, click Delete next to the address that you want to remove.

The event types shown in Table 2-5 can trigger email notifications if notification is configured. The events are always added to the System Application Event Log, according to the log entry types of Warning, Error, and Information.

NOTE:Although event log entries have unique IDs, the IDs are not guaranteed to remain the same in future releases.

Table 2-5 Events Types Organized by Log Entry Types

Event Types

Remarks

Log Entry Type: Warning

FullReplicationMissed

Similar to the Incremental Replication Missed event.

IncrementalReplicationMissed

Generated when any of the following applies:

  • A replication is manually paused while a scheduled incremental replication is due.

  • The system attempts to carry out a scheduled incremental replication while a manually-triggered replication is underway.

  • The system determines that the target has insufficient free disk space.

WorkloadOfflineDetected

Generated when the system detects that a previously online workload is now offline.

Applies to workloads whose protection contract’s state is not Paused.

Log Entry Type: Error

FailoverFailed


FullReplicationFailed


IncrementalReplicationFailed


PrepareFailoverFailed


Log Entry Type: Information

FailoverCompleted


FullReplicationCompleted


IncrementalReplicationCompleted


PrepareFailoverCompleted


TestFailoverCompleted

Generated upon manually marking a Test Failover operation a success or a failure.

WorkloadOnlineDetected

Generated when the system detects that a previously offline workload is now online.

Applies to workloads whose protection contract’s state is not Paused.

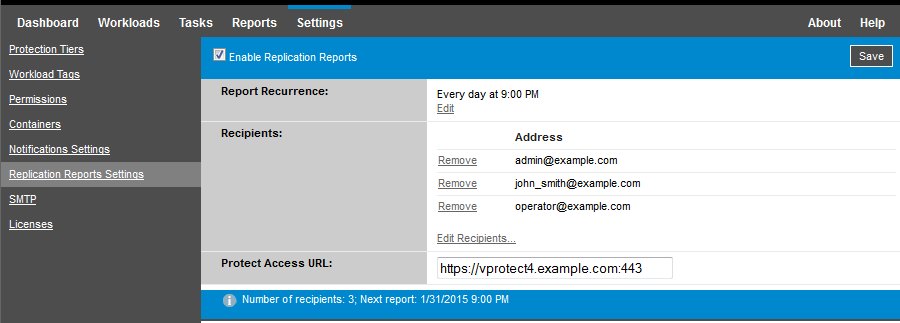
Setting Up Automatic Replication Reports by EMail

To set up PlateSpin Forge to automatically send out replication reports by email, follow these steps:

  1. Set up an SMTP server for PlateSpin Forge to use. See SMTP Configuration.

  2. In your PlateSpin Forge Web Interface, click Settings > Email > Replication Reports Settings.

  3. Select the Enable Replication Reports option.

  4. In the Report Recurrence section, click Configure and specify the required recurrence pattern for the reports.

  5. In the Recipients section, click Edit Recipients, type the required email addresses separated by commas, then click OK.

  6. (Optional) In the Forge Access URL section, specify a non-default URL for your PlateSpin Server (for example, when your Forge VM has more than one NIC or if it is located behind a NAT server). This URL affects the title of the report and the functionality of accessing relevant content on the server through hyperlinks within emailed reports.

  7. Click Save.

For information on other types of reports that you can generate and view on demand, see Generating Workload and Workload Protection Reports.

2.5.2 Language Setup for International Versions of PlateSpin Forge

PlateSpin Forge provides National Language Support (NLS) for Chinese Simplified, Chinese Traditional, French, German, and Japanese.

To use the PlateSpin Forge Web Interface and integrated help in one of these languages, the corresponding language must be added in your web browser and moved to the top of the order of preference:

  1. Access the Languages setting in your web browser:

    • Chrome:

      1. From the Chrome menu, click Settings, then scroll to and click Show advanced settings.

      2. Scroll to Languages, then click Language and input settings.

    • Firefox:

      1. From the Tools menu, select Options, then select the Content tab.

      2. Under Languages, click Choose.

    • Internet Explorer:

      1. From the Tools menu, select Internet Options, then select the General tab.

      2. Under Appearance, click Languages.

  2. Add the required language and move it up the top of the list.

  3. Save the settings, then start the client application by connecting to your PlateSpin Forge Server. See Launching the PlateSpin Forge Web Interface.

NOTE:(For users of Chinese Traditional and Chinese Simplified versions) Attempting to connect to the PlateSpin Forge Server with a browser that does not have a specific version of Chinese added might result in web server errors. For correct operation, use your browser’s configuration settings to add a specific Chinese language (for example, Chinese [zh-cn] or Chinese [zh-tw]). Do not use the culture-neutral Chinese [zh] language.

The language of a small portion of system messages generated by the PlateSpin Forge Server depends on the operating system interface language selected in your Forge VM:

To change the operating system language:

  1. Access your Forge VM.

    See Accessing and Working with the Forge Management VM in the Appliance Host.

  2. Start the Regional and Language Options applet (click Start > Run, type intl.cpl, and press Enter), then click the Languages (Windows Server 2003) or Keyboards and Languages (Windows Server 2008) tab, as applicable.

  3. If it is not already installed, install the required language pack. You might need access to your OS installation media.

  4. Select the required language as the interface language of the operating system. When you are prompted, log out or restart the system.

2.5.3 Using Tags to Help Sort Workloads

It is possible that the Workloads view of the Forge Web Interface might display a very long list of workloads. Sorting through these workloads to manage operations for similar workloads can become time-consuming.

To simplify workload list sorting, you can optionally attach identification tags to one or more workloads in your workload list, affiliating them with a unique color and description. When the tags are attached, you can sort the list by the tag attribute – grouping the similar tags together to facilitate mass selection for setting operations.

To set up workload tags:

  1. In the PlateSpin Forge Web Interface, click Settings > Workload Tags > Create Workload Tag. The Workload Tag Creation page is displayed.

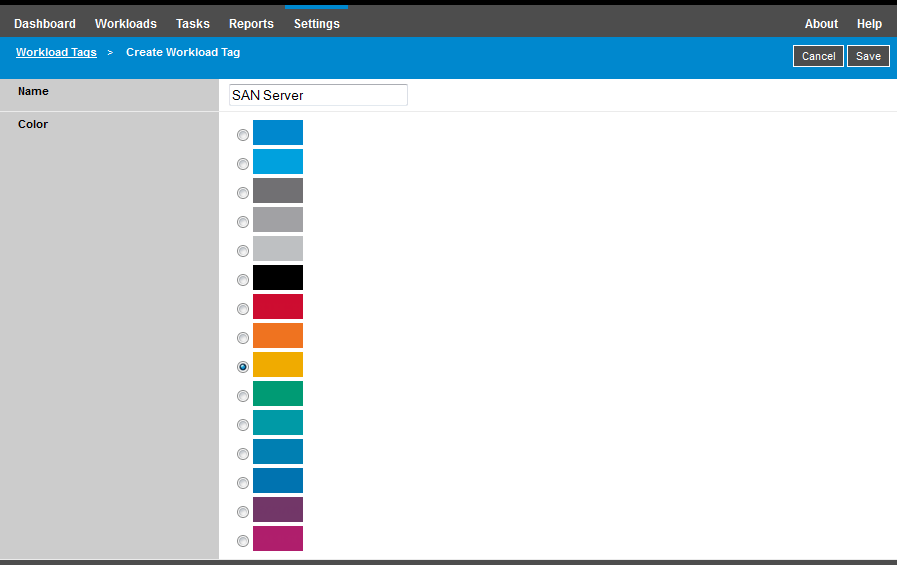
The page provides a way for you to specify a tag name (25-character limit) and associate a color with that description. You can create as many unique tags as you like, although the choice of unique colors is limited.

As you save a new tag, it is added to the list of available workload tags in the Workload Tags view of Settings page. In that view, you can edit or delete any of the tags in the list.

The Workloads page includes a Tag column where the single tag you associate with a workload is displayed. When you sort on this column, you can group the tags together to run available operations on those tagged workloads at the same time.

To associate a single tag with a workload:

  1. In the workload list, select the workload you want to tag, then click Configure to open its configuration page.

  2. In the Tag section of the configuration page, open the drop-down list, select the tag name you want to associate with the workload, then click Save.

More Tag Information

The following facts about workload tags are also important for you to know:

  • When you export a workload to a new server, its tag settings persist.

  • You cannot delete a tag if it is associated with any workload in the list.

  • To remove, or disassociate a tag from a workload, select the “empty” string from the drop-down list of tag names.

2.5.4 Configuring PlateSpin Server Behavior through XML Configuration Parameters

Some aspects of your PlateSpin Server’s behavior are controlled by configuration parameters that you set on a configuration web page residing your Forge VM at:

https://Your_PlateSpin_Server/platespinconfiguration/

NOTE:Under normal circumstances you should not need to modify these settings unless you are advised to do so by PlateSpin Support.

To change and apply any configuration parameters:

  1. From any web browser, open https://Your_PlateSpin_Server/platespinconfiguration/.

  2. Locate the required server parameter and change its value.

  3. Save your settings and exit the page.

No reboot or restart of services is required after the change is made in the configuration tool.

The following topics provide information on specific situations when you might need to change product behavior using an XML configuration value:

2.5.5 Optimizing Data Transfer over WAN Connections

You can optimize data transfer performance and fine tune it for WAN connections. You do this by modifying configuration parameters that the system reads from settings you make in a configuration tool residing on your Forge VM. For the generic procedure, see Configuring PlateSpin Server Behavior through XML Configuration Parameters.

Use these settings to optimize data transfers across a WAN. These settings are global and affect all replications using the file-based and VSS replications.

NOTE:If these values are modified, replication times on high-speed networks, such as Gigabit Ethernet, might be negatively impacted. Before modifying any of these parameters, consider consulting PlateSpin Support first.

Table 2-6 lists the configuration parameters that control file transfer speeds with the defaults and maximum values. You can modify these values through trial-and-error testing in order to optimize operation in a high-latency WAN environment.

Table 2-6 Default and Optimized File Transfer Configuration Parameters in https://Your_PlateSpin_Server/platespinconfiguration/

Parameter

Default Value

Maximum Value

AlwaysUseNonVSSFileTransferForWindows2003

False


FileTransferCompressionThreadsCount

Controls the number of threads used for packet-level data compression. This setting is ignored if compression is disabled. Because the compression is CPU-bound, this setting might have a performance impact.

2

N/A

FileTransferBufferThresholdPercentage

Determines the minimum amount of data that must be buffered before creating and sending new network packets.

10


FileTransferKeepAliveTimeOutMilliSec

Specifies ow long to wait to start sending keep alive messages if TCP times out.

120000


FileTransferLongerThan24HoursSupport

True


FileTransferLowMemoryThresholdInBytes

Determines when the server considers itself to be in a low memory state, which causes augmentation of some networking behavior.

536870912


FileTransferMaxBufferSizeForLowMemoryInBytes

Specifies the internal buffer size used in a low memory state.

5242880


FileTransferMaxBufferSizeInBytes

Specifies internal buffer size for holding packet data.

31457280


FileTransferMaxPacketSizeInButes

Determines the largest packets that will be sent.

1048576


FileTransferMinCompressionLimit

Specifies the packet-level compression threshold in bytes.

0 (disabled)

max 65536 (64 KB)

FileTransferPort

3725


FileTransferSendReceiveBufferSize

Specifies the TCP/IP window size setting for file transfer connections. It controls the number of bytes sent without TCP acknowledgement, in bytes.

When the value is set to zero (off), the default TCP window size is used (8 KB). For custom sizes, specify the size in bytes. Use the following formula to determine the proper value:

((LINK_SPEED(Mbps)/8)*DELAY(sec))*1000*1000

For example, for a 100 Mbps link with 10 ms latency, the proper buffer size would be:

(100/8)*0.01*1000*1000 = 125000 bytes

0 (8192 bytes)

max 5242880 (5 MB)

FileTransferSendReceiveBufferSizeLinux

Specifies the TCP/IP window size setting for file transfer connections for Linux. It controls the number of bytes sent without TCP acknowledgement, in bytes.

When the value is set to zero (off), the TCP/IP window size value for Linux is automatically calculated from the FileTransferSendReceiveBufferSize setting. If both parameters are set to zero (off), the default value is 248 KB. For custom sizes, specify the size in bytes.

NOTE:In previous release versions, you were required to set this parameter to 1/2 the desired value, but this is no longer required.

0 (253952 bytes)


FileTransferShutDownTimeOutInMinutes

1090


FileTransferTCPTimeOutMilliSec

Sets both the TCP Send and TCP Receive Timeout values.

30000


PostFileTransferActionsRequiredTimeInMinutes

60


2.5.6 Configuring Support for VMware vCenter Site Recovery Manager

You might use PlateSpin Forge to protect your workloads locally and then use some additional method to replicate those workloads to a remote location, such as a SAN. For example, you might choose to use VMware vCenter Site Recovery Manager (SRM) to replicate an entire datastore of replicated target VMs to a remote site. In this case, specific configuration steps are needed to ensure that the target VMs can be replicated and behave correctly when powered on at the remote site.

Workloads replicated by PlateSpin Forge and managed on VMware vCenter SRM can behave seamlessly if you configure PlateSpin Forge to support SRM by making the following adjustments:

  • Configure a setting to keep the PlateSpin Forge ISO and floppies on the same datastore as the VMware .vmx and .vmdk files.

  • Prepare the PlateSpin Forge environment to copy VMware Tools to the failover target. This involves some manual file creation and copying in addition to making some configuration settings that expedite the VMware Tools installation process.

To ensure that the workload files are kept on the same datastore:

  1. From any web browser, open https://Your_PlateSpin_Server/platespinconfiguration/to display the configuration web page.

  2. On the configuration web page, locate the CreatePSFilesInVmDatastore server parameter and change its value to true.

    NOTE:The person configuring the replication contract is responsible to ensure that the same datastore is specified for all target VM disk files.

  3. Save your settings and exit the page.

VMware Tools setup packages can be copied to the failover target during replication so that they can be installed by the configuration service when the VM is booted. This happens automatically when the failover target is able to contact the PlateSpin Forge Server. In cases where this cannot happen, you need to prepare your environment prior to replication.

To prepare your environment:

  1. Retrieve the VMware Tools packages from an ESX host:

    1. Secure copy (scp) the windows.iso image from the /usr/lib/vmware/isoimages directory on an accessible VMware host to a local temporary folder.

    2. Open the ISO and extract its setup packages, saving them to an accessible location:

      • VMware 5.x: The setup packages are setup.exe and setup64.exe.

      • VMware 4.x: The setup packages are VMware Tools.msi and VMware Tools64.msi.

  2. Create OFX packages from the setup packages you extracted from the VMware Server:

    1. Zip the package you want, making sure that the setup installer file is at the root of the .zip archive.

    2. Rename the .zip archive to 1.package so that it can be used as an OFX package.

      NOTE:If you want to create an OFX package for more than one of the setup packages, remember that each setup package must have its own unique .zip archive.

      Because each package must have the same name (1.package), if you want to save multiple .zip archives as OFX packages, you need to save each in its own unique subdirectory.

  3. Copy the appropriate OFX package (1.package) to %ProgramFiles(x86)%\PlateSpin\Packages\%GUID% on the PlateSpin Server. The value of %GUID% depends on the version of your VMware Server and its VMware Tools architecture.

    The following table lists the server versions, VMware Tools architecture and the GUID identifier you need to copy the package to the correct directory:

    VMware Server Version

    VMware Tools Architecture

    GUID

    4.0

    x86

    D052CBAC-0A98-4880-8BCC-FE0608F0930F

    4.0

    x64

    80B50267-B30C-4001-ABDF-EA288D1FD09C

    4.1

    x86

    F2957064-65D7-4bda-A52B-3F5859624602

    4.1

    x64

    80B1C53C-6B43-4843-9D63-E9911E9A15D5

    5.0

    x86

    AD4FDE1D-DE86-4d05-B147-071F4E1D0326

    5.0

    x64

    F7C9BC91-7733-4790-B7AF-62E074B73882

    5.1

    x86

    34DD2CBE-183E-492f-9B36-7A8326080755

    5.1

    x64

    AD4FDE1D-DE86-4d05-B147-071F4E1D0326

    5.5

    x86

    660C345A-7A91-458b-BC47-6A3914723EF7

    5.5

    x64

    8546D4EF-8CA5-4a51-A3A3-6240171BE278

Expediting the Configuration Process

After the failover target boots, the configuration service launches to prepare the VM for use, but sits inactive for several minutes, waiting for data from the PlateSpin Server or looking for VMware Tools on the CD ROM.

To shorten this wait time:

  1. On the configuration web page, locate the ConfigurationServiceValues configuration setting, and then change the value of its WaitForFloppyTimeoutInSecs subsetting to zero (0).

  2. On the configuration web page, locate the ForceInstallVMToolsCustomPackage and change the value to true.

With these settings in place, the configuration process takes less than 15 minutes: the target machine reboots (up to two times), the VMware tools are installed, and SRM accesses the tools to help it configure networking at the remote site.