8.5 Backing Up, Copying, and Restoring Configurations

Configurations are copied for two main reasons: to have a backup copy to use for a system restore if necessary and to copy a configuration from one machine to another.

An Operations Center configuration might need to be copied from one machine (source) to another (target) machine for other reasons including:

  • Promoting a test server configuration to a production server

  • Two identical Operations Center servers are configured for fault tolerance (high availability) purposes

  • A backup copy of customizations to the Operations Center configuration needs to be created without retaining the entire directory structure

  • After upgrading Operations Center, copy the configuration settings from the default database to a new external database

There are multiple ways to copy a full or partial configuration from one Operations Center server to another:

When importing and exporting files, verify that the Operations Center installation directory name and location are consistent on the source server and the target server.

8.5.1 Using the Configuration Storage Database File

Copy entire configurations from an Operations Center server by copying one file, when

  • The configuration is stored in a Configuration Storage data store located in the embedded Object ODB database (which is the default) versus an external database.

  • Both Operations Center servers are stopped.

To copy a Operations Center configuration when both servers are not running:

  1. If the target Operations Center server has Operations Center software installed, delete the /OperationsCenter_install_path/configstore/.$default.odb$ file.

  2. Shut down both servers.

  3. Copy the /OperationsCenter_install_path/configstore/default.odb file that contains the configuration to the /OperationsCenter_install_path/configstore directory on the target server.

    Do not copy any other files.

  4. Restart the target Operations Center server.

8.5.2 Using the Configuration Explorer

Use the Configuration Explorer when both Operations Center servers are stopped to either copy the open configuration to another configuration or to import and export full configurations:

Copying a Configuration from One Server to Another

  1. In the left pane of the Configuration Explorer, select a configuration to copy.

  2. Click Edit > Copy to open the Copy Configuration dialog box:

    Copy Configuration Dialog Box
  3. In the Copy Configuration dialog box, select a destination configuration.

  4. Click OK.

    The current configuration is copied the other configuration.

  5. If the target configuration contains data and the following dialog box displays, overwrite the existing data by clicking Yes:

    Configuration Manager Confirmation Dialog Box

Exporting a Configuration

  1. Select the configuration you want to export.

  2. Click File > Export.

  3. Select a location and file name, then click OK.

    If you receive an error, verify that the option to preload all elements on configuration open in selected in the dialog box accessed under Edit > Options.

Importing a Configuration

  1. Stop the Operations Center server and the Dashboard service.

  2. Open the moscfg.bat file (located by default in C:\NetIQOperationsCenter\NOC\bin).

  3. Click File > Import.

  4. Select a configuration file, and then click OK.

  5. Close the Configuration Explorer.

  6. (Conditional) If the configuration file that you are importing was created on an earlier date than the adapters.ini file or if the configuration file contains adapters that are not currently present in the Operations Center server, delete the adapters.ini file (located by default in C:\NetIQOperationsCenter\NOC\database\shadowed).

  7. Start the Operations Center server and the Dashboard service.

8.5.3 Using the Exportcfg and Importcfg Utilities

Use the exportcfg and importcfg utilities to copy a Operations Center configuration on UNIX or Linux systems (Linux, Solaris), which requires access to an X display. The utilities do not display a user interface, but use the X display to initialize a hidden client that communicates with the server.

Use the exportcfg and importcfg when the Operations Center servers are running.

To copy an Operations Center configuration using the exportcfg and importcfg utilities:

  1. At a command prompt on the server that contains the configuration to copy, enter the exportcfg command:

    • exportcfg dname filename

      For example,

      exportcfg "" allData.config.xml
      exportcfg root=Locations Locations.config.xml
      
    • To export for use in an on-line backup:

      exportcfg filename hostname port userid password dname [exportRelationships] [exportRelatedElements] [propertyFilter [excludeFilter]

      For example,

      exportcfg all.config.xml localhost 80 admin formula root=Organizations
      
    • To attempt to connect to the named configuration for use in off-line backup while the server is down:

      exportcfg -cold configurationName userid password dname [exportRelationships] [exportRelatedElements] [propertyFilter] [excludeFilter

      The -cold command can only be run locally. If using an object-oriented database, you must stop the server before using the -cold command.

      For example,

      exportcfg -cold all.config.xml MyDB admin formula root=Organizations
      

    The following table explains the replaceable parameters used with the exportcfg command:

    Replace…

    With…

    filename

    The name of the configuration file created on the Operations Center server to which the configuration is being copied.

    hostname

    The Operations Center server name.

    port

    The port number for the Operations Center server.

    configurationName

    Name given to the configuration specified in Configuration Manager.

    Default: default.

    userid

    User ID with Administrator rights used to access the Operations Center server. Providing the User ID prevents the server from requesting it.

    password

    Password for the User ID with Administrator rights used to access the Operations Center server.

    dname

    The DName of the element to export. Use “” for the Enterprise root.

    exportRelationships

    Exports all relationship with the configuration, expressed as True or False.

    exportRelatedElements

    Exports elements the relationships refer to. If elements are defined on the server to which the configuration is being copied, the importcfg command overwrites them.

    propertyFilter

    Named properties that are to be exported.

    excludeFilter

    As an inverse of the above option, use this option to specify named properties that are not to be copied, based on a regular expression.

  2. Enter importcfg at a command prompt on the server on which the configuration is to be installed using the following syntax:

    importcfg filename removeDeleted
    

    The following table explains the replaceable parameters used with the importcfg command:

    Replace…

    With…

    filename

    The name of the configuration file to be imported.

    removeDeleted

    true: existing elements and relationships not referenced by the configuration file are removed.

    false: all existing elements and relationships remain on the server.

    To learn more about this functionality, see Step 3 in Importing Configuration Files.

    For example:

    importcfg allData.config.xml true
    
    importcfg Locations.config.xml false
    
  3. Enter the Web server hostname at the command prompt.

  4. Enter the Web server port at the command prompt.

  5. If you did not provide your User ID and password as part of the exportcfg command, enter the User ID and password at their respective command prompts.

    The configuration is copied.

8.5.4 Using Import/Export from the Operations Center Console

Configuration imports and exports of full or partial configurations can be done via the Operations Center console. The advantage of the Configuration Import/Export feature is that the Operations Center servers need not be stopped.

The console Import/Export feature allows you to copy a specified hierarchy of elements from one server and import it into another server including the:

  • Element relationships

  • Related elements

  • Element properties

  • SCM definitions

  • Layout SVG drawings

  • SLA definitions including SLA calendars (applies to Service Model elements only)

The console Import/Export feature was designed to copy the Services > Service Models hierarchy, but can also be used an some Administration branches such as:

  • Adapters

  • Metamodel

  • Graphics

  • Security

  • Server > Algorithms

  • Server > Operations Definitions

  • Time Management > Calendars (Does not include Blackout Calendars which are exported along with Element Properties.)

However, the console Import/Export feature is NOT used for Database Definitions, Data Warehouse, Jobs, BDI adapter definitions, Automation, Scripts, Schedules, Time Categories, Service Level Agreements.

The Operations Center console has import and export functionality available:

Exporting a Configuration File

If elements are already defined on the target server and you copy only the relationships, the relationships remain intact. If you copy the related elements, then the elements and their properties overwrite those on the target server.

As an example of exporting relationships with a server configuration, assume that you want to export a view with ACLs intact, but you do not want to copy the user credentials to the target system. The relationship is between the ACL and the user. If you do not export related elements, then the user’s password is left intact on the target system.

If the target server doesn’t have the related elements, they can be created. This can occur in the case of a relationship between an element in the Service Models hierarchy and an element in the Elements hierarchy. In this case, to construct the relationship, the target element must be defined in Configuration Storage. It does not, however, affect any potential algorithm settings, or other property data related to the target element.

To export a configuration file:

  1. In the Explorer pane, expand Administration.

  2. Right-click Server, select Configuration > Export to open the Export Configuration dialog box:

    Export Configuration Dialog Box
  3. For Select Element(s) to Export, click Browse and navigate to the elements to export, then click OK to display the selected elements.

    Select the portion of the tree to export. All elements under the selected element are exported as well as all the relationships. To export only the elements and no relationships (just the Elements hierarchy), select Elements in the hierarchy under Enterprise. To export the entire hierarchy, select Enterprise.

  4. For Select the Destination File, click Browse and navigate to the location where you want to export the element, then click Open to display the selected location in this field.

  5. Specify the items to export: with the following settings:

    Export Element Relationships: Select this option to export only the relationships and not the elements themselves, if the elements are defined on the target server. Property data is not exported.

    Export Related Elements: Select this option to export the elements referred to in the relationships and the associated properties. If imported, the elements and properties on the target server are overwritten.

    Restrict Exported Properties To: Use this option to specify properties to copy, based on a regular expression. For example, specify SVG_Drawing, and no ACLs or other property data other than the SVG_Drawing property are exported. Assume that you export drawings associated with the elements in a portion of the hierarchy. Use the wildcard “*” to identify any text. For example, use SVG.* to export the same properties as SVG_Drawing. Use the “|” (pipe) character to separate a list of properties. For example, SVG.*|acl.* exports SVG Drawings as well as ACLs.

    Exclude Exported Properties To (Regular Expression): As an inverse of the above option, use this option to specify properties that are not to be copied, based on a regular expression.

  6. Click OK to export the configuration.

Importing a Configuration File

Before importing a configuration file, be sure the file meets the requirements for well-formed imported XML code containing necessary DTD headers, and the basic XML tags and commands for elements and views.

To import a configuration file:
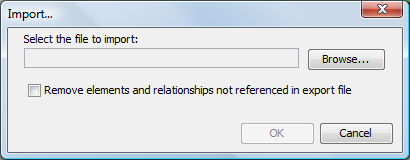
  1. In the Operations Center console Explorer pane, right-click the Server element, then select Configuration > Import to display the Import dialog box:

  2. In the Select the File to Import field, click Browse and navigate to the location to which you want to import the configuration.

  3. (Optional) Select the Remove Elements and Relationships Not Referenced in the Export File check box.

    This action is taken before importing the configuration file.

    There could be situations in which you delete elements in one system and want to import this modified configuration to a second system, and automatically delete elements in the second system that are not in the latest imported configuration file.

    Elements that are generated by adapters do not display after importing until an adapter creates them. If you have set an algorithm on an element, it should be reapplied when the adapter creates the element, because there is a reference to that element in Configuration Storage.

  4. Click OK to import the configuration.

8.5.5 Using NOC Script to Import and Export Configuration XML Files

Use NOC Script to perform and import and export of configurations:

Exporting Configuration Files

The following sample code exports a configuration file:

var server = formula.Root.findElement('formulaServer=Server/root=Administration')
var dname = element.dname;
formula.log.info( "Exporting the hierarchy starting at " + dname);
server.perform(session, "Config|ExportSilent", [], [ dname, 'd://OperationsCenter_install_path//cstest.xml']);

Replace the following variables:

element.dname

Replace with the DName of the element to export.

d://OperationsCenter_install_path//cstest.xml

Replace with the path and export file name.

Importing Configuration Files

The following sample code imports a configuration file.

var server = formula.Root.findElement('formulaServer=Server/root=Administration') 
server.perform(session, "Config|ImportSilent", [], ['d://OperationsCenter_install_path//cstest.xml']);

Replace the following variables:

d://OperationsCenter_install_path//cstest.xml

Replace with the path and export file name.

Understanding XML File Structure

Any structure in your Service Models hierarchy can be translated into an XML file using the Export command. The file can then be edited for required changes or shared with other installations.

The well-formed XML contains basic tags and commands. At the simplest level, the XML file must contain this basic structure:

<views>
  <tree>
    <element>element definition tags</element>
  </tree>
</views>

Imported XML files need to be well-formed XML files containing necessary DTD headers, as shown in the following example XML code. This code creates a hierarchy with Test Element as the top element with a native child (Child Element) and a link to an existing technology branch (Tivoli TEC+):

<!DOCTYPE views PUBLIC "-//Managed Object Solutions, Inc.//DTD views 1.0//EN" "http://www.ManagedObjects.com/dtds/views_1.0.dtd">

<views destroy="no">
    <tree start_at="root=Organizations">
      <element> 
        <name>Test Element</name>
        <class>org</class> 
        <displaySourceElements>false</displaySourceElements> 
        <contact>Jim</contact> 
        <company>Enigma Corp</company> 
        <address>394 First Street, Fairfax, VA</address> 
        <phone>703-555-1212</phone> 
        <email>test@mo.com</email> 
        <secure name="simple" related="yes" self="yes" children="no"> 
          <grant names="GroupOne,GroupTwo" permissions="view,manage,access,define"/> 
          <deny names="GroupThree" permissions="access,define"/> 
        </secure>
        <element>
          <name>Child Element</name>
          <class>org</class>
          <displaySourceElements>true</displaySourceElements>
          <contact>John</contact>
          <company>Enigma Corp</company> 
          <address>394 First Street, Fairfax, VA</address> 
          <phone>703-555-1212</phone> 
          <fax>703-555-3939</fax> 
          <pager>322-325-3565</pager> 
          <sref name="simple"/> 
          <relate kind="ORG">script=TivoliTec+/root=Elements</relate> 
        </element>
      </element>
     </tree>
</views>

Understanding XML Tags

Table 8-3 provides description of main XML tags used for the creation of Service Views.

Table 8-3 Upper Level XML Tags

Tag

Description

<views>

The initial tag provided in the XML stream that establishes the processing mode for the additional XML commands that follow. There can be only one <views> tag defined per XML file. The following attribute is specified for an <element> tag:

destroy: Specifies if the file runs in destructive or nondestructive mode. Set it to Yes (destructive) to replace all existing elements with only those element definitions provided in the XML file. The default is No (nondestructive), which updates the properties of existing elements, retains existing elements, and updates the elements listed in the XML file.

<tree>

Use within the <view> tag to specify a hierarchy of elements to build. The following attribute is specified for a <tree> tag:

start_at: Specifies the root for the new hierarchy to enable constructing a branch at any point. If the root is not specified, the default is Organizations. For example, to modify the structure under the Northeast location, specify:

<tree start_at="org=Northeast/root=Organizations">

<create>

Use within the <view> tag to add elements. If an element already exists, it is updated and a log message is generated.

<delete>

Use within the <view> tag to remove elements. The <delete> tag cannot contain nested <element> subtags.

<modify>

Use within the <view> tag to update specific elements. If the element does not exist, it is created and a log message is generated.

<update>

Use within the <view> tag to update elements while retaining an existing hierarchy. If the element does not exist, it is created and a log message is generated.

<element>

Use within the <tree>, <create>, <delete>, <modify>, or <update> tags to define elements. A complete hierarchical structure can be defined using nested <element> tags. The following attributes are specified for an <element> tag:

  • auto_relate_children: Set to Yes to automatically create relationships with children elements. The default is Yes.

  • prevent_secure: Set to Yes to not apply the element security to the child. The default is Yes.

The <element> tag contains subtags that fully define attributes about the element including the element ID, properties, security information, and child relationships. The <name> and <class> tags are used to form the DName for the generated element.

For a list of element-related tags, see Table 8-4.

Because the <update>, <create>, <delete>, and <modify> tags do not use a start_at attribute, top-level <element> tags must have a <dname> or <name>, <class>, and <parent> combination of subtags declared. Nested elements only require <name> and <class>, or a <dname> to be defined.

IMPORTANT:The <create>, <delete>, <modify>, and <update> tags do not prune the hierarchy even if view is set to destroy. They also do not change (or create) auto-related children.

Element Property Tags

The tags listed in Table 8-4 are nested within an <element> tag and specifically define the properties of the element.

Table 8-4 Element Definition Tags

Element Tag

Specifies…

<Lat>

The numeric value for the latitude of the location. Used specifically for elements native to the Locations hierarchy.

<Long>

The numeric value for the longitude of the location. Used specifically for elements native to the Locations hierarchy.

<address>

The mailing address for the contact person.

<algorithm>

The type of algorithm used to calculate the element’s condition.

<algorithmDisseminates>

If True, child elements inherit algorithm settings. If True,StopAtNoChildren, algorithms apply to all child elements except those with no children. If True,StopAtNoDiscoveredChildren, algorithms apply to all child elements except those with no discovered children (discovery is not forced). These settings do not apply to matched children.

<algorithmParameters>

A semicolon-delimited list of algorithm parameters if required based on type specified in the <algorithm> tag.

<class>

The class of the location. If <tree start_at="root=Organizations"> is specified for the <tree> tag, the class specified for direct children (1st level) elements must be org. Otherwise, the class is not recognized by the system.

<company>

The company name for the contact person.

<contact>

The name of the contact person.

<displaySourceElements>

If True, matched elements display under the element as children. If False, matched elements do not display as children, but do contribute to the element’s state.

<dname>

The name and class attributes are used to form the DName for the generated element.

<element>

Nests another element as a child under the element.

<email>

The e‑mail for the contact person.

<fax>

The fax number for the contact person.

<graphic>

A graphics file to show for the element in the Layout view. Use a relative path to the image file; the path specified in the XML file is appended to the mos/html directory.

<ignoreChildAlarms>

If True, alarms from all children are not propagated to the element.

<matches>

A regular expression or class expression used to match elements.

<name>

The short name of the element.

<pager>

The pager number for the contact person.

<parent>

The DName of the parent element if the <element> tag is not nested within another <element> tag.

<phone>

The phone number for the contact person.

<propagateSecurity>

If True, security permissions from the element are inherited by matched children.

<relate>

Bind an element from any place in Operations Center by using the <relate> tag. The <relate> tag specifies a child relationship for the enclosing <element> tag. The <relate> tag accepts the following attributes:

  • prevent_secure: If Yes (checked), element security is not applied to the child.

  • kind: Defines the relationship type. Initially set to ORG (the default), but in the future could be set to another kind of relationship.

<script>

A script used to match elements.

<secure>

Security permissions for the element. Each <secure> tag can have the following attributes:

  • name: Name of the security definition which allows you to invoke it again using the <sref> tag.

  • related: If Yes (checked), applies the security permissions to all elements specified using <relate> tags, where kind=ORG. The default is No (unchecked).

  • self: If Yes (checked), applies security permissions to the element itself.

  • children: If Yes (checked), applies security to children of the element.

  • mergeRelated: If Yes (checked), applies the grant or deny security entries to the security of the related element. If No (unchecked), the existing security is not used. The default is Yes.

Within the <secure> tag, use the <grant> or <deny> tags to define actual permissions. The following attributes are specified for <grant> and <deny> tags:

  • names: A comma-delimited list of users or groups who are granted or denied permission to the element.

  • permissions: A comma-delimited list of permissions. The current list includes view, access, define, and manage.

HINT:Applying security access to groups that you’ve defined is a more efficient method of applying security, rather than assigning security to each individual element defined within the XML file. It also enables an easier method of tracking a user’s security level.

<serf>

A reference to previously defined security permissions using the <secure> tag. Specify the name of the <secure> tag to reference. Using <serf> allows security definitions to be easily reused.

<url>

A Web site address for the contact person or company.

8.5.6 Using NOC Script to Backup the Configuration to an ODB Database File

Using Operations Center scripting capability, there is a fast and easy way to export an entire configuration to an Object database (.odb) format. This configuration can then be saved as a backup for use if a system restore is needed, or used to copy the configuration to another Operations Center server.

The syntax for the job script is:

formula.util.snapshotConfig( filename, directory )

where filename is the name of the file to export to, and directory is its location.

Both parameters are optional. If filename is omitted, the snapshot name takes the form of snapshot.timestamp.odb (for example, snapshot.20071011151144.odb).  If directory is omitted, the default location for files is $Install/configstore.