3.2 Managing a Model Repository Structure
When you set up the SNMP adapter, it is necessary to create a model structure to organize data originating from the MIBs.
Three types of objects are available to create the structure for the Model Repository:
-
Containers: Placeholder objects, similar to a folder, that can logically group other, “contained” objects.
For more information, see Section 3.2.2, Creating Repository Containers.
-
Collectors: Containers that can also have properties that point directly to specific MIB values within an agent. Collectors allow you to select managed objects from wherever they normally live in the Model Repository and collect them in one central place.
For more information, see Section 3.2.3, Creating Repository Collectors.
-
Branches: Allows selecting a MIB branch from an exact point downwards in the MIB metadata tree.
For more information, see Section 3.2.4, Creating Repository Branches.
The following sections provide instructions on creating structure for the Model Repository:
3.2.1 Browsing the Model Repository
To browse the model repository:
-
In the pane, expand the root element.
-
Right-click the element, then select to open the Browse Model Repository dialog box:

-
Double-click each item to browse its branch of the tree.
Selecting an item shows basic information displayed in the pane to the right.
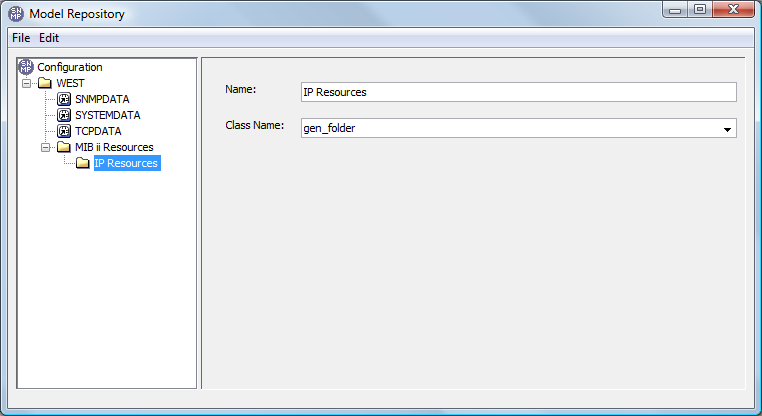
3.2.2 Creating Repository Containers
A container is simply a placeholder object that can be used to logically group other, “contained” objects. A container is analogous to a folder.
Adding Containers to the Model Repository
To add containers to the model repository:
-
In the Browse Model Repository dialog box, right-click an item, then select > .
A new container (folder) is added to the tree view:
-
Use the fields displayed in the right pane to update the name and class for the new container.
Removing a Container from the Model Repository
To remove a container from the model repository:
-
In the Browse Model Repository dialog box, right-click a container, then select .
The container is removed from the tree.
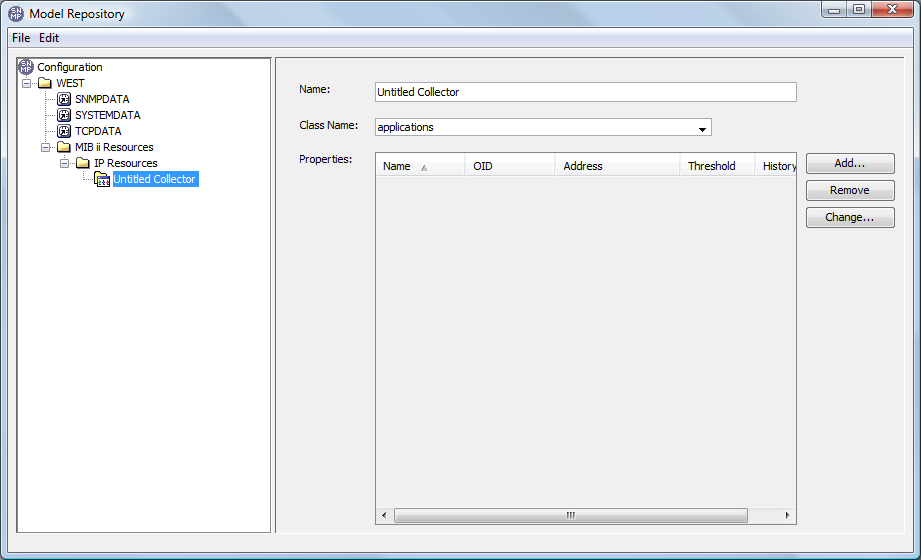
3.2.3 Creating Repository Collectors
Collectors allow you to select managed objects from various locations and collect them in a central place. A collector is a container that also is made up of properties, which point directly to specific MIB values within an agent. These properties can have user-defined thresholds assigned to them, which is a way to model state within the adapter.
Adding Collectors to the Model Repository
To add collectors to the model repository:
-
In the Browse Model Repository dialog box, right-click an item, then select > .
A new collector is added to the tree view.
-
Specify the name and class for the collector.
-
Continue to Adding Properties to a Collector.
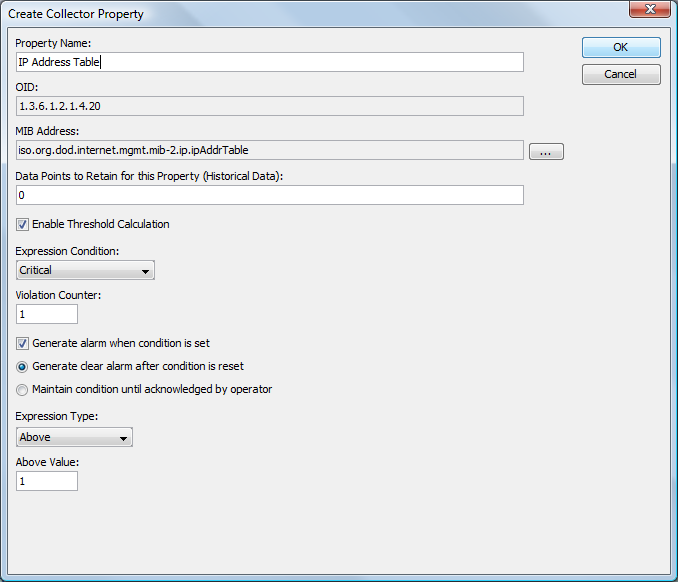
Adding Properties to a Collector
To add properties to a collector:
-
In the Browse Model Repository dialog box, browse, then select the collector item.
-
Click to open the Create Collector Property dialog box:
-
Specify a name for the property.
-
Under , click
 () to browse, then select the appropriate MIB node.
Making a selection fills in the and fields.
-
(Optional) Specify for this property (Historical Data).
-
(Optional) Select the check box to specify conditions for generating alarms.
Then, specify the condition threshold values:
-
From the drop-down list, select the element condition that triggers the element condition change alarm.
This is used in conjunction with the value.
-
In the field, specify the number of times the threshold can be reached before the element condition change is issued.
For example, if the is Critical and the is 2, an element condition change is issued after an element reaches the Critical condition twice.
-
-
Select the check box to issue an alarm when the threshold is violated using the and values.
If deselected, no alarm is issued.
Then, select one of the following options to determine which action is performed after an alarm is issued:
-
Generate clear alarm after condition is reset: Clears the alarm when the element’s condition is reset.
-
Maintain condition until acknowledged by operator: Locks the element’s condition until it is manually released when the alarm is acknowledged.
-
-
Define the violation trigger threshold using an and corresponding settings together to define the violation trigger threshold:
Expression Type
Evaluates Expressions…
Above
Above the specified value.
Below Value
Below the specified value.
Between
Containing values between the specified minimum and maximum.
String
Whose results match the specified string.
Define the string value using equals, contains, starts with, ends with, or matches (regex) operators.
Select the check box to evaluate the inverse of the string specified.
For example, select as the Expression Type to monitor values that exceed the number specified in the Expression's field.
-
When the definition is complete, click to save the collector property.
Editing Collector Properties
To update collector properties:
-
Select the property item in the Collector Property list.
-
Click to open the Edit Collector Property dialog box.
-
Update the information, then click .
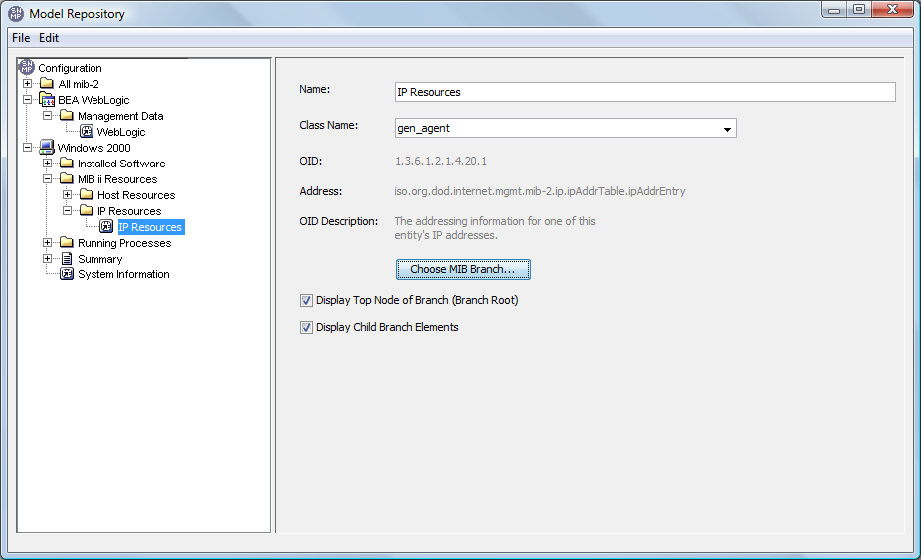
3.2.4 Creating Repository Branches
Branches are extracted from the MIB metadata tree. A branch is a convenient monitoring point that allows a whole class of information to be duplicated within Operations Center from the target host/device.
Keep in mind when creating a branch object, that potentially a large amount of data must be collected to build the branch hierarchy; using a small subset of a MIB branch is likely the best approach to collecting this data.
To add branches to the Model Repository:
-
In the dialog box, right-click a folder or container, then select > .
A new branch is added to the tree view:
-
Use the properties displayed in the right pane to update the name and class for the new branch.
-
Click to browse, then select the appropriate MIB branch.
-
Select the check box to display the top object of the branch as a child element.
-
Select the check box to show all child elements of the selected branch in the hierachy tree.
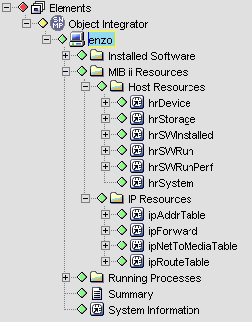
In the figure in Step 1, child branches for the IP Resources branch are selected for display. Therefore, any host or device element set up in Operations Center with Windows 2000 as a selected model automatically has the child elements under the element, as shown in Figure 3-4. Notice how the entire structure under the element corresponds to the Windows 2000 structure, as set up in the Model Repository.
Figure 3-4 Selected branches defined in the Model Repository display under the enzo element in the Operations Center console