9.3 Using Jobs
You can use a job to run scripts. Jobs, which are configured and managed in the Operations Center console, can be run, scheduled, enabled and disabled, and stopped. You can also view the status of jobs and change the definition of jobs.
Review the following sections for how to use jobs in Operations Center:
9.3.1 Accessing Jobs
To view job definitions, in the Operations Center console under Enterprise, click Administration > Time Management > Jobs. An element for each job definition displays.
9.3.2 Scheduling Jobs
Scheduling a job requires defining when it will run, associating a script to run, and enabling the job.
To schedule a job:
-
In the Explorer pane, expand Administration > Time Management.
-
Right-click Jobs, then select Create Job.

-
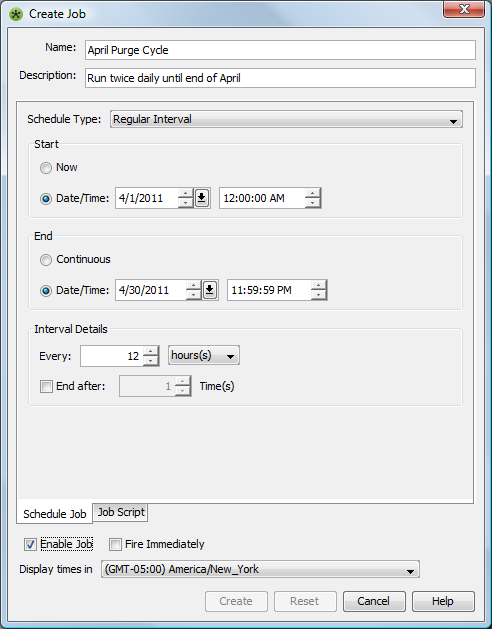
Click the Schedule Type drop-down list, then select the job’s schedule type:
Cron String: Runs the job based on the time interval specified by a raw cron string.
For more information on cron strings, see Cron String.
Regular Interval: Runs the job at a particular time interval for an optional number of times.
Specify one of the following as a start time:
-
Now: To start the job immediately.
-
Date/Time: A specific start date and time.
Specify one of the following for an end date/time:
-
Continuous: No end date/time.
-
Date/Time: A specific end date and time.
Select an interval (minutes, hours, months, and so on).
End the job after a certain number of runs by specifying the number of times to run the job.
Daily Interval: Runs the job every day or every x number of days, at the specified time interval.
Specify one of the following as a start time:
-
Now: To start the job immediately.
-
Start Date: A specific start date and time.
Specify one of the following as an end date:
-
None: No end date.
-
End Date: A specific end date.
Specify how often to run the job during a day:
-
Once: Runs the job once as the specified start time.
-
Every: Runs the job at the specified time interval (seconds, minutes, hours).
Specify the daily interval to run the job. For example, enter 5 to run the job every five days at the specified frequency.
Weekly Interval: Runs the job on a weekly basis, on particular days of the week.
Specify a start and end date.
Specify a daily frequency as described above for the Daily Interval schedule.
Select the weekly interval by entering a number. For example, enter 2 to run the job every two weeks.
Select the days of the week when the job runs. Use Work Week to select Monday through Friday; use Weekend to select Saturday and Sunday; or, select All.
Monthly Interval: Runs the job on a monthly basis.
Specify a start and end date.
Specify a daily frequency as described above for the Daily Interval schedule.
Select one of the following for the monthly interval:
-
Day x of every y month: Runs the job on a specific day of the month (enter 1 for the first day) of every x month. For example, enter 3 to run every three months.
-
The x y of every z month: Runs the job on the first, second, third, fourth or last day (or specific day) of every z months. For example, specify the last Friday of every fourth month.
-
-
Complete the options appropriate for the schedule type selected.
If the Regular Interval schedule type is selected with a start date/time, consider selecting the Fire Immediately check box to run the job as soon as it is created, rather than waiting for the next date/time interval before starting.
If you do not fire the script immediately, the script starts at the next specified interval after the Operations Center server starts.
-
Select a time zone from the Display Times In drop-down list.
Either select the time zone for starting and ending the job, or use the local host time for either the Operations Center server or the client.
If the job can be executed from servers in different time zones, consider selecting Server Default Time Zone, which uses the local server’s time zone (as defined by its operating system).
Select the Do Not Adjust Execution Time for Time Zone check box to use the job’s specified start and end times based on the local server’s time zone, and not add or subtract hours when the job restarts on a server with a different time zone. Leave this check box unmarked to adjust the start and end times when the server time zone changes.
-
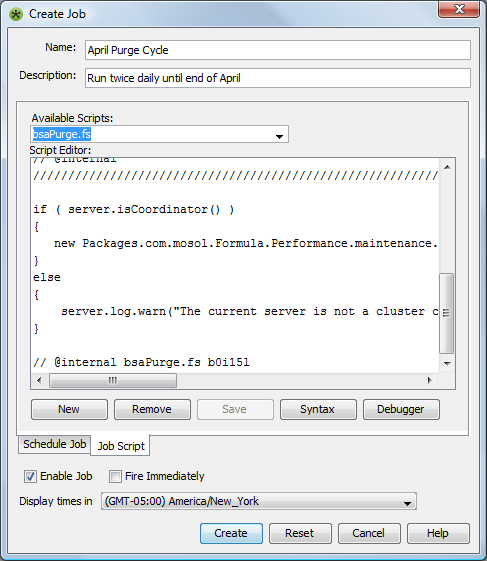
Click the Job Script tab to specify the script to run.
When defining the script that will run for the job, either select an existing script or enter a new one. The dialog box in which you enter a script has options for checking the syntax of the script and debugging the script.

-
Perform one of the following steps:
-
Click the Available Scripts drop-down list, then select the script file to use.
The script code displays in the Script Editor section. Make any changes in the script code in the Script Editor section.
-
Click the New button to enter a new script, then:
-
Enter the name of the new script file in the Available Scripts drop-down list.
-
Click the Syntax button to have Operations Center software check the syntax of the script.
-
Click the Debugger button to debug the script.
-
When complete, click the Save button to add the new script.
-
-
-
Select the Enable Job check box to activate the script when the server starts.
-
Click the Create button to save the job.
Cron String
You can specify the interval that a job will run as a time interval specified by using a raw cron string. A cron string is an expression-type command that is comprised of six or seven field values separated by white spaces. These fields are described in Table 9-1.
Table 9-1 Cron String Fields
|
Field Name |
Values |
Special Characters |
|---|---|---|
|
Seconds |
0–59 |
, ‑ * / |
|
Minutes |
0–59 |
, ‑ * / |
|
Hours |
0–23 |
, ‑ * / |
|
Day of Month |
1–31 |
, ‑ * ? / L C |
|
Month |
1–12 or JAN–DEC |
, ‑ * / |
|
Day of Week |
1–7 or SUN–SAT |
, ‑ * ? / L C # |
|
Year (optional) |
empty, 1970–2099 |
, ‑ * / |
Table 9-2 describes the characters that can be used in the cron string. The legal characters and the names of months and days of the week are not case sensitive.
Table 9-2 Cron String Special Characters
|
Name |
Character |
Description |
|---|---|---|
|
Asterisk |
* |
Indicates all possible values. For example, as a value in the Minutes field runs every minute. |
|
Question Mark |
? |
Indicates no specific value. Available for Day of Month and Day of Week. This is useful to specify something in one of the two fields, but not the other. See the examples in Table 9-3 for clarification. |
|
Hyphen |
‑ |
Specifies a range. For example, 10–12 in the Hours field runs for hours 10, 11, and 12. |
|
Comma |
, |
Declares additional values. For example, MON,WED,FRI in the Day of Week field runs the job on Monday, Wednesday, and Friday. |
|
Forward Slash |
/ |
Defines increments. For example, 0/15 in the Seconds field runs the job on seconds 0, 15, 30, and 45. Whereas, 5/15 in the Seconds field runs the job on seconds 5, 20, 35, and 50. Can be used after the * (asterisk) character where the * is interpreted as 0. |
|
Capital L |
L |
Specifies last, but has different results depending on the field. Available for Day of Month and Day of Week. For example, in the Day of Month field runs the last day of the month (day 31 for January, day 28 for February on nonleap years). If in the Day of Week field by itself, it runs on 7 or SAT. Use in the Day of Week field after another value to run the last X day of the month (6L is the last Friday of the month). Do not specify lists, or ranges of values, as there could be confusing results. |
|
Pound Symbol |
# |
Specifies the nth day of the month. Available for Day of Week only. For example, 6#3 in the Day of Week field runs the third Friday of the month (day 6 = Friday and "#3" = the 3rd one in the month). 2#1 runs the first Monday of the month and 4#5 the fifth Wednesday of the month. Note that if #5 is specified and there is no 5th day of the given day-of-week in the month, then no firing occurs that month. |
|
Capital C |
C |
Indicates the value is evaluated against an assigned calendar, if any. Available for Day of Month and Day of Week fields. If no calendar is associated, then it is equivalent to having an all-inclusive calendar. For example, 5C in the Day of Month field runs the first day included by the calendar on or after the 5th. Whereas, 1C in the Day of Week field runs the first day included by the calendar on or after Sunday. |
Table 9-3 shows a few examples of full cron string expressions.
Table 9-3 Cron String Examples
|
String |
Job Fires... |
|---|---|
|
0 0 12 * * ? |
At 12pm (noon) every day |
|
0 15 10 ? * * |
At 10:15am every day |
|
0 15 10 ? * * |
At 10:15am every day |
|
0 15 10 * * ? |
At 10:15am every day |
|
0 15 10 * * ? 2005 |
At 10:15am every day during the year 2005 |
|
0 * 14 * * ? |
Every minute starting at 2pm and ending at 2:59pm, every day |
|
0 0/5 14 * * ? |
Every 5 minutes starting at 2pm and ending at 2:55pm, every day |
|
0 0/5 14,18 * * ? |
Every 5 minutes starting at 2pm and ending at 2:55pm, and fire every 5 minutes starting at 6pm and ending at 6:55pm, every day |
|
0 0‑5 14 * * ? |
Every minute starting at 2pm and ending at 2:05pm, every day |
|
0 10,44 14 ? 3 WED |
At 2:10pm and at 2:44pm every Wednesday in the month of March |
|
0 15 10 ? * MON–FRI |
At 10:15am every Monday, Tuesday, Wednesday, Thursday, and Friday |
|
0 15 10 15 * ? |
At 10:15am on the 15th day of every month |
|
0 15 10 L * ? |
At10:15am on the last day of every month |
|
0 15 10 ? * 6L |
At 10:15am on the last Friday of every month |
|
0 15 10 ? * 6L |
At10:15am on the last Friday of every month |
|
0 15 10 ? * 6L 2002–2005 |
At 10:15am on every last Friday of every month during the years 2002, 2003, 2004, and 2005 |
9.3.3 Running Jobs
After enabled, jobs run according to the schedule defined for each job.
A job can also be manually run outside a defined schedule without interrupting its scheduled runs.
To manually run a job outside its schedule:
-
In the Explorer pane, expand the root Administration element > Time Management > Jobs.
-
Right-click the job definition, then select Run Job.
9.3.4 Viewing the Status of Jobs
Table 9-4 lists the various conditions that a job element can have.
Table 9-4 Job Conditions
|
Default |
Condition |
Description |
|---|---|---|
|
|
INFORMATIONAL |
Job is scheduled to run, but is currently dormant |
|
|
OK |
Job is in the process of being run |
|
|
MINOR |
Job is enabled, but completed |
|
|
UKNOWN |
Job is disabled |
|
|
CRITICAL |
Job failed |
To view a job’s status:
-
In the Operations Center hierarchy under Enterprise, click Administration > Time Management > Jobs.
-
Do one of the following:
-
Mouse over the Jobs element to view a summary of the state of all jobs.
-
Mouse over a specific job to learn about its current state.
-
-
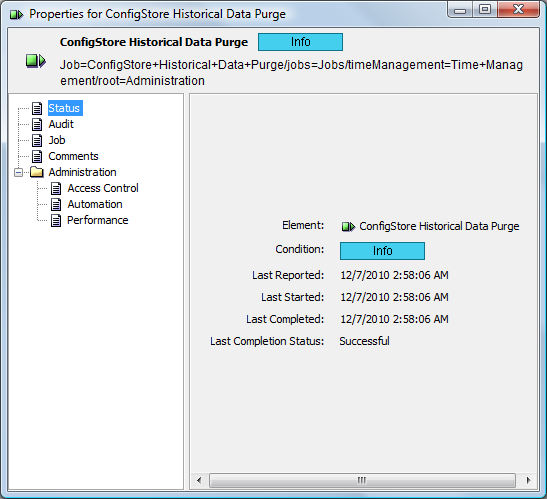
To learn more about a particular job, right-click the job, select Properties, then in the Properties dialog box, select Status.
The dialog box displays the condition, as well as the last reported, started, and completed times, and the last completion status:

9.3.5 Enabling and Disabling Jobs
You can enable or disable a specific job, or all jobs:
Enabling or Disabling a Specific Job
To enable or disable a job:
-
In the Explorer pane, expand the root Administration element > Time Management > Jobs.
-
Right-click the job definition, then select Enable Job or Disable Job.
Enabling or Disabling All Jobs
To enable or disable all jobs:
-
In the Explorer pane, expand the root Administration element > Time Management.
-
Right-click the Jobs element, then select Enable All Jobs or Disable All Jobs.
9.3.6 Stopping Jobs
You can stop jobs manually or from within a script:
Manually Stopping a Job
To stop a job in the Operations Center console:
-
In the Explorer pane, expand the root Administration element > Time Management > Jobs.
-
Right-click a job, then select Stop Job.
A message displays indicating the job is stopped.
The Stop Job option attempts to interrupt the selected job while it is running. In some cases, the Operations Center server might not be able to halt the job. If the job cannot be stopped, the following message displays:
Attempted to interrupt/stop job, but the job did not respond.
Using a Script to Stop a Job
When creating a script, include an operation that periodically detects the interrupt flag set by selecting Stop Job option on the job element.
If the script detects this interrupt flag, it should exit the job. Any script or class can check the interrupt flag and exit if it has been interrupted.
For information on creating scripts, see Section 9.2, Using Server Scripts.
The following sample script shows how to periodically check for an interrupt by the Stop Job command:
var i = 0;
while(true)
{
   if ( i == 20000000 )
   {
      i = 0
      formula.log.error('checking for interruption!')
      if ( java.lang.Thread.interrupted() == true )
      {
        formula.log.error('Detected interrup…stopping!')
        break;
      }
   }
   i++
}
9.3.7 Changing Job Definitions
To modify or delete a job definition:
-
To edit the job, do the following:
-
Right-click the job, then select Properties
-
In the Properties dialog box, select Job. The Job definition properties display.
-
-
To delete a job, right-click it, then select Delete Job.