14.6 Using Automation Filters

For each automation definition, a filters specifies an events that trigger actions when they occur. Operations Center supplies a set of default filters but new filters can also be defined. After defined, automation filters are available to select when creating automation definitions.

14.6.1 Understanding the Default Filters

Any of the default definitions can be edited to meet specific requirements.

When more than one filter is selected for an automation event, any of the selected filters can be triggered for the automated action to occur. For example, if both the Alarm Closed and Element Is at Major Condition filters are selected, the specified action is triggered when either event occurs.

Alarm-related filters, such as any alarm opened, critical alarm opened, major alarm opened, and so on, trigger automation events when an alarm is added or updated. Note that alarm-based automations are not applied to elements that are configured to not show alarms.

Table 14-3 defines the default filters that can be used with any automation.

Table 14-3 Default Automation Filters

Filter

Description

A service level breach occurred

A Service Level breach alarm occurred.

A service level warning occurred

A Service Level warning alarm occurred.

An alarm is closed

An alarm of any type for the source element was closed.

An alarm event occurs on the element

By default, adding or updating a real-time alarm triggers this filter.

You can change the alarm event type and alarm channel, as well as add other alarm information requirements.

See the next section for details.

An alarm operation was performed

By default, any alarm operation triggers the automation event.

To specify an operation, click the operation link in the Automation Description section and enter the command that should trigger the automation event.

Any alarm is opened

An alarm of any type (new or updated) occurred for the source element.

A critical alarm is opened

A critical alarm occurred for the source element.

The element is at an OK condition

A source element is in or changed to the OK state.

The element is at a critical condition

A source element is in or changed to critical alarm state.

The element is at an information condition

A source element is in or changed to information alarm state.

The element is at a major condition

A source element is in or changed to major alarm state.

Element is at a minor condition

A source element is in or changed to minor alarm state.

A major alarm is opened

A major alarm occurred for the source element.

A minor alarm is opened

A minor alarm occurred for the source element.

The element’s condition changes

A source element’s condition changes to and from any state.

To specify a “changed to” condition, click the condition link in the Automation Description section, then select the condition that should trigger the automation event.

14.6.2 Filtering Alarm Events

NOTE:Alarm-based automations are not applied to elements that are configured to not show alarms.

To define filters on alarm events:
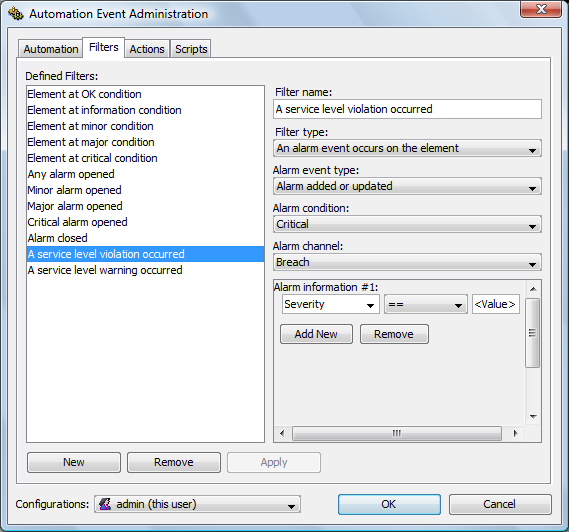
  1. When the selected filter is An Alarm Event Occurs on the Element, click the event link in the Automation Description section of the dialog box to select the alarm event, alarm channel, and other alarm information required to trigger the automation:

    [under construction]

    Click the event link to specify an alarm event that triggers the automation action.

  2. Define alarm event requirements on this dialog box:

    [under construction]
  3. Select an alarm event type:

    • Alarm Added or Updated

    • Alarm Added

    • Alarm Updated

    • Alarm Removed

  4. (Optional) Specify an alarm condition, alarm channel, and alarm information, such as a date range.

    The automation event occurs only if all the alarm criteria are met.

  5. To add alarm information criteria:

    • In the first column, select a column name (such as Severity, ID, Rule, and so on).

    • Incoming alarm data in the selected column is compared to the value entered in the far right column, using the selected comparison operator.

      For example, the previous figure shows alarms must have a date/time stamp equal to or greater than 12/10/2007.

    • Click Add New to specify additional alarm information.

      Multiple criteria are evaluated using the “AND” operator.

14.6.3 Defining a New Filter

New automation filters are available to select when creating automation definitions.

To define a new filter:

  1. In the Explorer pane, expand Administration.

  2. Right-click Automation, then select Properties to open the Status property page.

  3. In the left pane, click Automation to open its property page.

  4. Click Change to open the Automation Event Administration dialog box.

  5. Click the Filters tab.

  6. Click the Configurations drop-down list, then select the user, group, or the Automation server for which the new filter is available:

  7. Click New.

  8. Specify a name for the new filter in the Filter Name field.

  9. Click the Filter Type drop-down to select the type of filter, then do the following:

  10. Click Apply to save the new filter.

14.6.4 Modifying a Filter

To update an automation filter:

  1. In the Explorer pane, expand Administration.

  2. Right-click Automation, then select Properties to open the Status property page.

  3. In the left pane, click Automation to open its property page.

  4. Click Change to open the Automation Event Administration dialog box.

  5. Click the Filters tab.

  6. Click the Configurations drop-down list, then select the user, group, or the Automation server for which the filter is defined.

  7. In the Defined Filters list, select a filter.

    The filter’s settings display on the right.

  8. For some filters, there is an option to modify the parameters in the in the Automation Description section.

    For more information about parameters, see Section 14.6.1, Understanding the Default Filters.

  9. Click Apply to update the parameters.

14.6.5 Deleting a Filter

To delete an automation filter:

  1. In the Explorer pane, expand Administration.

  2. Right-click Automation, then select Properties to open the Status property page.

  3. In the left pane, click Automation to open its property page.

  4. Click Change to open the Automation Event Administration dialog box.

  5. Click the Filters tab.

  6. Click the Configurations drop-down list, then select the user, group, or the Automation Server for which the filter is defined.

  7. In the Defined Filters list, select the filter, then click Remove to delete the filter.