14.7 Using Automation Actions

For each automation definition, actions specify what happens when a filter is triggered. Table 14-4 lists the set of default actions supplied by the Operations Center.

Table 14-4 Default Automation Actions

Action

Parameters

Start the gong.

Plays an audio file, which can be configured.

Stop the gong.

Stops playing the audio file.

Start chirping.

Plays an audio file, which can be configured.

Stop chirping.

Stops playing the audio file.

Generate the computer noise.

Plays an audio file, which can be configured.

You can define new actions.

Some automation actions must execute on the server, while other automation actions can execute on the client or the server. The following automation actions must execute on the server:

  • Mail element and alarm information

  • Mail element information

To use automation actions:

14.7.1 Understanding Action Parameters

The Actions tab provides predefined actions that occur when triggered by a filter. You can define additional actions as needed.

Table 14-5 lists the different types of automation actions. Many automation actions require additional parameters, such as a sender and recipient e‑mail address.

Table 14-5 Types of Automation Actions

Action

Parameters

Mail element and alarm information.

  • The sender e‑mail address.
  • The SMTP server address.
  • The recipient e‑mail address (optional, can use element).

Mail element information.

  • The sender e‑mail address.
  • The SMTP server address.
  • The recipient e‑mail address (optional, can use element).

Open alarm pop up window.

Alarm detail field #1 (optional). Specify an alarm column name to show in addition to the standard Operations Center alarm columns.

Alarm detail field #2 (optional).

Maximum alarms to keep in pop up. Default is 100 (optional).

Alarm message expression (optional). Specify a regular expression to display a portion of the alarm description. If any text in the alarm description matches the regular expression, it is displayed with the alarm. Otherwise or if left blank, the entire alarm description is displayed. For example:

  • /^.{20}/ Display the first twenty characters

  • /http:.*/ Display everything after the first http: found

  • /\d*/ Display the first number found

Page element.

  • The paging ID (optional, can use element).
  • The paging message (optional, can use element).
  • The SNPP server address (optional) The SNPP server port (optional).

Play an audio clip.

Name of audio file.

Options:

  • Play Indefinitely

  • Play Once

  • Play for Duration (in Seconds)

Post alarm to tec.

  • The hostname of the TEC server.
  • The port of the TEC server (optional, defaults to 0).
  • The event class (optional, defaults to LogFile_Base).
  • The event source (optional, defaults to Formula).
  • The event severity (optional, defaults to WARNING).

Post to tec.

  • The hostname of the TEC server.
  • The port of the TEC server (optional, defaults to 0).
  • The message to send to TEC The event class (optional, defaults to LogFile_Base).
  • The event source (optional, defaults to Formula).
  • The event severity (optional, defaults to WARNING).

Run a predefined script from the script library.

Library script name Script parameters and setup code.

The script name must be unique. If two identical script names are in different directories, you must rename one of the scripts. Otherwise, errors occur when the script is run.

Run a script.

Script code.

For more information about creating scripts and script selections, see the Operations Center 5.5 Scripting Guide.

Stop a running audio clip.

Name of audio file.

14.7.2 Using the Open Alarm Pop-up Dialog Box Action

The Open Alarm Pop-up Dialog Box action is valid for client automations only, meaning those configured for a user or group. It is invalid for automations on the Automation Server.

The Open Alarm Pop-up Dialog Box action is invalid for the following automation filters, because the Open Alarm Pop-up Dialog Box action explicitly assumes that it is displaying an alarm, as suggested by its name. The filters match events that are not produced directly by an alarm:

  • Element at CRITICAL condition

  • Element at MAJOR condition

  • Element at MINOR condition

  • Element at INFORMATION condition

  • Element at OK condition

  • The element’s condition changes

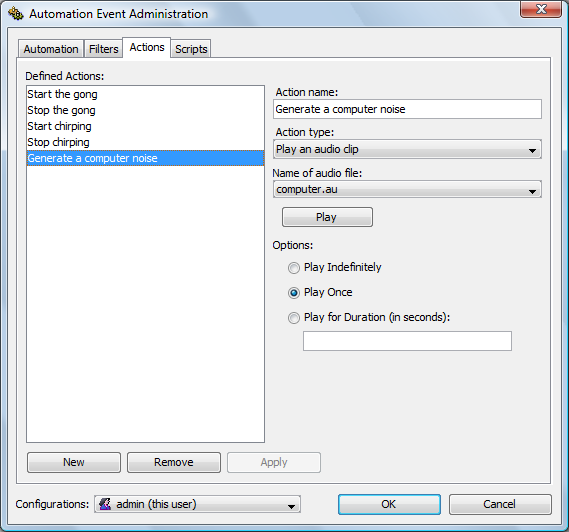
14.7.3 Defining a New Action

New automation actions are available to select when creating automation definitions.

To define an automation action:

  1. In the Explorer pane, expand Administration.

  2. Right-click Automation, then select Properties to open the Status property page.

  3. In the left pane, click Automation to open its property page.

  4. Click Change to open the Automation Event Administration dialog box:

  5. Click the Actions tab.

  6. Click the Configurations drop-down list, then select the user, group, or the Automation server for which the action is available.

  7. Click New.

  8. Specify a name for the action in the Action Name field.

  9. Click the Action Type drop-down list, then select an action to be performed when the event is triggered.

    Depending on the action selected, additional drop-down lists and options lists display for selection.

  10. Select the appropriate parameters for the action.

  11. Click Apply.

    The action displays in the Defined Actions section.

14.7.4 Modifying an Automation Action

It is possible to modify actions, such as changing the audio file or script associated with a particular action. You can also set a default behavior for updated automations.

Modifying an Automation Action

To update an automation action:

  1. In the Explorer pane, expand Administration.

  2. Right-click Automation, and select Properties to open the Status property page.

  3. In the left pane, click Automation to open its property page.

  4. Click Change to open the Automation Event Administration dialog box.

  5. Click the Actions tab.

  6. Click the Configurations drop-down list, and select the user, group, or Automation Server that the action is available for.

  7. Select the action to modify.

  8. Edit the action parameters.

  9. Click Apply to save the changes.

Setting the Default Behavior for Updated Automations

By default, all automation actions that monitor changes in element conditions are performed when any of these automations is modified, even when no element condition change occurs. The default setting is:

Automations.element.change.never.fires=false

To modify this setting:

  1. Open the formula.properties file.

  2. Change the setting to True to prevent automatic execution of all automation actions related to element condition changes when any of them is updated.

14.7.5 Deleting an Automation Action

To delete an automation action:

  1. In the Explorer pane, expand Administration.

  2. Right-click Automation, and select Properties to open the Status property page.

  3. In the left pane, click Automation to open its property page.

  4. Click Change to open the Automation Event Administration dialog box.

  5. Click the Actions tab.

  6. Click the Configurations drop-down list, and select the user, group, or Automation Server for which the action is available.

  7. Select an action, then click Remove.

  8. Click Apply to delete the action.