5.5 Specifying Scenario-Specific Attributes
The attributes available vary for each type scenario. The attributes display in the Create Scenario dialog box, in the third tab whose name matches the selected scenario type, such as FTP or HTTP. This section explains the attributes for each scenario that display in the tab:
5.5.4 HTTP(S) Parameters
Adding parameters to HTTP(S) scenarios enables the following customizations:
Adding Header Information
An HTTP transaction consists of headers that specify information such as the action required of the server, the type of data being returned, or a status code.
Use the Add Header parameter to add customized header information in the HTTP request or manipulate existing HTTP headers by overriding values. For example, setting name to Accept-Transfer-Encoding and value to None informs the Web server that no transfer encoding is necessary.
Another use for the header information is to arbitrarily add cookies to a synthetic session by adding cookies explicitly via the option.
Data Capture
Data capture defines a unique piece of HTML response data or header date that a user might want to capture and use dynamically for form field data in subsequent scenarios for an HTTP test. If the name of the data capture is in variable format (surrounded by curly braces {}), then the captured data is stored in a variable and is available for the remainder of the test.
Form Fields
Specify form fields for an HTTP test scenario to add form data for a URL request. Web site forms receive the information required to properly access the page and run the test.
For example, to search for content on a specific page, first log in to access the page. Use form fields to have the test log in before performing other tests on the site.
Post Raw Data
When specifying an HTTP POST, you can post form field data to the server or post it as raw data. Normally, XML data is URL-encoded, which a server can not process. The Post Raw Data feature enables the Experience Manager Monitor to send XML data to servers that require an XML string as the post data.
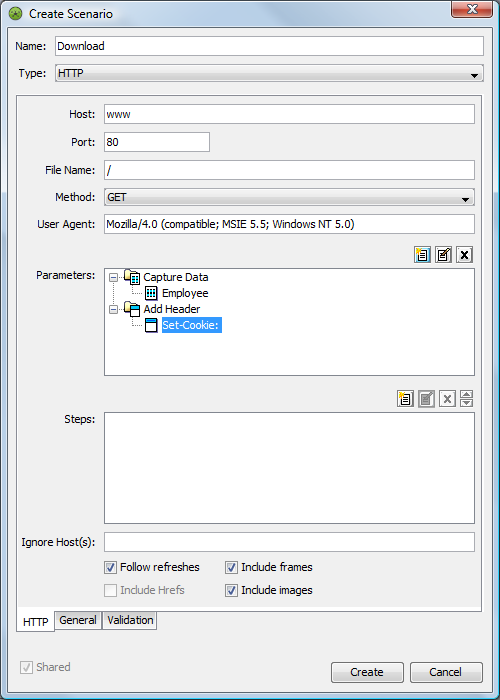
Defining a Parameter for the HTTP(S) Test Scenario
To define a parameter for the HTTP(S) test scenario:
-
In the Create Scenario dialog box, in the tab, click the
 icon to open the Create Parameter dialog box:
-
Select the drop-down list and select the type of action to be performed.
The following table provides explanations of each parameter type:
Parameter Type
Function
Next Steps
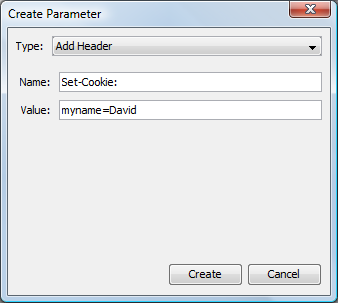
Add Header
Adds customized header information, manipulates existing HTTP headers by overriding values or adds cookies.
-
Type a name for the header in the text box.
-
Type the value for the header in the text box.
-
Add cookies explicitly by typing Set-Cookie: (ending colon is required) in the text box and setting the value pair in the text box (for example, myname=David).
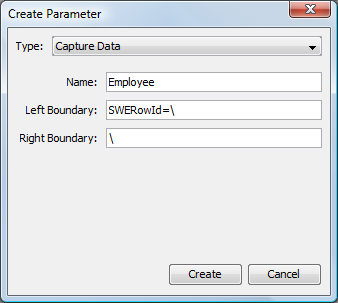
Capture Data
Captures data.
-
Type the name for the data capture in the text box.
-
To define how the test searches for data to capture, specify the left_boundary and right_boundary.
For example, if left_boundary="SWERowId=\" and the right_boundary="\" and if any of the HTML response data from within all scenarios of a test contains [SWERowId=\"1-999\"], the data captured is [1-999].
-
When a marked form_field or cookie with use_capture_data contains this value, a dynamic substitution occurs when running the scenarios.
Post Raw Data
Posts raw data.
-
In the text box, specify the raw data to send.
-
Use date macros to define values for posting raw data. See Section 5.5.13, Using Date Macros within Scenarios for more information.
-
Select the check box if the data is in XML format.
Submit Form Field
Submits a form field.
-
Specify the and that the Web page form field expects.
-
Date macros can define values for form fields. See Section 5.5.13, Using Date Macros within Scenarios for more information.
-
Select the check box if the value is already URL-encoded.
-
Select the check box to replace the value with the captured data. If this option is selected, the specified above must be the name of the captured data.
-
Select the check box to have the form field value contain the value for the cookie. If selected, the specified above must be the name of the cookie.
-
If both and are selected, the test engine attempts to fill the dynamic value from the cookie and then from the captured data store.
-
Select the check box to encrypt the form field because it is a user password field.
-
-
Click the button.
The Create Parameter dialog box closes and the new parameter displays in the list.
Adding Header Information
To add header information:
-
In the Create Parameter dialog box, select the drop-down list, then click :
-
Type the header name in the text box.
-
Type the header value in the text box:
-
Add cookies explicitly by typing Set-Cookie: (ending colon is required) in the Name text box and setting the value pair in the Value text box (for example, myname=David).
-
Use date macros to define values for the header. See Section 5.5.13, Using Date Macros within Scenarios for more information.
-
-
Click the button.
The Create Parameter dialog box closes and the new parameter displays in the list in the Create Scenario dialog box:
5.5.5 Handling Dynamic Web Pages
To perform multiple HTTP tests under one scenario, use step tags. The steps instruct a scenario to crawl through a set of Web pages by extracting the URL link for a specific HREF, REFRESH, FRAME, FORM-GET, or FORM-POST.
Steps define a series of sequential actions where each relies on the previous. When a step fails, then all remaining steps are not executed. Step tags apply to the current scenario only, as they are performed separate from and without impact to the next scenario.
For example, assume an HTTP scenario performs a search for “NetIQ” on Google. The engine parses the HTML response and searches for the HREF link of “NetIQ” and then proceeds to www.netiq.com.
Additionally, it is possible to validate the following aspects of a Web page:
-
The title of the Web page
-
The length of the Web page’s contents
-
The Web page’s return code
-
Specific content within the Web page
To set up dynamic Web pages:
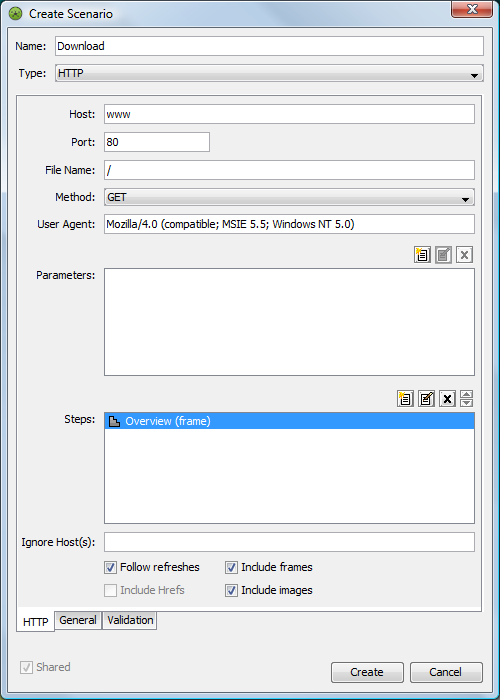
Setting Step Tags for the HTTP(S) Test Scenario
To set step tags for the HTTP(S) test scenario:
-
In the Create Scenario dialog box, in the tab, click the
icon. The Create Step dialog box opens.
-
Type a step name in the text box.
-
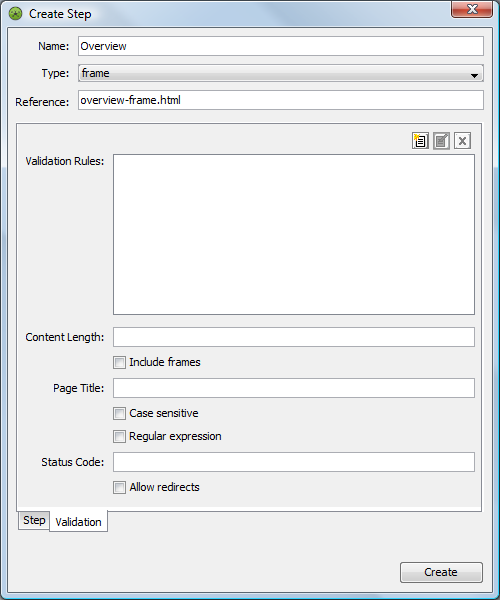
Select the drop-down list and select a step type:
Href: Finds its URL from <a href="url">. In the text box, specify the name of the link on the Web page. For example, the reference is <b>NetIQ</b> and the URL is http://www.netiq.com if the HTML code is:
<a href="http://www.netiq.com"><b>NetIQ</b></a>
The reference must include all syntax between the <a> and </a> tags.
Frame: Finds its URL from <frame src="url">. In the Reference text box, specify the src value of the frame tag. For example, the reference and URL are overview-frame.html if the HTML code is:
<FRAME src="overview-frame.html" name="packageListFrame">
Refresh: Finds its URL from <meta http-equiv="refresh" content="X;URL=url …>. In the Reference text box, specify the URL portion of the content value of the <meta> tag. For example, the reference and URL are mlb_scoreboard.jsp?ymd=20030812 if the HTML code is:
<meta http-equiv="refresh" content="180;URL=mlb_scoreboard.jsp?ymd=20030812">
form-get: Finds its URL from <form action="url">.
form-post: Posts its URL to <form action="url">. Specify a value in the Reference text box.
For form-get and form-post, specify the reference as the name of the button of the corresponding input type=submit tag. For example, the reference is Google Search and the URL is the search from the form action, if the HTML code is:
<form action="/search" name=f>
<input type=submit value="Google Search" name=btnG>
</form>
Define the form_field values in the parameter definitions. See Section 5.5.4, HTTP(S) Parameters.
-
Create parameters by clicking the
icon to open the Create Parameter dialog box.
-
Select the drop-down list and select a parameter type:
Capture Data: Specify the name for the data capture in the text box, and the left and right boundaries in the and text boxes.
Submit Form Field: Specify the form name in the text box and an optional value in the text box. Select the check boxes for ,, and/or .
Post Raw Data: Specify the data in the text box. Select the check box if the data is XML code.
-
To save the parameter, click the button.
The Create Parameter dialog box closes and the new parameter displays in the list.
Specifying Response Time Validation for the Step
To specify response time validation for the step:
-
In the Create Step dialog box, click the tab to display the tab:
-
Click the
icon to open the Create Rule dialog box.
-
Select the drop-down list, then click .
Response time is the default for all scenarios except HTTP and HTTPS.
-
Select the e drop-down list and select one of the following:
Range: Generates an alarm when the response time is within the specified time range. Specify the time range using the and (in milliseconds) text boxes. Select the drop-down list and select a severity to set for the alarm issued when the response time is within the specified time range.
Upper Threshold: Generates an alarm when the response time exceeds the specified maximum time interval.
Lower Threshold: Generates an alarm when the response time is less than the specified minimum time interval.
-
If the Response Type is Lower or Upper Threshold, select the drop-down list and select a severity to set for the alarm issued when a response time rule violation occurs.
-
In the text box, specify a description for the issued alarm:
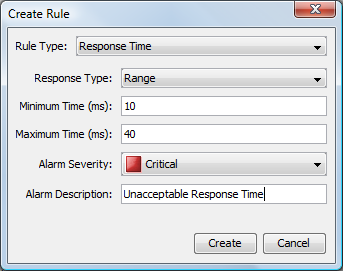
-
Click the button to create the rule.
The rule displays in the list in the tab.
-
In the tab, provide information for the following HTTP content that returns from Web server and can be validated:
Content Length: An element that defines the HTML document’s content length. Select the check box to calculate the content length for all frames including main HTML document. The content length does not include images or other types of application/binary data.
Page Title: An element that defines the HTML document’s title. Select the check box if the match must be case sensitive. The test fails if the value does not match.
Select the n check box if case does not matter. The regular expression entered is used to validate the syntax.
Status Code: An element that defines the HTML document’s return status code. Type the valid HTTP response code. The test fails if the codes do not match.
Select the check box to allow page redirects without failing the test. For example, assume the HTTP code is set to 200 and this check box is selected. The test does not fail if, through the gathering of URL assets, there are one or more redirects that have a code of 302.
-
Click the button to create the step.
The Create Step dialog box closes and the step definition displays in the list in the Create Scenario dialog box.
-
Because steps occur in the order in which they display, you can click the
 and icons to reorder selected steps:
-
Click the button to create the scenario.
The new scenario displays under the Shared Scenarios element in the Explorer pane.
Specifying Rules for Cookie or Content Match Validations
When defining HTTP and HTTPS test scenarios, it is possible to define rules for performing specific actions based on cookie or content matches.
To specify rules for cookie or content match validations:
-
In the Create Scenario dialog box, click the tab to display the tab.
-
Click the
icon to open the Create Rule dialog box:

-
Select the drop-down list and select one of the following:
-
To validate cookies received from Web pages, select .
-
To validate page content, select .
-
-
In the text box, type the page field name or cookie field name.
-
In the text box, type the cookie or content value.
-
Select the following check boxes as needed:
Fail on match: Causes the scenario to fail if the rule content is matched.
Case Sensitive: Specifies that matching is case sensitive. Clear the check box if the value specified is a regular expression.
Regular Expression: Identifies the value specified as a regular expression.
-
Click the button to create the rule.
The rule displays in the tab:
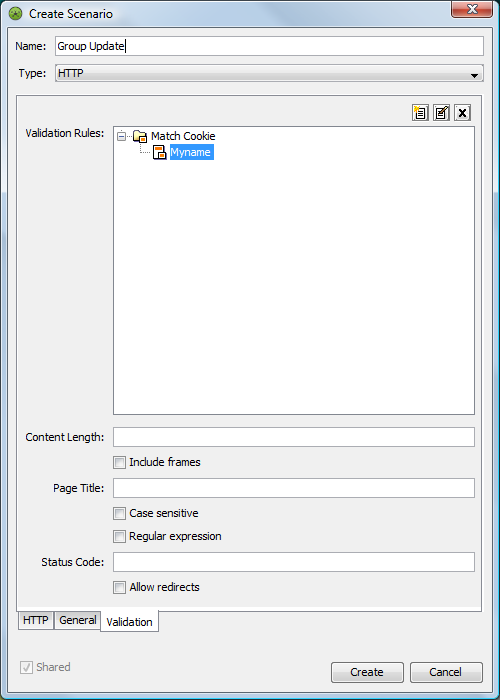
-
In the tab, type information for the following HTTP content that returns from Web server and can be validated:
Content Length: An element that defines the HTML document’s content length. Select the check box to calculate the content length for all frames including main HTML document. The content length does not include images or other types of application/binary data.
Page Title: An element that defines the HTML document’s title. Select the check box if the match must be case sensitive. The test fails if the value does not match.
Select the check box if case does not matter. The regular expression entered validates the syntax.
Status Code: An element that defines the HTML document’s return status code. Type the valid HTTP response code. The test fails if the codes do not match.
Select the s check box to allow page redirects without failing the test. For example, assume the HTTP code is set to 200 and this check box is selected. The test does not fail if, through the gathering of URL assets, there are one or more redirects that have a code of 302.
-
Click the button to create the scenario.
The new scenario displays under the Shared Scenarios element in the Explorer pane.
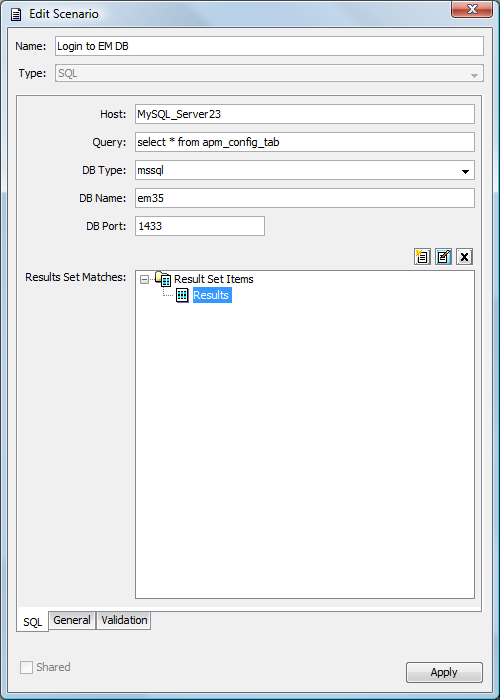
5.5.10 SQL Scenario Attributes
Table 5-9 describes the SQL scenario attributes.
Table 5-9 SQL Scenario Attributes
|
Attribute |
Specify |
|---|---|
|
Host |
Name of the host server. |
|
Query |
Actual query statement to execute. Use date macros to define values for the query. See Section 5.5.13, Using Date Macros within Scenarios for more information. |
|
DB Type |
Type of database. Specify oracle, sybase, db2, or mssql7. |
|
DB Name |
Name of the database. |
|
DB Port |
Port number used by the database. |
To define a result set to match the SQL test:
-
In the Explorer pane, expand the root element > > > > .
-
Right-click an SQL test, then click to open the Status property page.
-
In the left pane, click to open the Test property page:
-
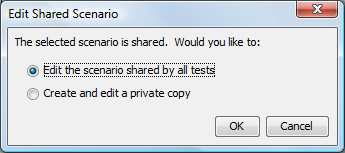
Select a scenario, then click the
 icon to open the Edit Scenario dialog box. The Edit Shared Scenario dialog box displays:
-
Do one of the following:
-
Select the radio button to edit the shared scenario definition.
-
Select the radio button to modify the scenario without affecting all tests that use it.
-
-
Click the
icon to open the Edit Result Set Item dialog box:
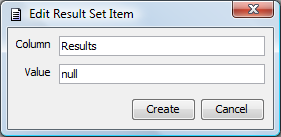
-
In the text box, type the name of the database column.
is the name of the database column name.
-
In the text box, type one of the following:
-
Type value for a result set that matches this value.
-
Type null for a result set that returns a null value.
-
-
Click the button.
The new result set displays in the Edit Scenario dialog box:
-
Click the button to update the scenario and close the Edit Scenario dialog box.